6 minutes
Démarrage rapide
Apprenez à construire, publier et interroger facilement un Subgraph sur The Graph.
Prérequis
- Un portefeuille crypto
- Une adresse de contrat intelligent sur un réseau pris en charge
- Node.js installé
- Un gestionnaire de package de votre choix (
npm,yarnoupnpm)
Comment construire un subgraph
1. Créer un subgraph dans Subgraph Studio
Accédez à Subgraph Studio et connectez votre portefeuille.
Subgraph Studio vous permet de créer, de gérer, de déployer et de publier des subgraphs, ainsi que de créer et de gérer des clés API.
Click “Create a Subgraph”. It is recommended to name the Subgraph in Title Case: “Subgraph Name Chain Name”.
2. Installez la CLI Graph
Sur votre machine locale, exécutez l’une des commandes suivantes :
Utilisation de npm :
npm install -g @graphprotocol/graph-cli@latestUsing yarn:
yarn global add @graphprotocol/graph-cli3. Initialiser votre subgraph
Vous trouverez les commandes pour votre subgraph spécifique sur la page du subgraph dans Subgraph Studio.
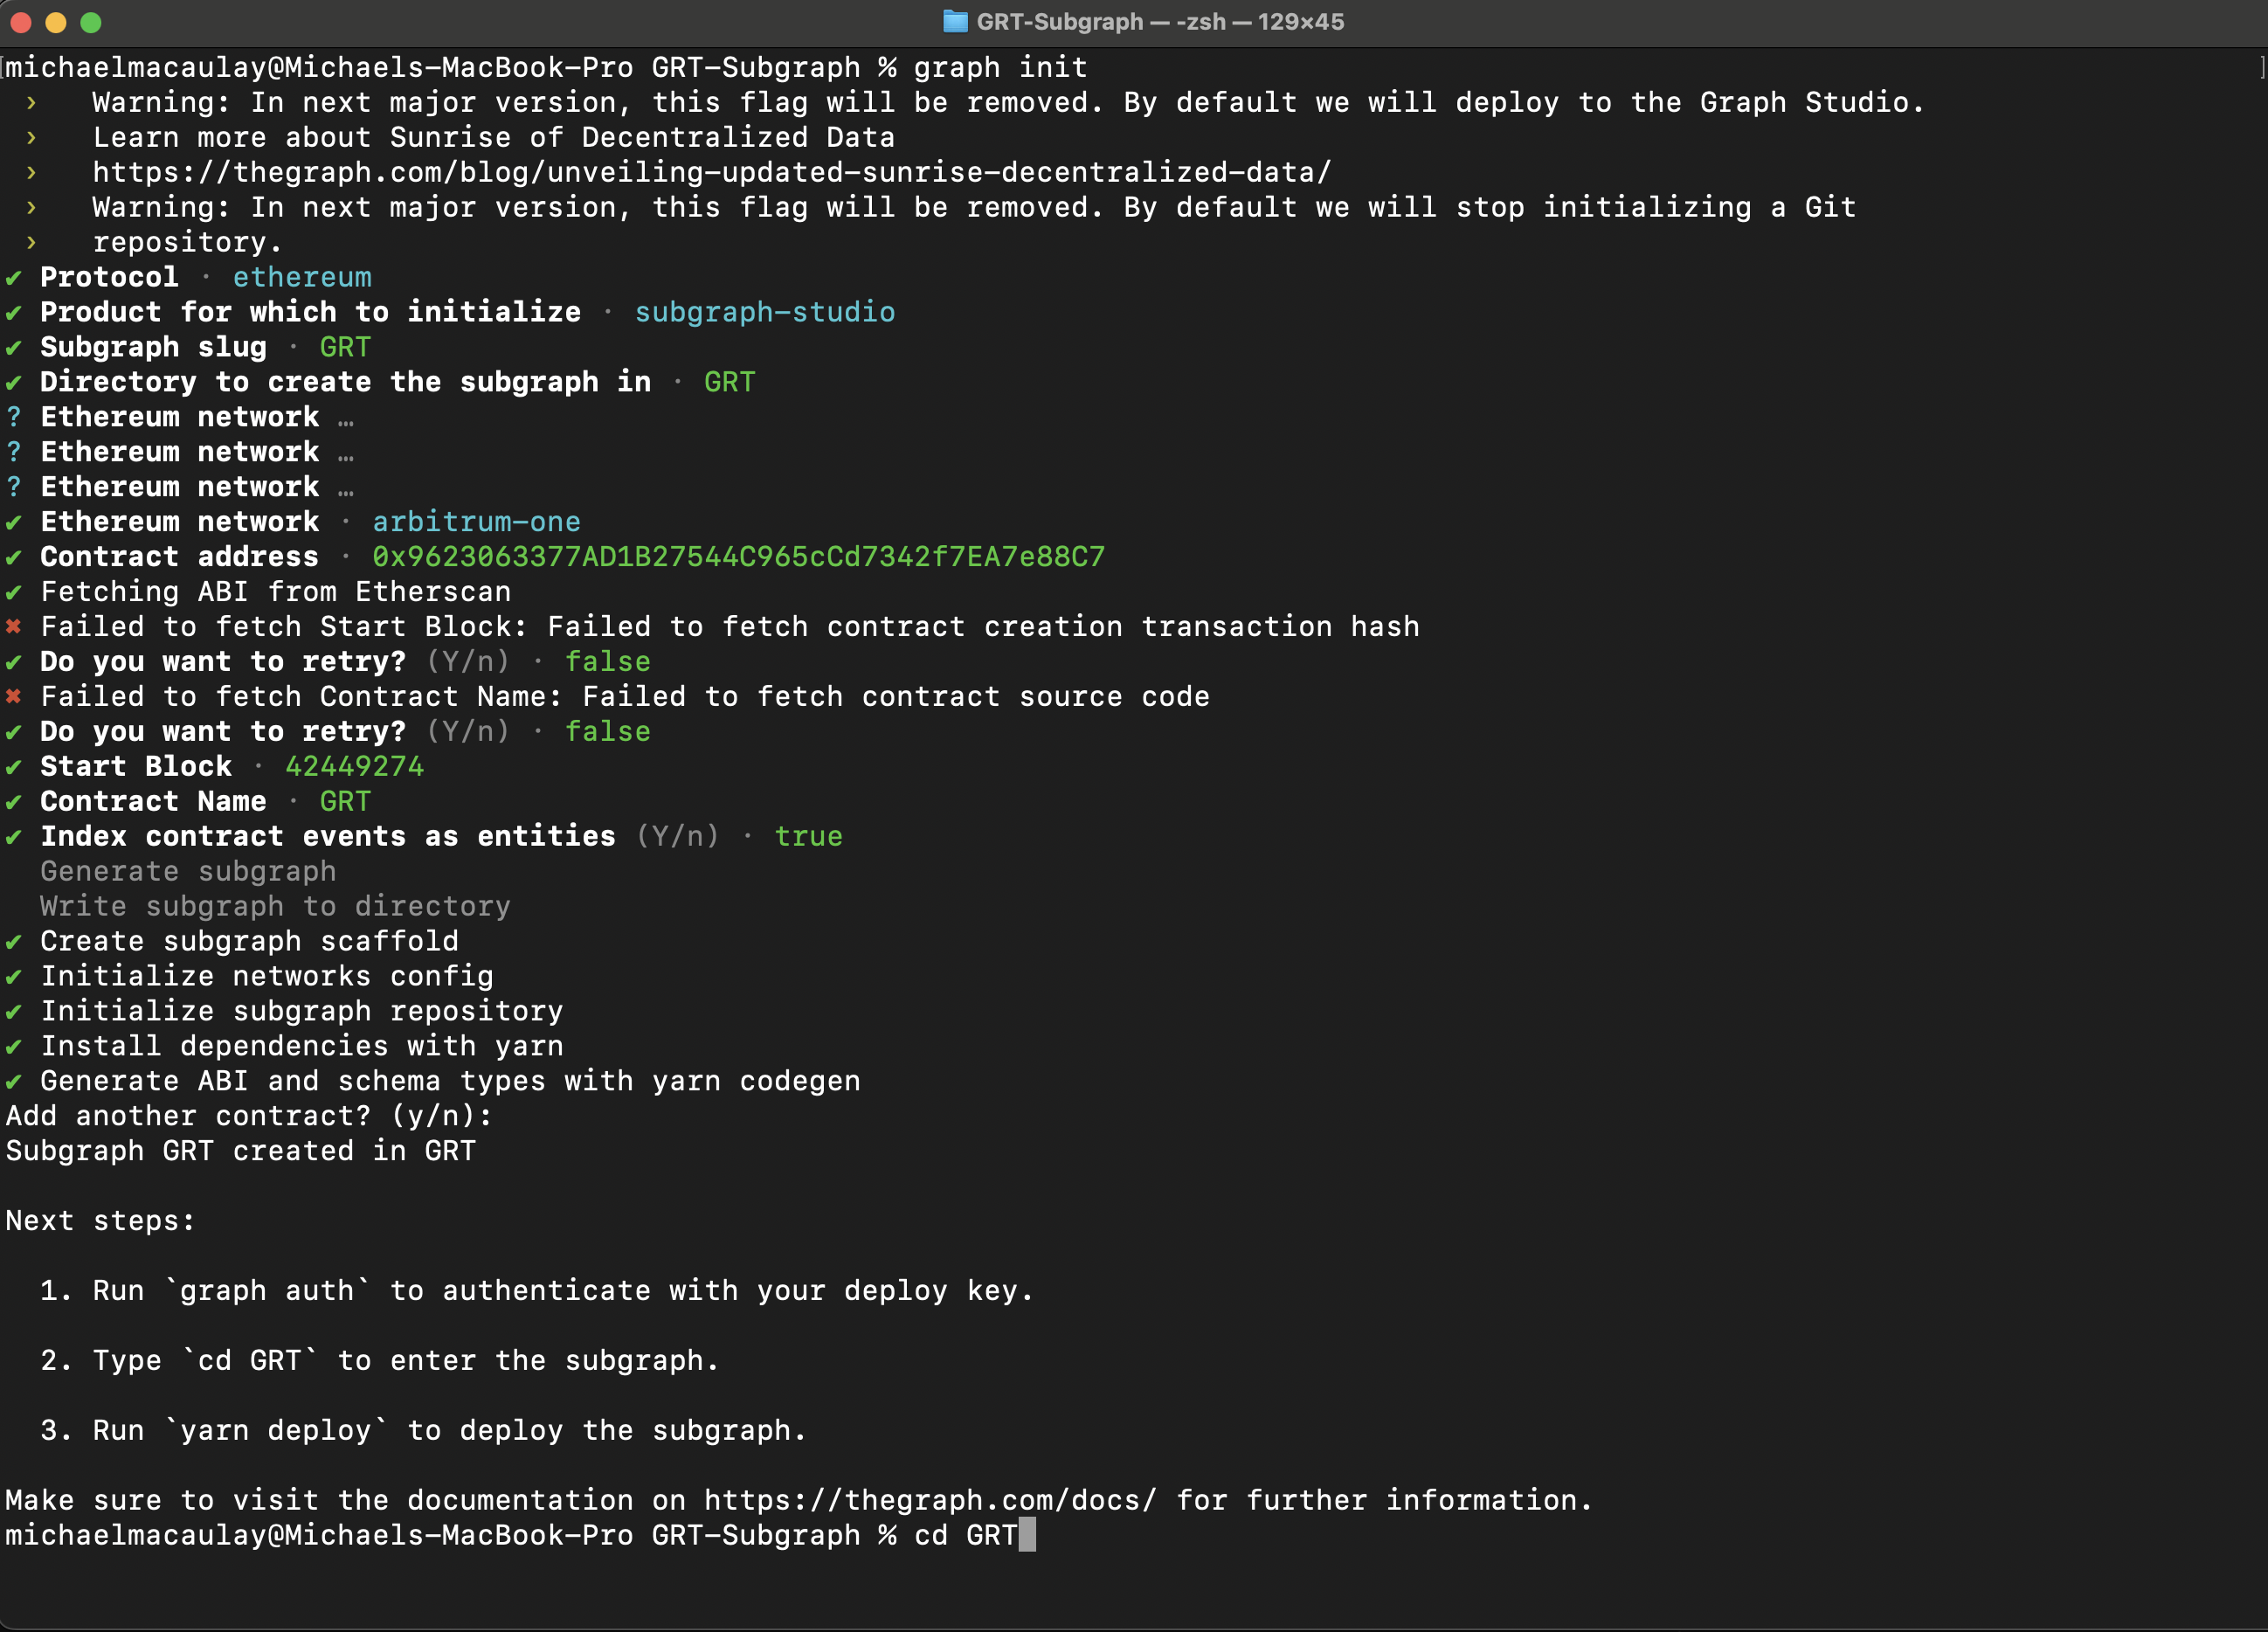
La commande graph init créera automatiquement un échafaudage d’un subgraph basé sur les événements de votre contrat.
La commande suivante initialise votre subgraph à partir d’un contrat existant :
graph initSi votre contrat est vérifié sur le scanner de blocs où il est déployé (comme Etherscan), l’ABI sera automatiquement créé dans le CLI.
Lorsque vous initialisez votre subgraph, la CLI vous demande les informations suivantes :
- Protocole : Choisissez le protocole à partir duquel votre subgraph indexera les données.
- Subgraph slug : Créez un nom pour votre subgraphe. Votre nom de subgraph est un Identifiant pour votre subgraph.
- Répertoire : Choisissez un répertoire dans lequel créer votre Subgraph.
- Réseau Ethereum (optionnel) : Vous pouvez avoir besoin de spécifier le réseau compatible EVM à partir duquel votre subgraph indexera les données.
- Adresse du contrat : Localisez l’adresse du contrat intelligent dont vous souhaitez interroger les données.
- ABI : Si l’ABI n’est pas renseigné automatiquement, vous devrez le saisir manuellement sous la forme d’un fichier JSON.
- Bloc de départ : Vous devez saisir le bloc de départ pour optimiser l’indexation du Subgraph des données de la blockchain. Localisez le bloc de départ en trouvant le bloc où votre contrat a été déployé.
- Nom du contrat : Saisissez le nom de votre contrat.
- Indexer les événements contractuels comme des entités : Il est conseillé de mettre cette option à true, car elle ajoutera automatiquement des mappages à votre subgraph pour chaque événement émis.
- Ajouter un autre contrat (facultatif) : Vous pouvez ajouter un autre contrat.
La capture d’écran suivante donne un exemple de ce à quoi on peut s’attendre lors de l’initialisation du subgraph :
4. Modifiez votre subgraph
La commande init de l’étape précédente crée un Subgraph d’échafaudage que vous pouvez utiliser comme point de départ pour construire votre Subgraph.
Lorsque vous modifiez le Subgraph, vous travaillez principalement avec trois fichiers :
- Manifest (
subgraph.yaml) - définit les sources de données que votre Subgraph indexera. - Schema (
schema.graphql) - définit les données que vous souhaitez extraire du Subgraph. - AssemblyScript Mappings (
mapping.ts) - translates data from your data sources to the entities defined in the schema.
Pour une description détaillée de la manière d’écrire votre Subgraph, consultez Créer un Subgraph.
5. Déployez votre Subgraph
N’oubliez pas que le déploiement n’est pas la même chose que la publication.
Lorsque vous déployez un Subgraph, vous l’envoyez au Subgraph Studio, où vous pouvez le tester, le mettre en scène et le réviser. L’indexation d’un Subgraph déployé est effectuée par l’Indexeur de mise à niveau, qui est un indexeur unique détenu et exploité par Edge & Node, plutôt que par les nombreux Indexeurs décentralisés de The Graph Network. Un Subgraph déployé est libre d’utilisation, à taux limité, non visible par le public et destiné à être utilisé à des fins de développement, de mise en place et de test.
Une fois que votre Subgraph est écrit, exécutez les commandes suivantes :
```shgraph codegen && graph build```Authentifiez et déployez votre Subgraph. La clé de déploiement se trouve sur la page du Subgraph dans Subgraph Studio.
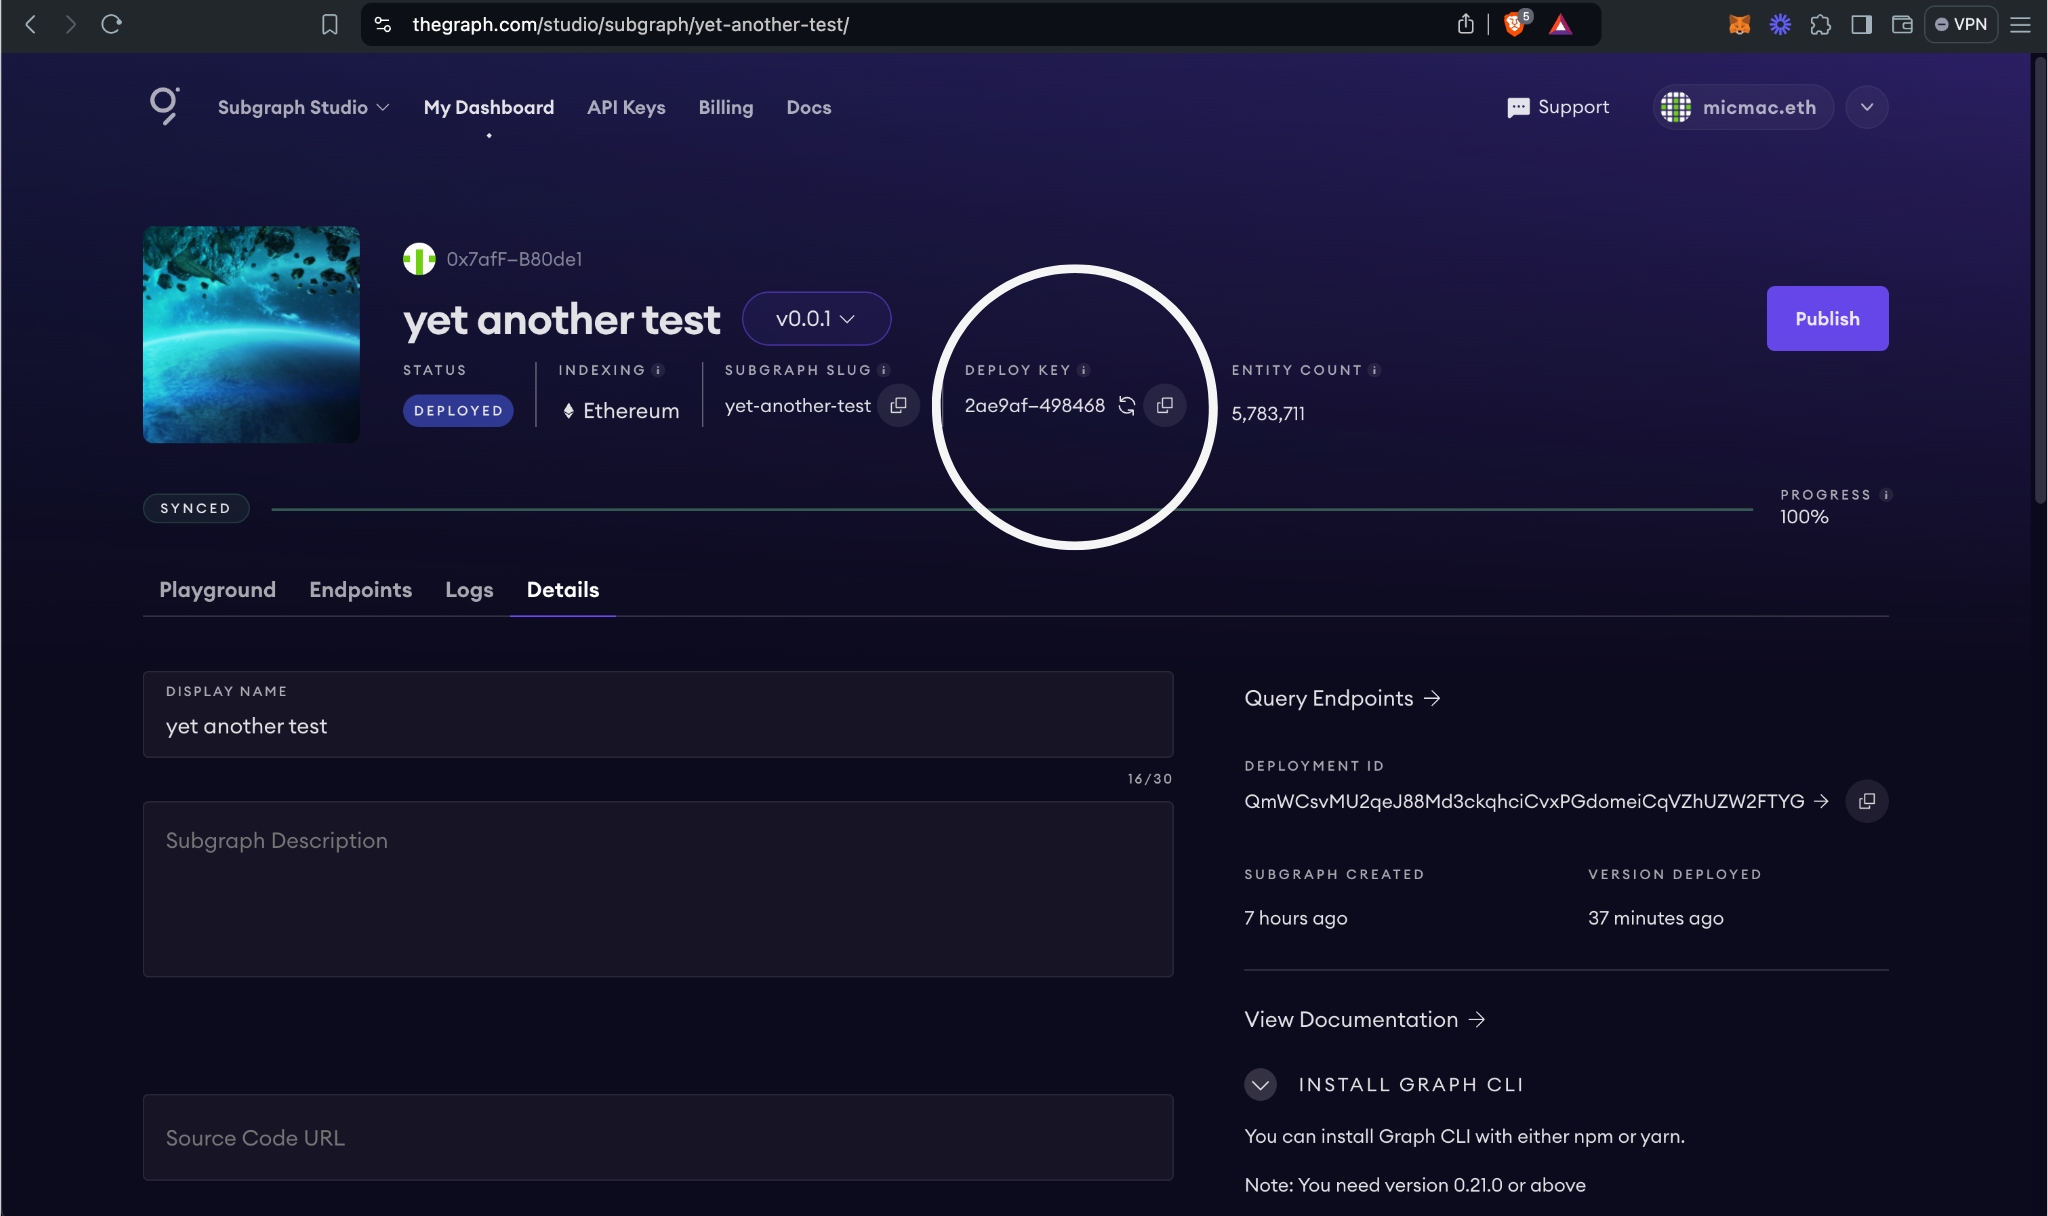
```shgraph auth <DEPLOY_KEY>graph deploy <SUBGRAPH_SLUG>```La CLI demandera un label de version. Il est fortement recommandé d’utiliser le versionnement sémantique, par exemple 0.0.1.
6. Examinez votre subgraph
Si vous souhaitez tester votre subgraph avant de le publier, vous pouvez utiliser Subgraph Studio pour effectuer les opérations suivantes :
-
Exécuter un exemple de requête.
-
Analysez votre subgraph dans le tableau de bord pour vérifier les informations.
-
Vérifiez les logs sur le tableau de bord pour voir s’il y a des erreurs avec votre subgraph. Les logs d’un subgraph opérationnel ressemblent à ceci :
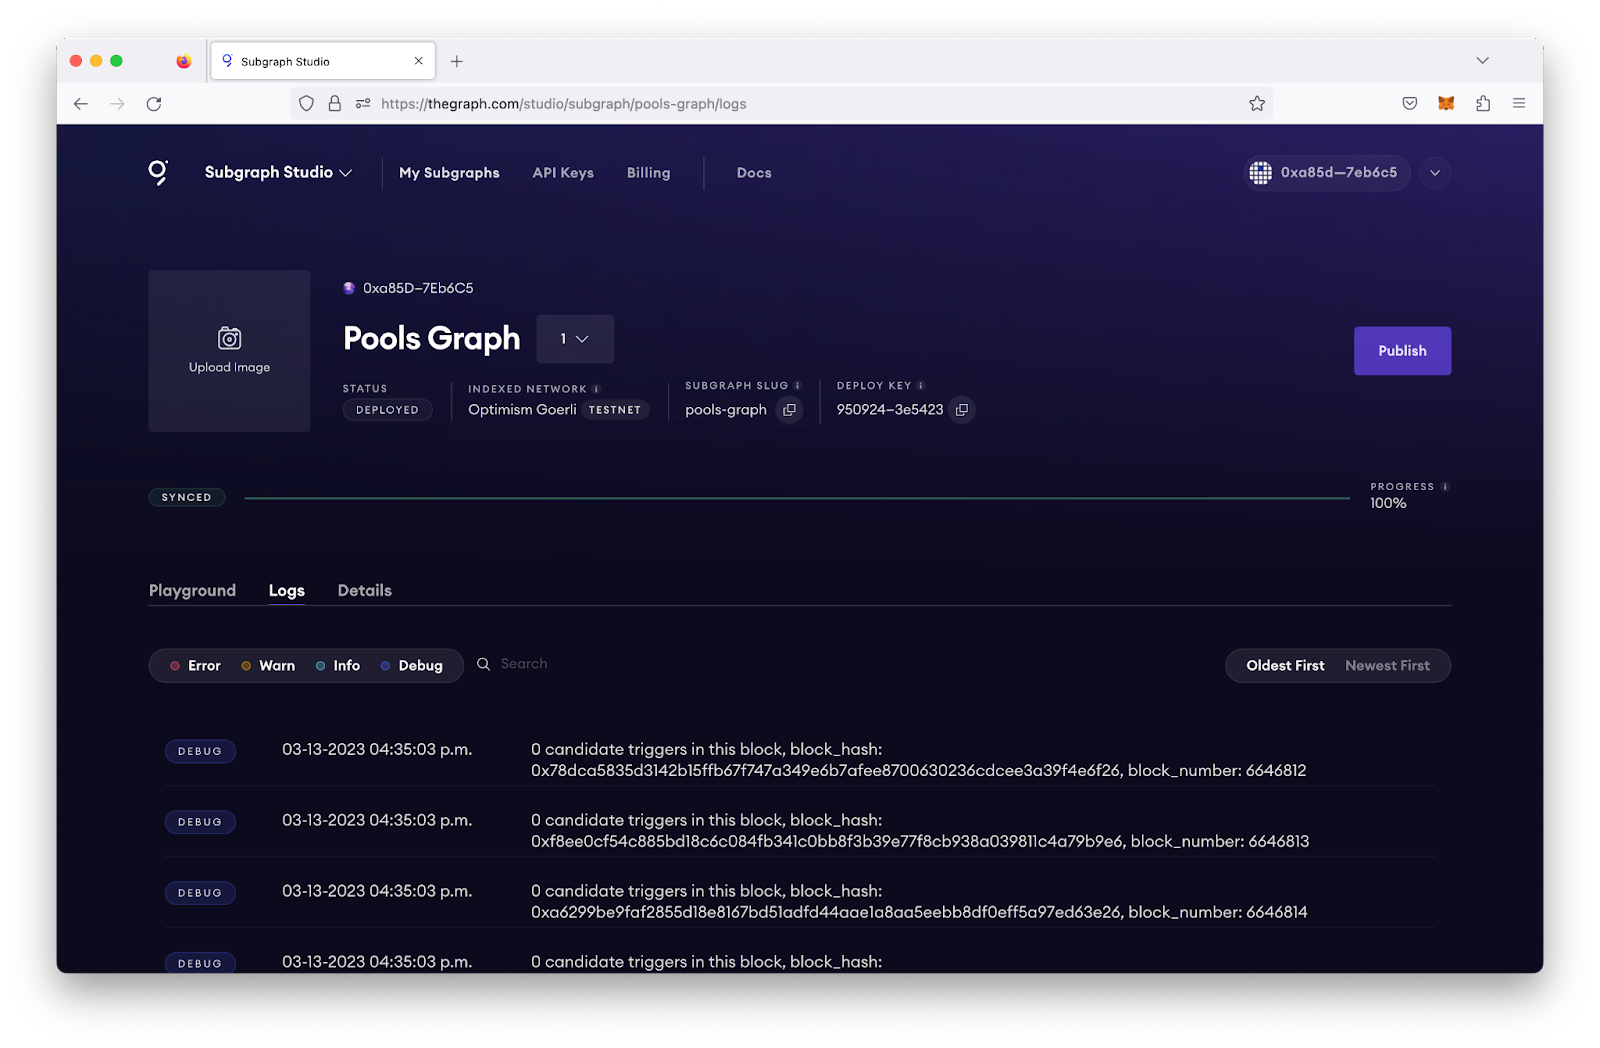
Logs du subgraph
7. Publier votre subgraph sur The Graph Network
Lorsque votre subgraph est prêt pour un environnement de production, vous pouvez le publier sur le réseau décentralisé. La publication est une action onchain qui effectue les opérations suivantes :
- Il rend votre subgraph disponible pour être indexé par les Indexeurs décentralisés sur The Graph Network.
- Il supprime les limites de taux et rend votre subgraph publiquement consultable et interrogeable dans Graph Explorer.
- Il met votre subgraph à la disposition des Curateurs pour qu’ils le curent.
Plus la quantité de GRT que vous et d’autres personnes curez dans votre subgraph est importante, plus les Indexeurs seront incités à indexer votre subgraph, ce qui améliorera la qualité du service, réduira la latence et renforcera la redondance du réseau pour votre subgraph.
Publier avec Subgraph Studio
Pour publier votre subgraph, cliquez sur le bouton Publier dans le tableau de bord.
Sélectionnez le réseau dans lequel vous souhaitez publier votre subgraph.
Publication à partir de la CLI
Depuis la version 0.73.0, vous pouvez également publier votre subgraph à l’aide de Graph CLI.
Ouvrez le graph-cli.
Utilisez les commandes suivantes :
```shgraph codegen && graph build```Then,```shgraph publish```- A window will open, allowing you to connect your wallet, add metadata, and deploy your finalized Subgraph to a network of your choice.
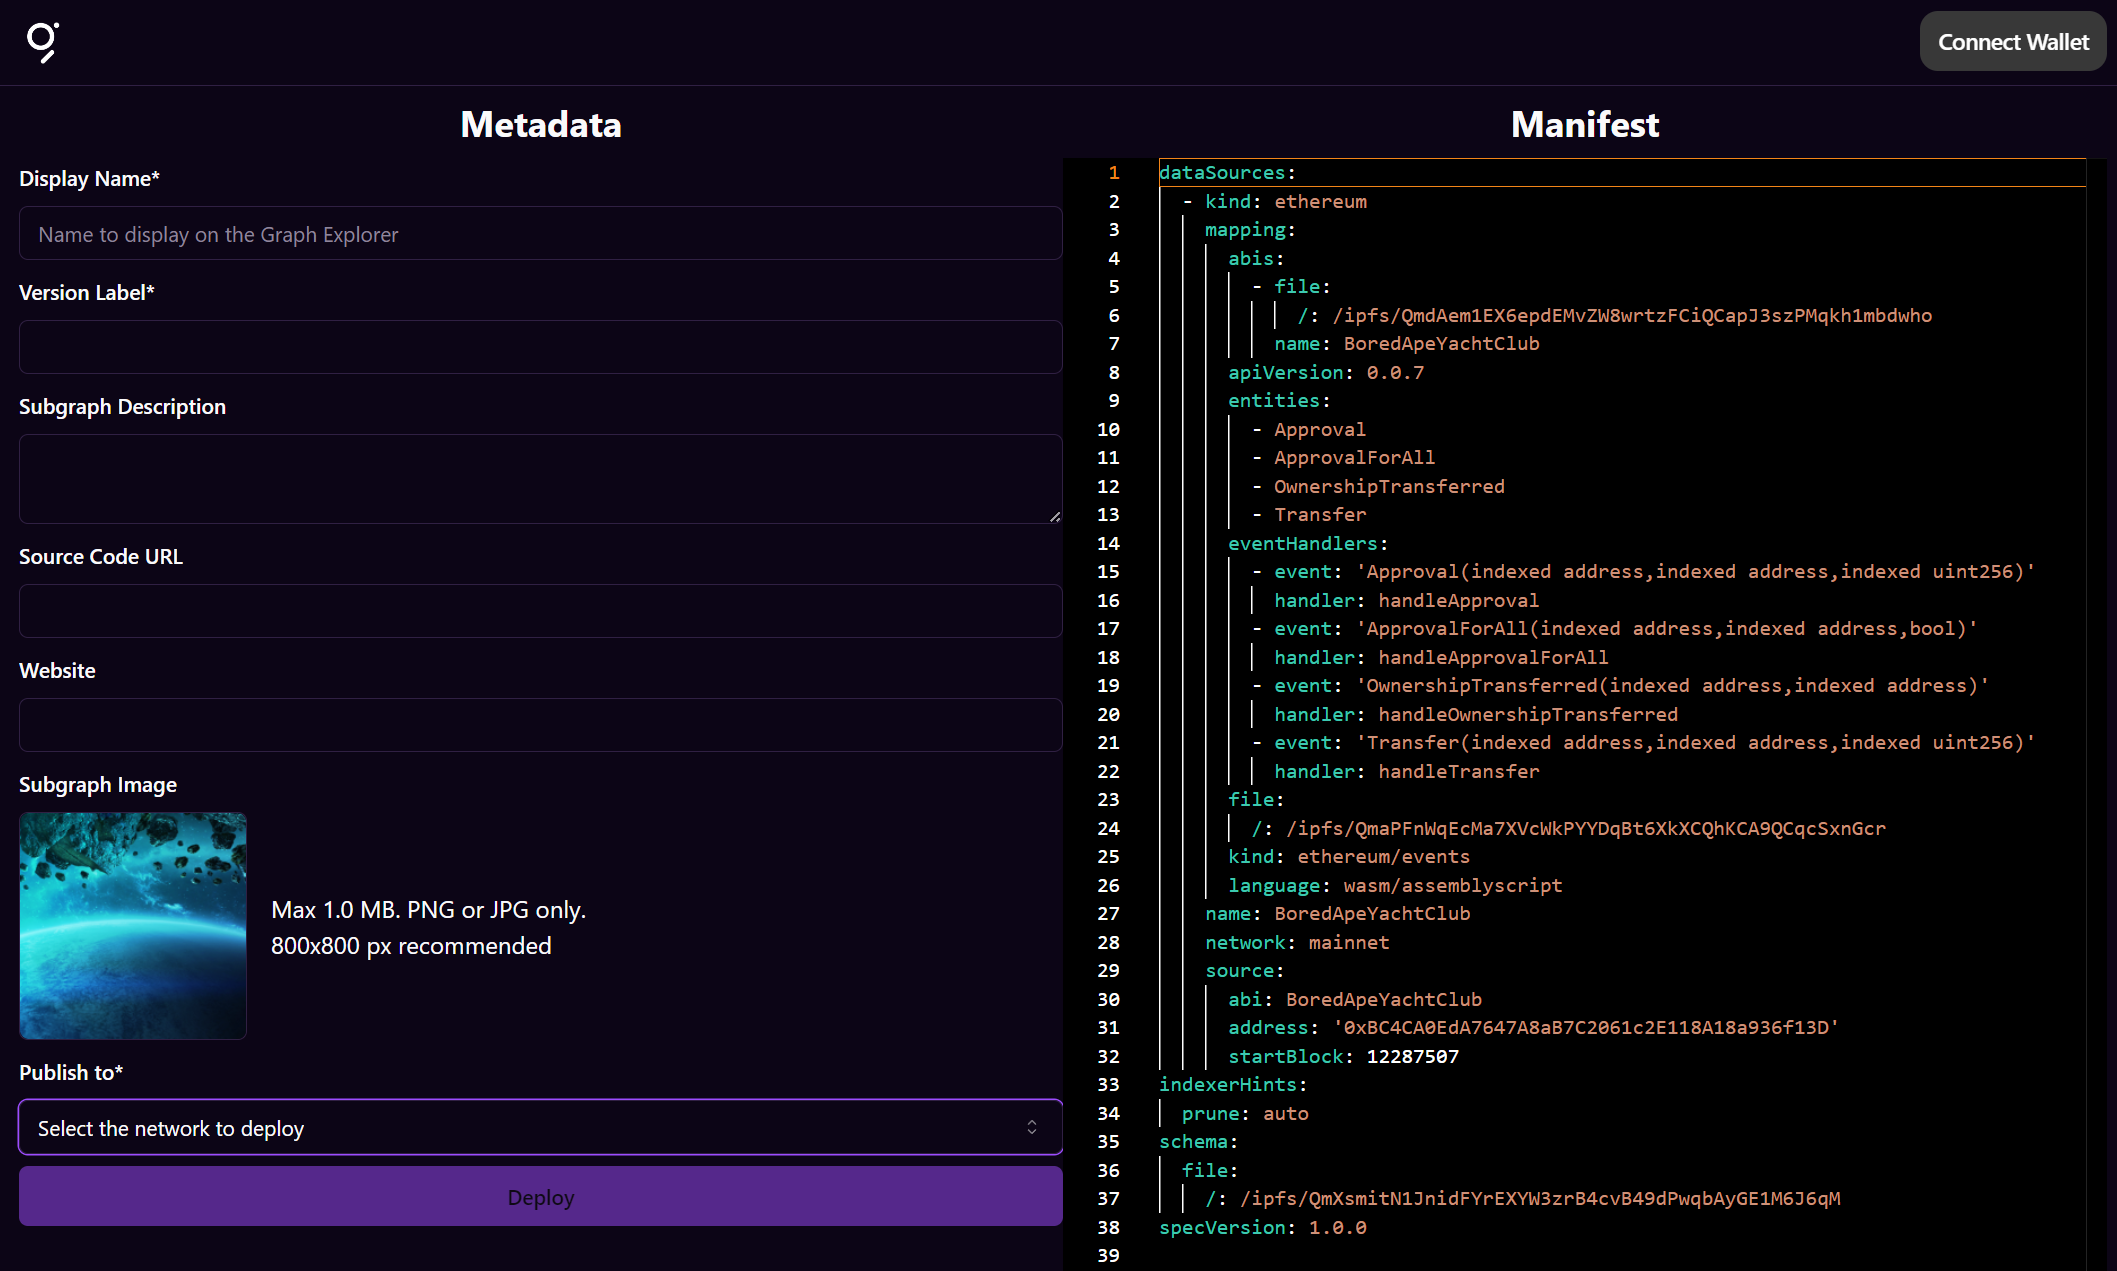
Pour personnaliser votre déploiement, voir Publier un subgraph.
Adding signal to your Subgraph
-
Pour inciter les Indexeurs à interroger votre subgraph, vous devez y ajouter un signal de curation GRT.
- Cette action améliore la qualité de service, réduit la latence et améliore la redondance et la disponibilité du réseau pour votre Subgraph.
-
Si éligibles aux récompenses d’indexation, les Indexeurs reçoivent des récompenses en GRT proportionnelles au montant signalé.
- Il est recommandé de rassembler au moins 3 000 GRT pour attirer 3 Indexeurs. Vérifiez l’éligibilité des récompenses en fonction de l’utilisation des fonctions du subgraph et des réseaux pris en charge.
Pour en savoir plus sur la curation, lisez Curating.
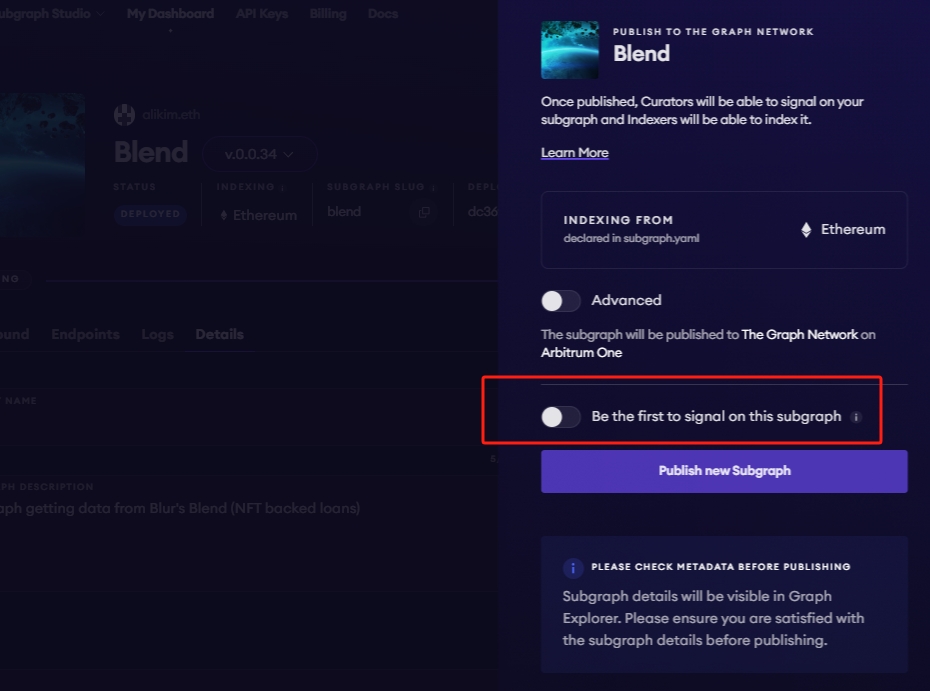
Pour économiser des frais de gas, vous pouvez créer votre subgraph dans la même transaction que vous le publiez en sélectionnant cette option :
8. Interroger votre subgraph
Vous avez maintenant accès à 100 000 requêtes gratuites par mois avec votre subgraph sur The Graph Network !
Vous pouvez interroger votre subgraph en envoyant des requêtes GraphQL à son URL de requête, que vous trouverez en cliquant sur le bouton Requête.
Pour plus d’informations sur l’interrogation des données de votre subgraph, lisez Interroger The Graph.