Démarrage Rapide
Reading time: 5 min
This guide will quickly take you through how to initialize, create, and deploy your subgraph to Subgraph Studio.
Assurez-vous que votre subgraph indexera les données d'un [réseau pris en charge] (/developing/supported-networks).
Ce guide est rédigé en supposant que vous possédez :
- Un portefeuille crypto
- Une adresse de smart contract sur le réseau de votre choix
Go to the and connect your wallet.
Once your wallet is connected, you can begin by clicking “Create a Subgraph." It is recommended to name the subgraph in Title Case: "Subgraph Name Chain Name."
The Graph CLI is written in TypeScript and you will need to have node and either npm or yarn installed to use it. Check that you have the most recent CLI version installed.
Sur votre machine locale, exécutez l'une des commandes suivantes :
npm install -g @graphprotocol/graph-cli@latest
npm install -g @graphprotocol/graph-cli
Initialize your subgraph from an existing contract by running the initialize command:
graph init --studio <SUBGRAPH_SLUG>
Lorsque vous initialisez votre subgraph, l'outil CLI vous demande les informations suivantes :
- Protocole : choisissez le protocole à partir duquel votre subgraph indexera les données
- Slug de subgraph : créez un nom pour votre subgraph. Votre slug de subgraph est un identifiant pour votre subgraph.
- Répertoire dans lequel créer le subgraph : choisissez votre répertoire local
- Réseau Ethereum (facultatif) : vous devrez peut-être spécifier à partir de quel réseau compatible EVM votre subgraph indexera les données
- Adresse du contrat : localisez l'adresse du contrat intelligent à partir de laquelle vous souhaitez interroger les données
- ABI : si l'ABI n'est pas renseigné automatiquement, vous devrez le saisir manuellement sous forme de fichier JSON
- Bloc de démarrage : il est suggéré de saisir le bloc de démarrage pour gagner du temps pendant que votre subgraph indexe les données de la blockchain. Vous pouvez localiser le bloc de démarrage en recherchant le bloc dans lequel votre contrat a été déployé.
- Nom du contrat : saisissez le nom de votre contrat
- Indexer les événements de contrat en tant qu'entités : il est suggéré de définir cette valeur sur true car cela ajoutera automatiquement des mappages à votre subgraph pour chaque événement émis
- Ajouter un autre contrat (facultatif) : vous pouvez ajouter un autre contrat
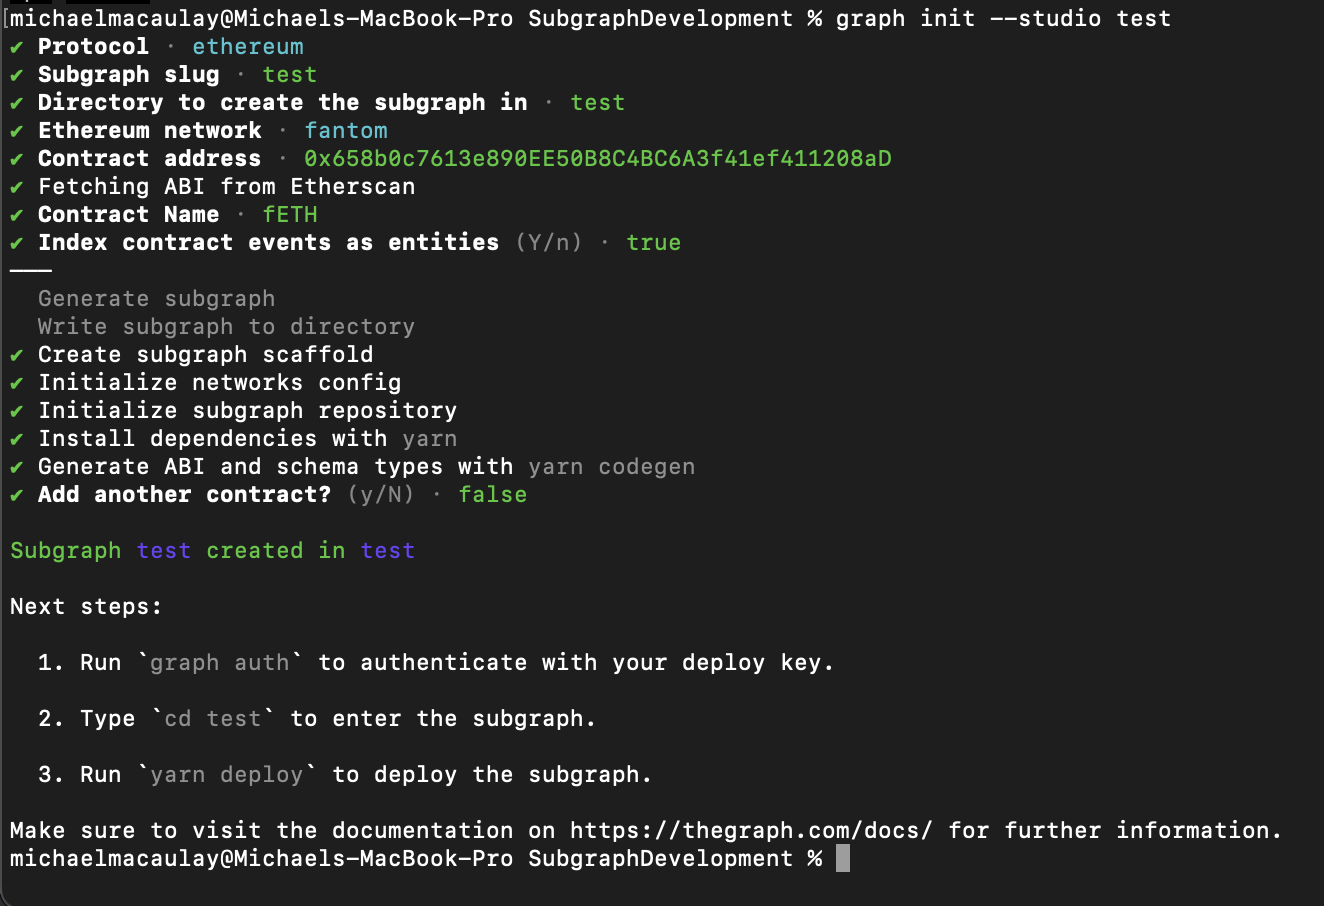
La capture d'écran suivante donne un exemple de ce qui vous attend lors de l'initialisation de votre subgraph :

Les commandes précédentes créent un subgraph d'échafaudage que vous pouvez utiliser comme point de départ pour construire votre propre subgraph. Lorsque vous apporterez des modifications au subgraph, vous travaillerez principalement avec trois fichiers :
- Manifest (
subgraph.yaml) - The manifest defines what datasources your subgraphs will index. - Schema (
schema.graphql) - The GraphQL schema defines what data you wish to retrieve from the subgraph. - AssemblyScript Mappings (
mapping.ts) - This is the code that translates data from your datasources to the entities defined in the schema.
For more information on how to write your subgraph, see .
Une fois votre subgraph écrit, exécutez les commandes suivantes :
$ graph codegen$ graph build
- Authentifiez et déployez votre subgraph. La clé de déploiement se trouve sur la page du subgraph dans Subgraph Studio.
$ graph auth --studio <DEPLOY_KEY>$ graph deploy --studio <SUBGRAPH_SLUG>
You will be asked for a version label. It's strongly recommended to use for versioning like 0.0.1. That said, you are free to choose any string as version such as:v1, version1, asdf.
In Subgraph Studio's playground environment, you can test your subgraph by making a sample query.
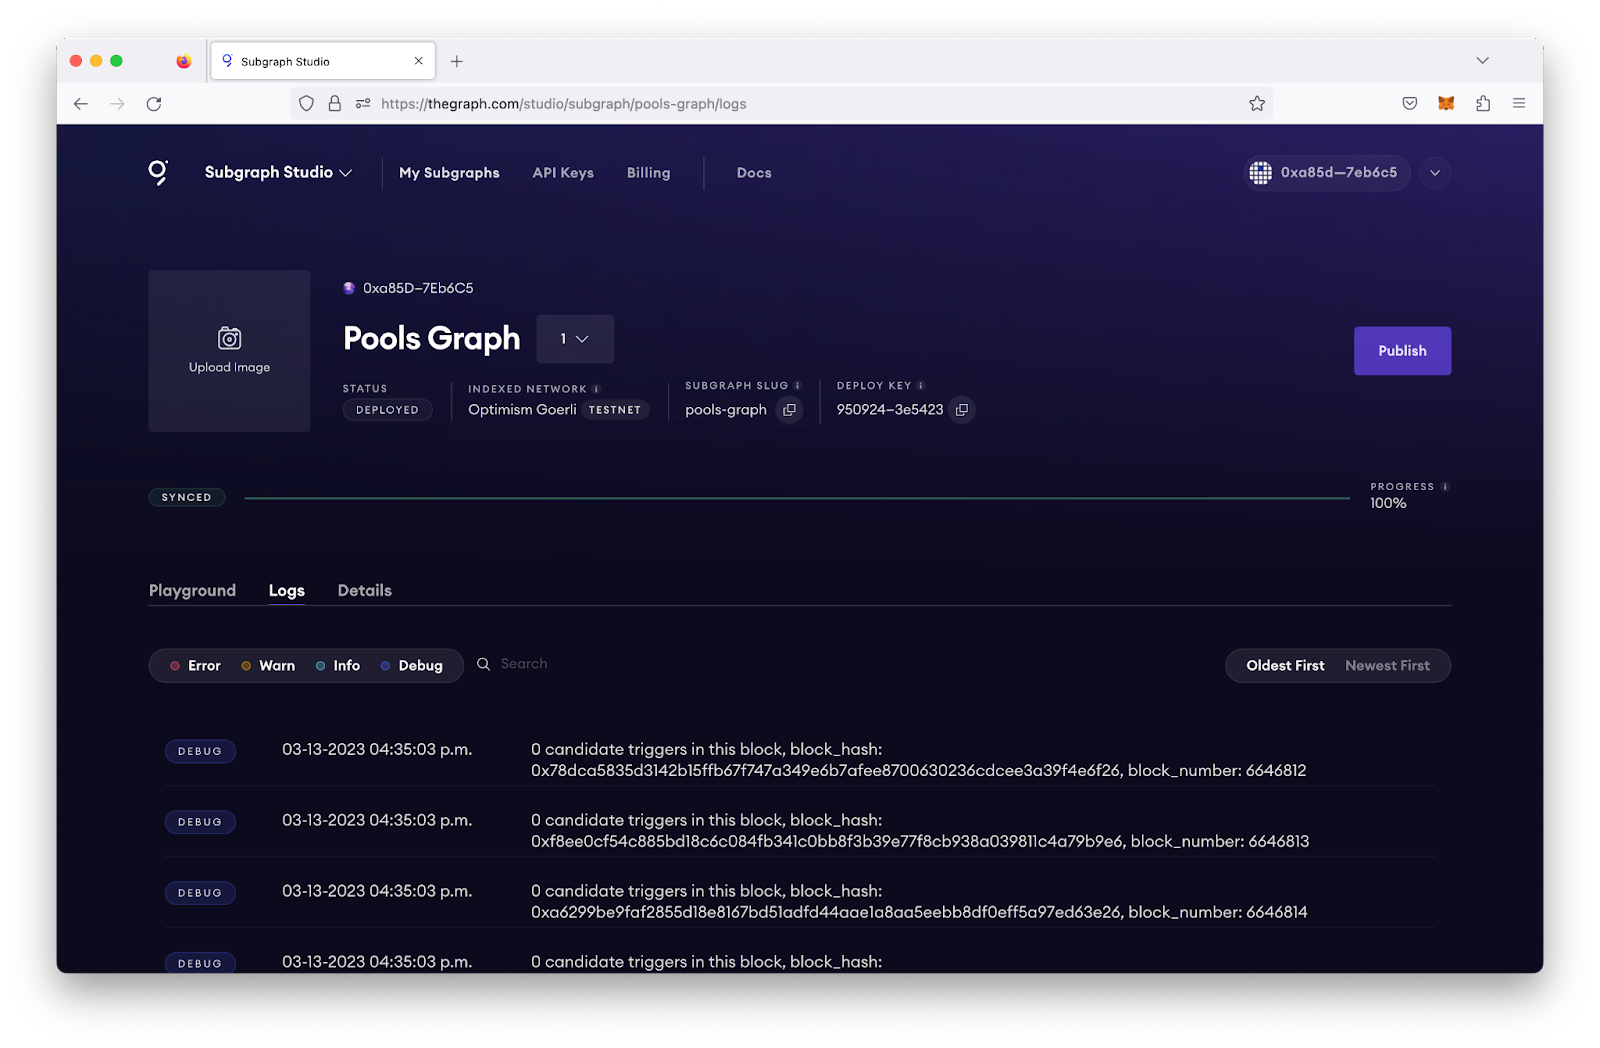
Les registres ou logs vous indiqueront s'il y a des erreurs avec votre subgraph. Les logs d'un subgraph opérationnel ressembleront à ceci :

If your subgraph is failing, you can query the subgraph health by using the GraphiQL Playground. Note that you can leverage the query below and input your deployment ID for your subgraph. In this case, Qm... is the deployment ID (which can be located on the Subgraph page under Details). The query below will tell you when a subgraph fails, so you can debug accordingly:
{indexingStatuses(subgraphs: ["Qm..."]) {nodesyncedhealthfatalError {messageblock {numberhash}handler}nonFatalErrors {messageblock {numberhash}handler}chains {networkchainHeadBlock {number}earliestBlock {number}latestBlock {number}lastHealthyBlock {number}}entityCount}}
Once your subgraph has been deployed to Subgraph Studio, you have tested it out, and you are ready to put it into production, you can then publish it to the decentralized network.
In Subgraph Studio, you will be able to click the publish button on the top right of your subgraph's page.
Select the network you would like to publish your subgraph to. It is recommended to publish subgraphs to Arbitrum One to take advantage of the .
The (upgrade Indexer)[/sunrise/#about-the-upgrade-indexer] will begin serving queries on your subgraph regardless of subgraph curation, and it will provide you with 100,000 free queries per month.
For a higher quality of service and stronger redundancy, you can curate your subgraph to attract more Indexers. At the time of writing, it is recommended that you curate your own subgraph with at least 3,000 GRT to ensure 3-5 additional Indexers begin serving queries on your subgraph.
Pour économiser sur les coûts de gaz, vous pouvez organiser votre subgraph dans la même transaction que celle où vous l'avez publié en sélectionnant ce bouton lorsque vous publiez votre subgraph sur le réseau décentralisé de The Graph :

Désormais, vous pouvez interroger votre subgraph en envoyant des requêtes GraphQL à l'URL de requête de votre subgraph, que vous pouvez trouver en cliquant sur le bouton de requête.
If you don't have your API key, you can query via the free, rate-limited development query URL, which can be used for development and staging.
For more information about querying data from your subgraph, read more .