3 minutes
How to Manage API keys
This guide shows you how to create, manage, and secure API keys for your Subgraphs.
Overview
API keys are required to query Subgraphs. They authenticate users and devices, authorize access to specific endpoints, enforce rate limits, and enable usage tracking across The Graph.
Prerequisites
- A Subgraph Studio account
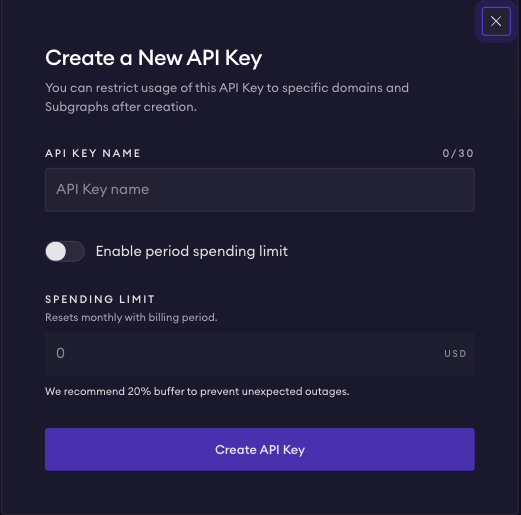
Create a New API Key
- Navigate to Subgraph Studio
- Click the API Keys tab in the navigation menu
- Click the Create API Key button
A new window will pop up:
- Enter a name for your API key
- Optional: You can enable a period spending limit
- Click Create API Key
Using Your API Key
Always keep your API key in environment variables or a secure secrets manager. Do not hardcode it in your codebase or expose it in client-side apps.
When you query The Graph from your dapp, you can use your API key in two ways:
-
In the URL (optimal method for Subgraph queries):
Include the API Key directly to your query endpoint:
https://gateway.thegraph.com/api/<YOUR_API_KEY>/subgraphs/id/<SUBGRAPH_ID> -
As a bearer Token:
Include your API Key in the
Authorizationrequest header for added security:Authorization: Bearer <YOUR_API_KEY>Curl command example:
curl -X POST \-H "Content-Type: application/json" \-H "Authorization: Bearer {api-key}" \-d '{"query": "{ graphNetworks(first: 5) { id controller graphToken epochManager } graphAccounts(first: 5) { id names { id } defaultName { id } createdAt } }", "operationName": "Subgraphs", "variables": {}}' \https://gateway.thegraph.com/api/subgraphs/id/DZz4kDTdmzWLWsV373w2bSmoar3umKKH9y82SUKr5qmp
Check out Querying from an App for more details.
Manage API Keys
The “API keys” table lists existing API keys and allows you to manage or delete them. For each key, you can see its status, the cost for the current period, the spending limit for the current period, and the total number of queries.
How to Set Spending Limits
- Find your API key in the API keys table
- Click the “three dots” icon next to the key
- Select “Manage spending limit”
- Enter your desired monthly limit in USD
- Click Save
Manage spending limit: this is an optional monthly spending limit for a given API key, in USD. This limit is per billing period (calendar month).
How to Rename an API Key
- Click the “three dots” icon next to the key
- Select “Rename API key”
- Enter the new name
- Click Save
How to Regenerate an API Key
- Click the “three dots” icon next to the key
- Select “Regenerate API key”
- Confirm the action in the pop up dialog
Warning: Regenerating an API key will invalidate the previous key immediately. Update your applications with the new key to prevent service interruption.
API Key Details
Monitoring Usage
- Click on your API key to view the Details page
- Check the Overview section for:
- Total number of queries
- GRT spent
- Current usage statistics
Restricting Domain Access
- Click on your API key to open the Details page
- Navigate to the Security section
- Click “Add Domain”
- Enter the authorized domain name
- Click Save
Limiting Subgraph Access
- In the API key Details page
- Navigate to the Security section
- Click “Assign Subgraphs”
- Select the Subgraphs you want to authorize
- Click Save