Building Subgraphs with Subgraph Studio
Follow this how-to guide for using the Subgraph Studio to build and publish subgraphs on the decentralized network.
Subgraphs are a core component of . They allow any developer to build and deploy performant and discoverable APIs with data indexed from decentralized networks like Ethereum, IPFS, and other blockchains. Subgraph developers define which data will be indexed from the blockchain and how it will be stored and made available via an API layer. build and use subgraphs to power their production applications.
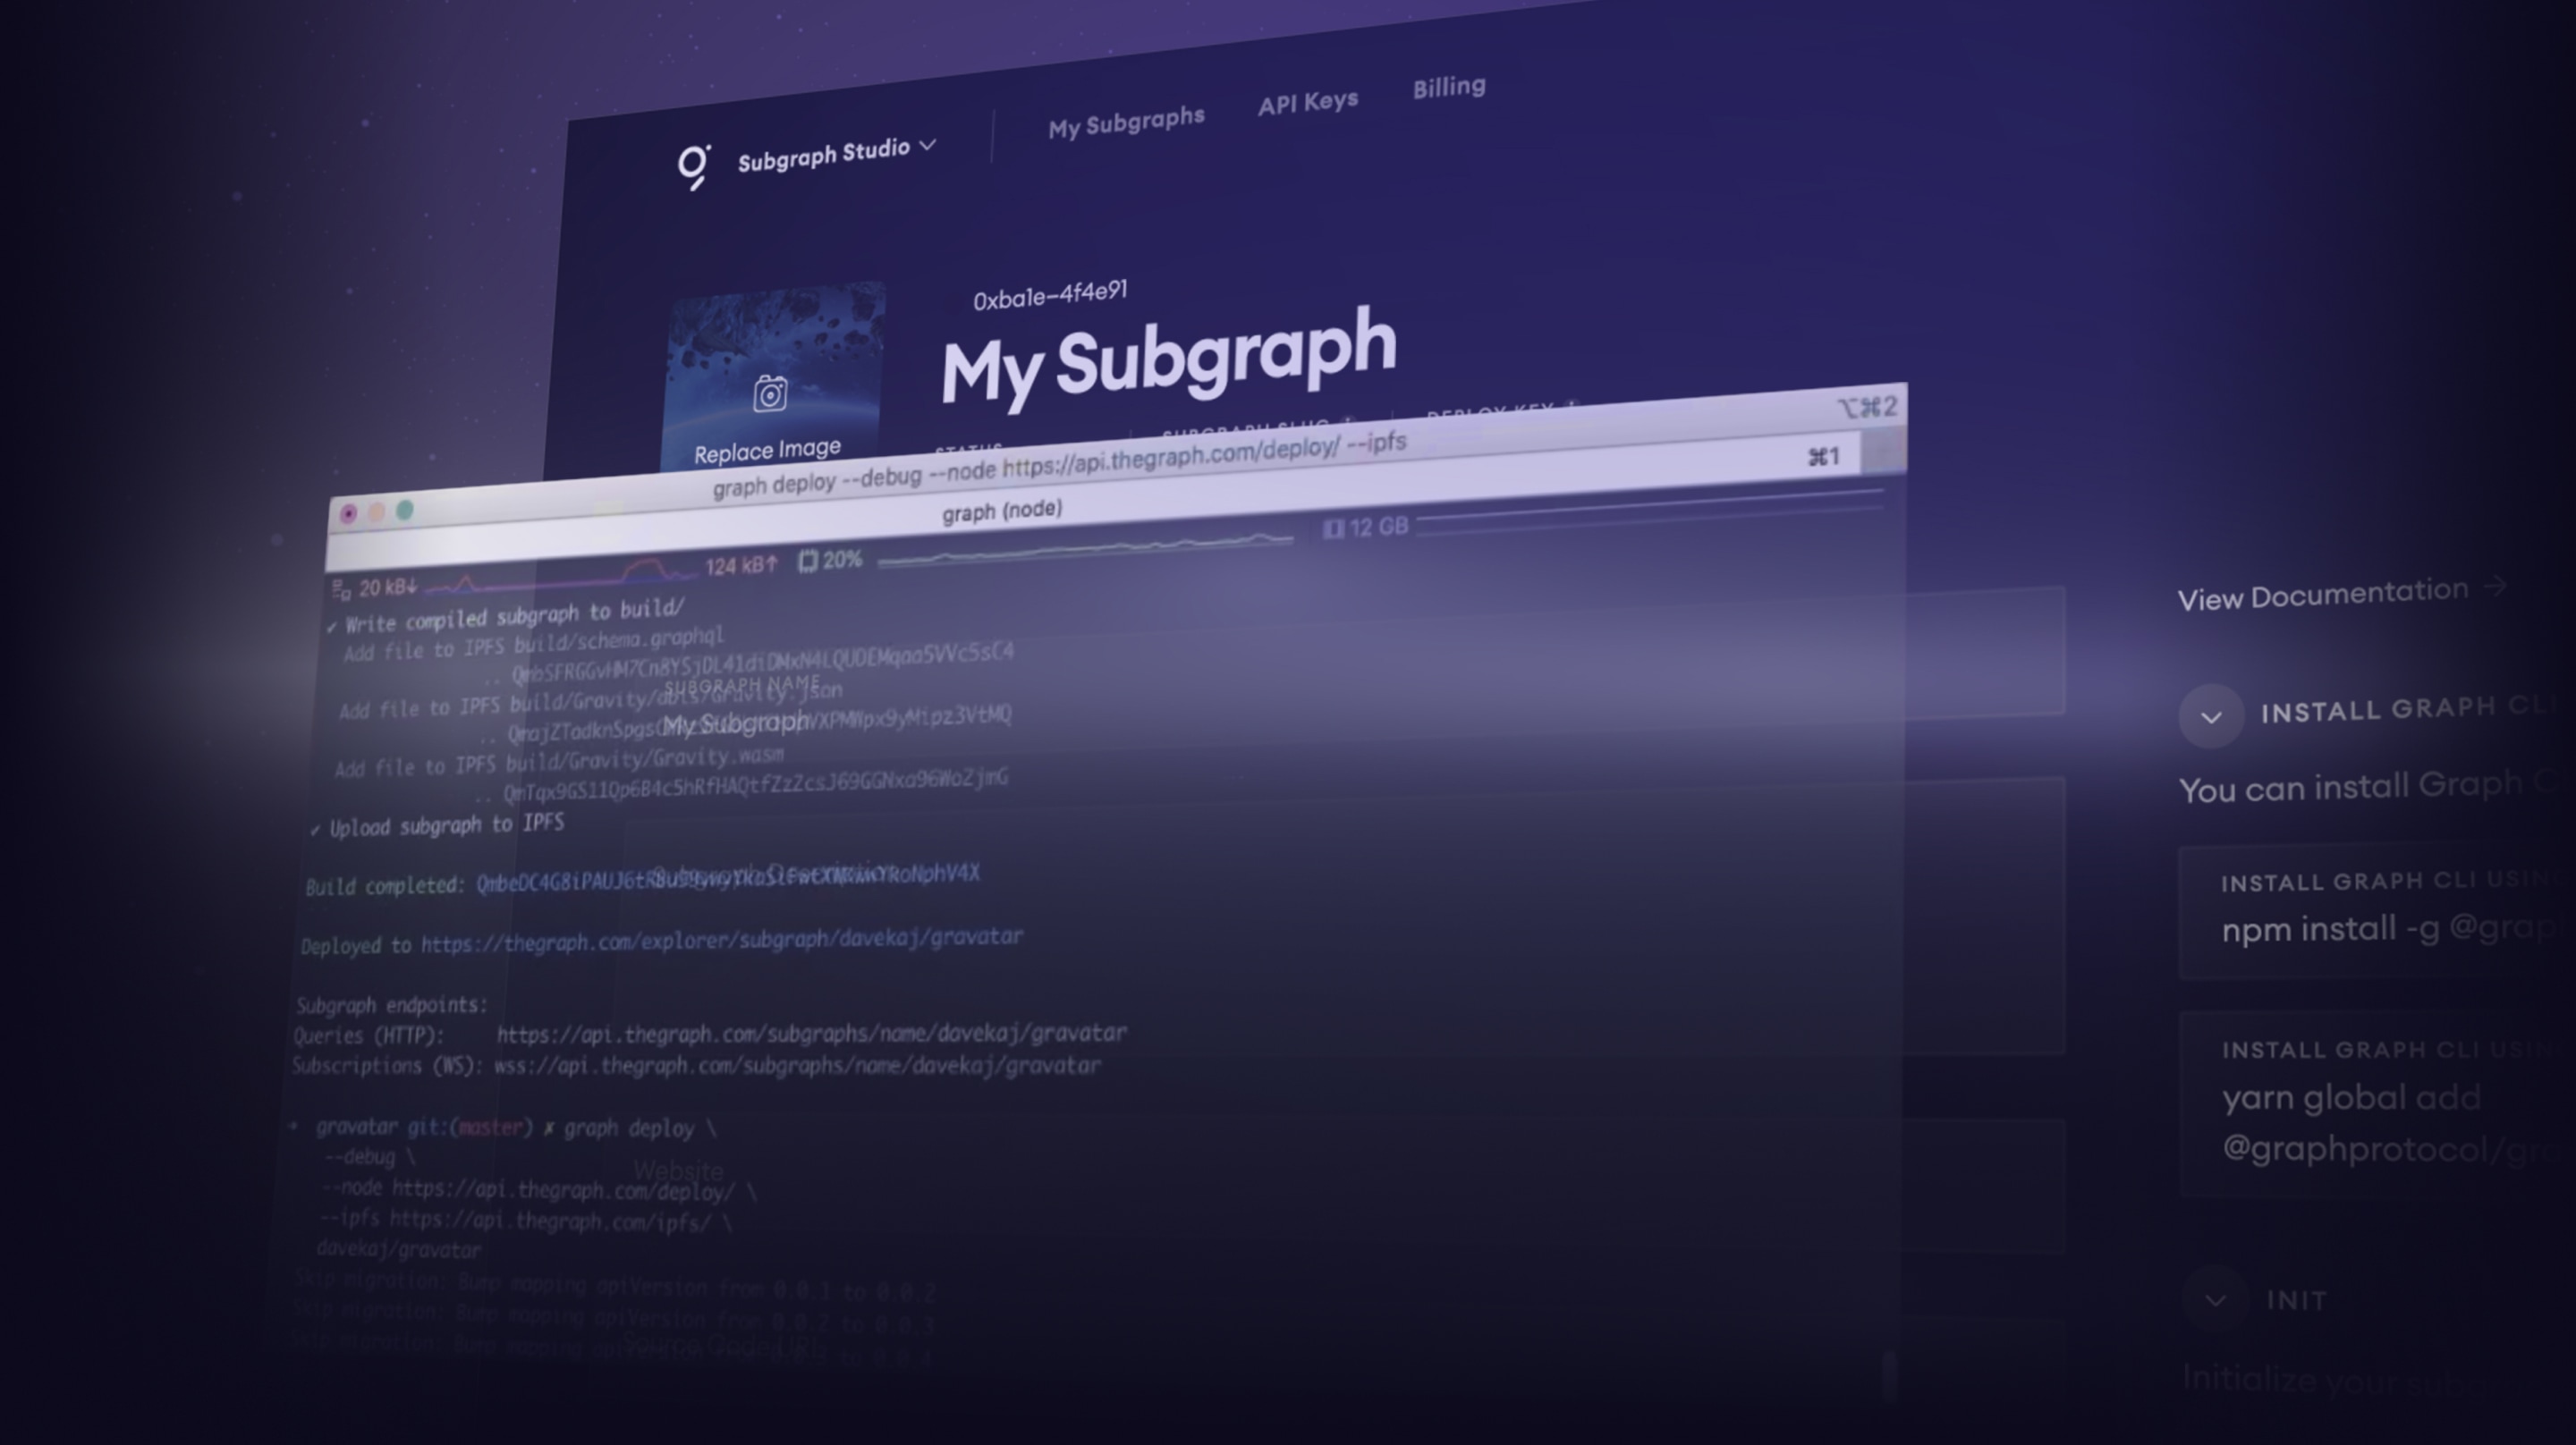
Subgraph Studio, launched today, enables developers to permissionlessly deploy and curate on subgraphs to earn query fees! Curation on The Graph is one of the first curation markets to go live on Ethereum at this scale.
In this guide you will learn how to build your first subgraph using the and . The subgraph you will be building will be for indexing and querying for data from the smart contract. Zora is an NFT marketplace. Zora has a that has links to their as well as an official .
You will learn how to build, test, and publish a similar subgraph to The Graph’s decentralized network by indexing data from the Zora smart contract.
Prerequisites
To be successful in this tutorial, you should have the following:
- Node.js installed on your machine
- Metamask wallet
Getting Started
To get started, visit the Subgraph Studio at https://thegraph.com/studio.
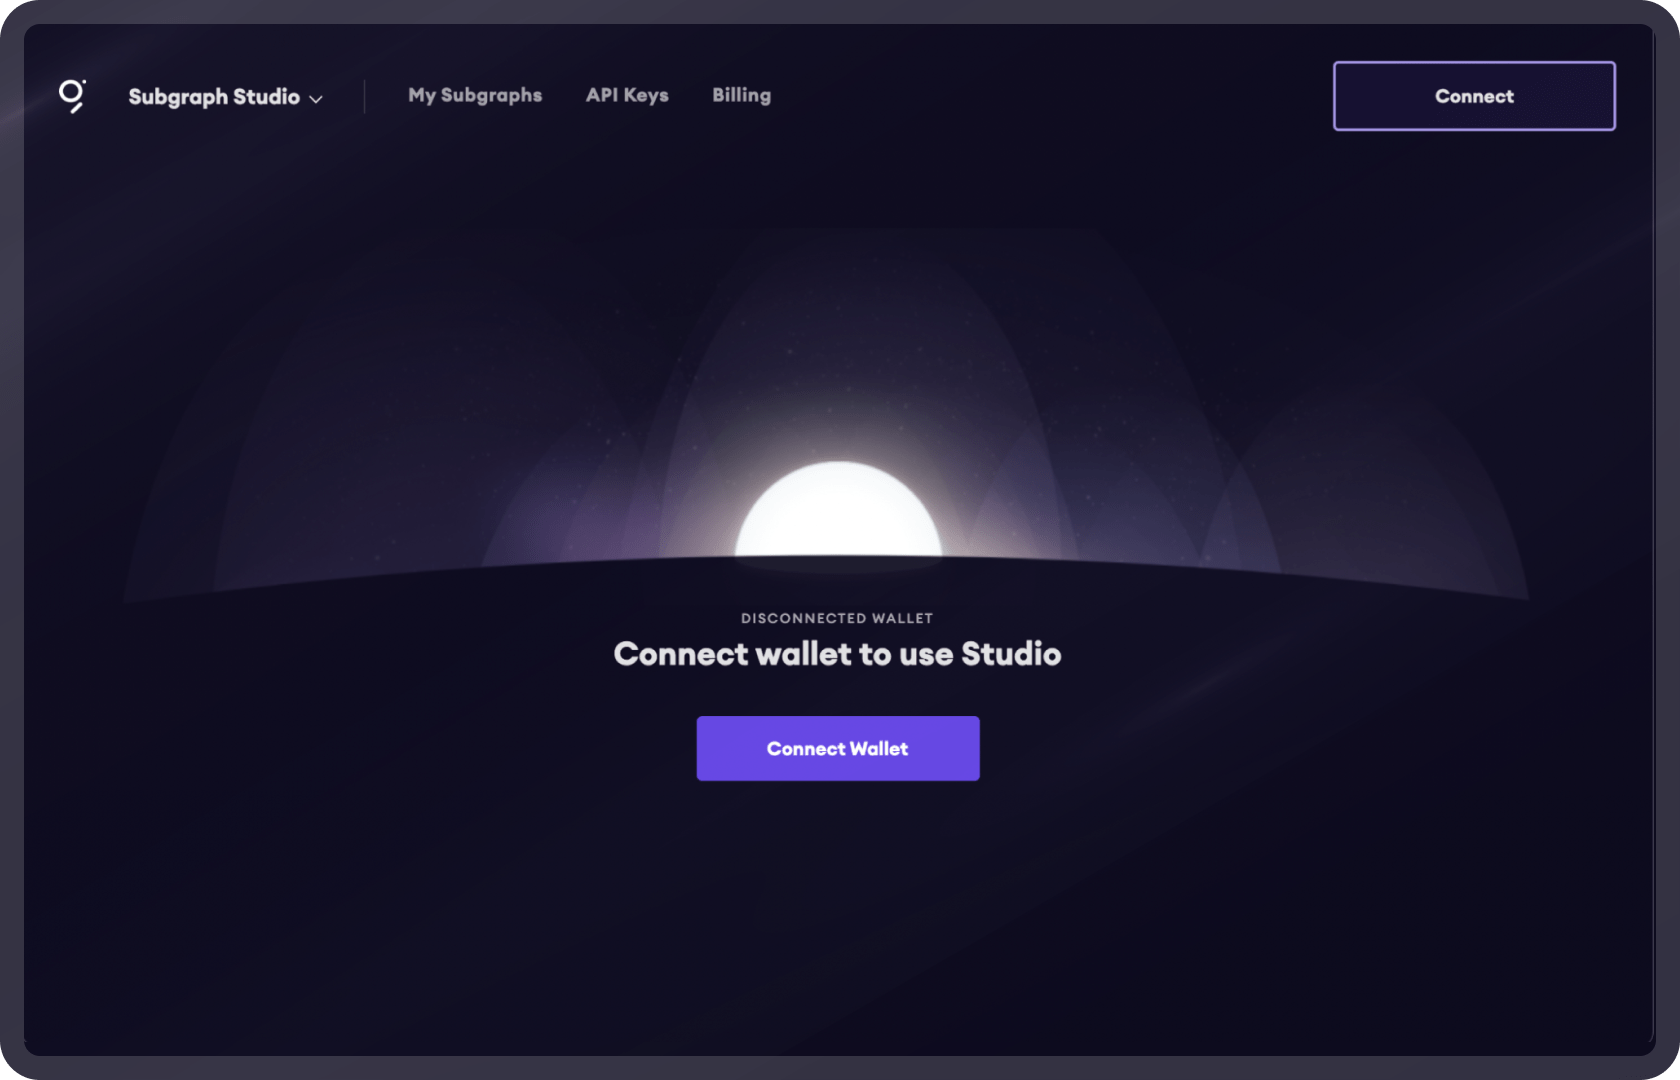
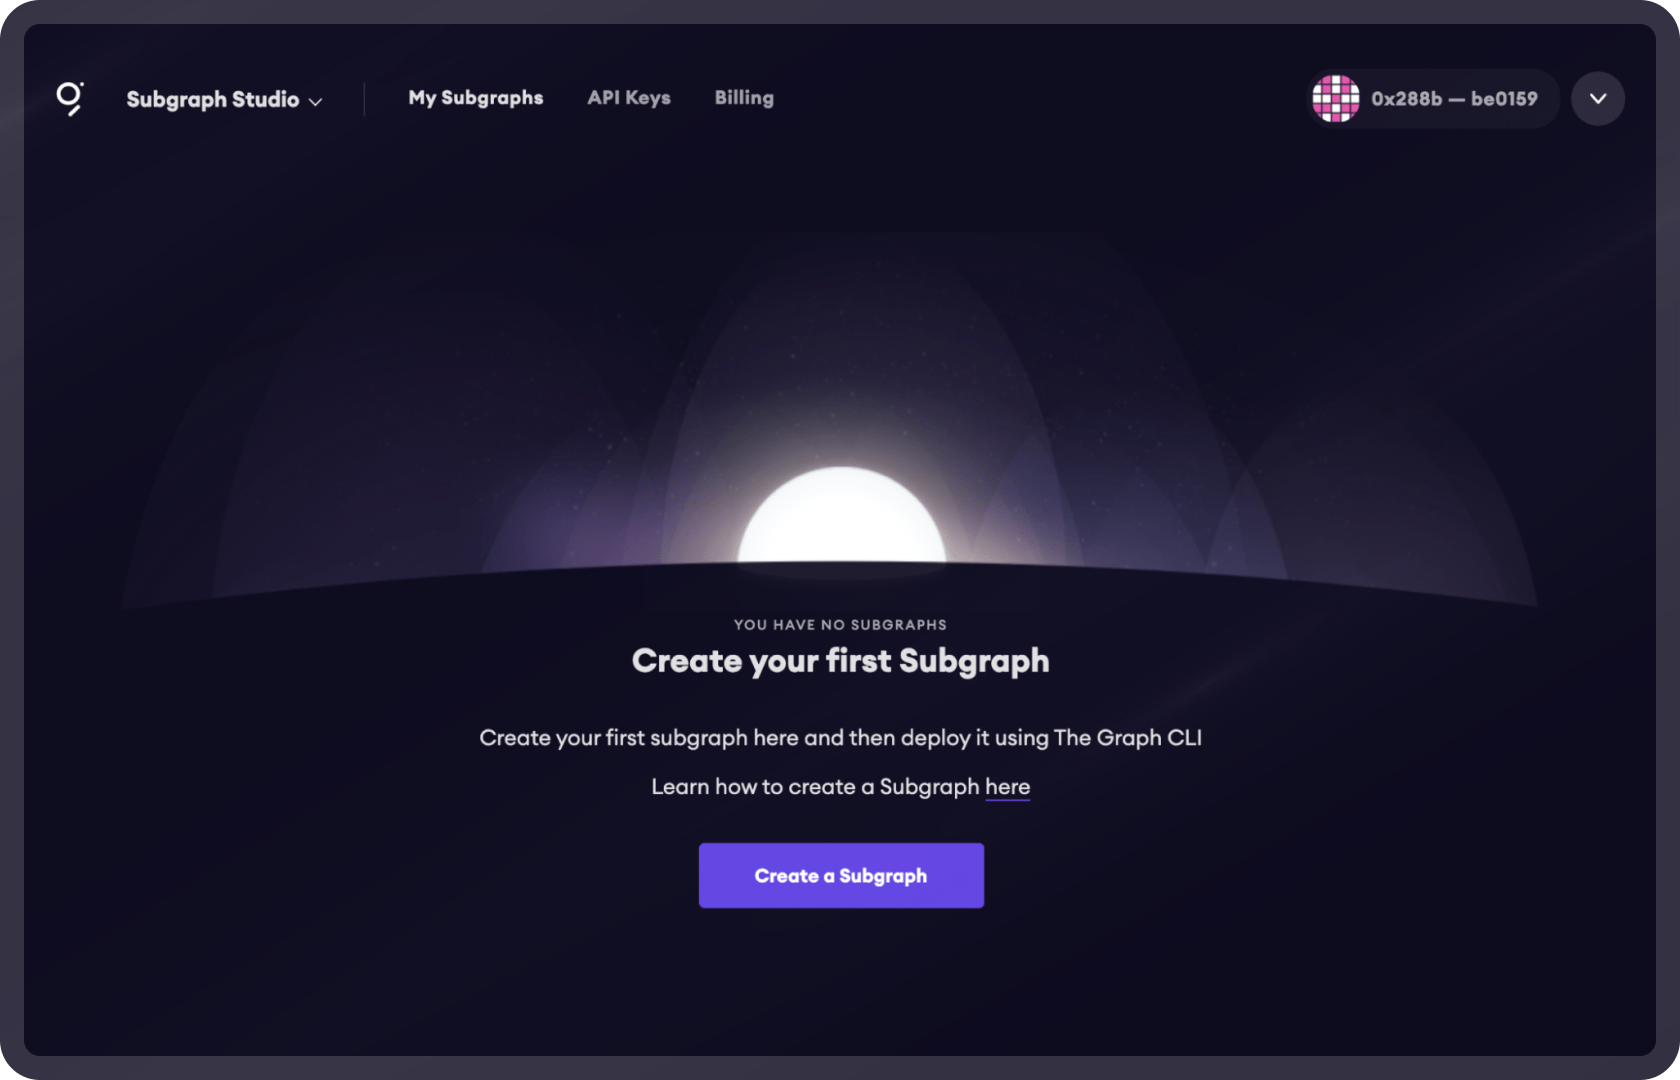
Here, click Connect Wallet and choose a wallet address to authenticate. Once you’ve authenticated, you should be able to click Create a Subgraph to create a new subgraph.
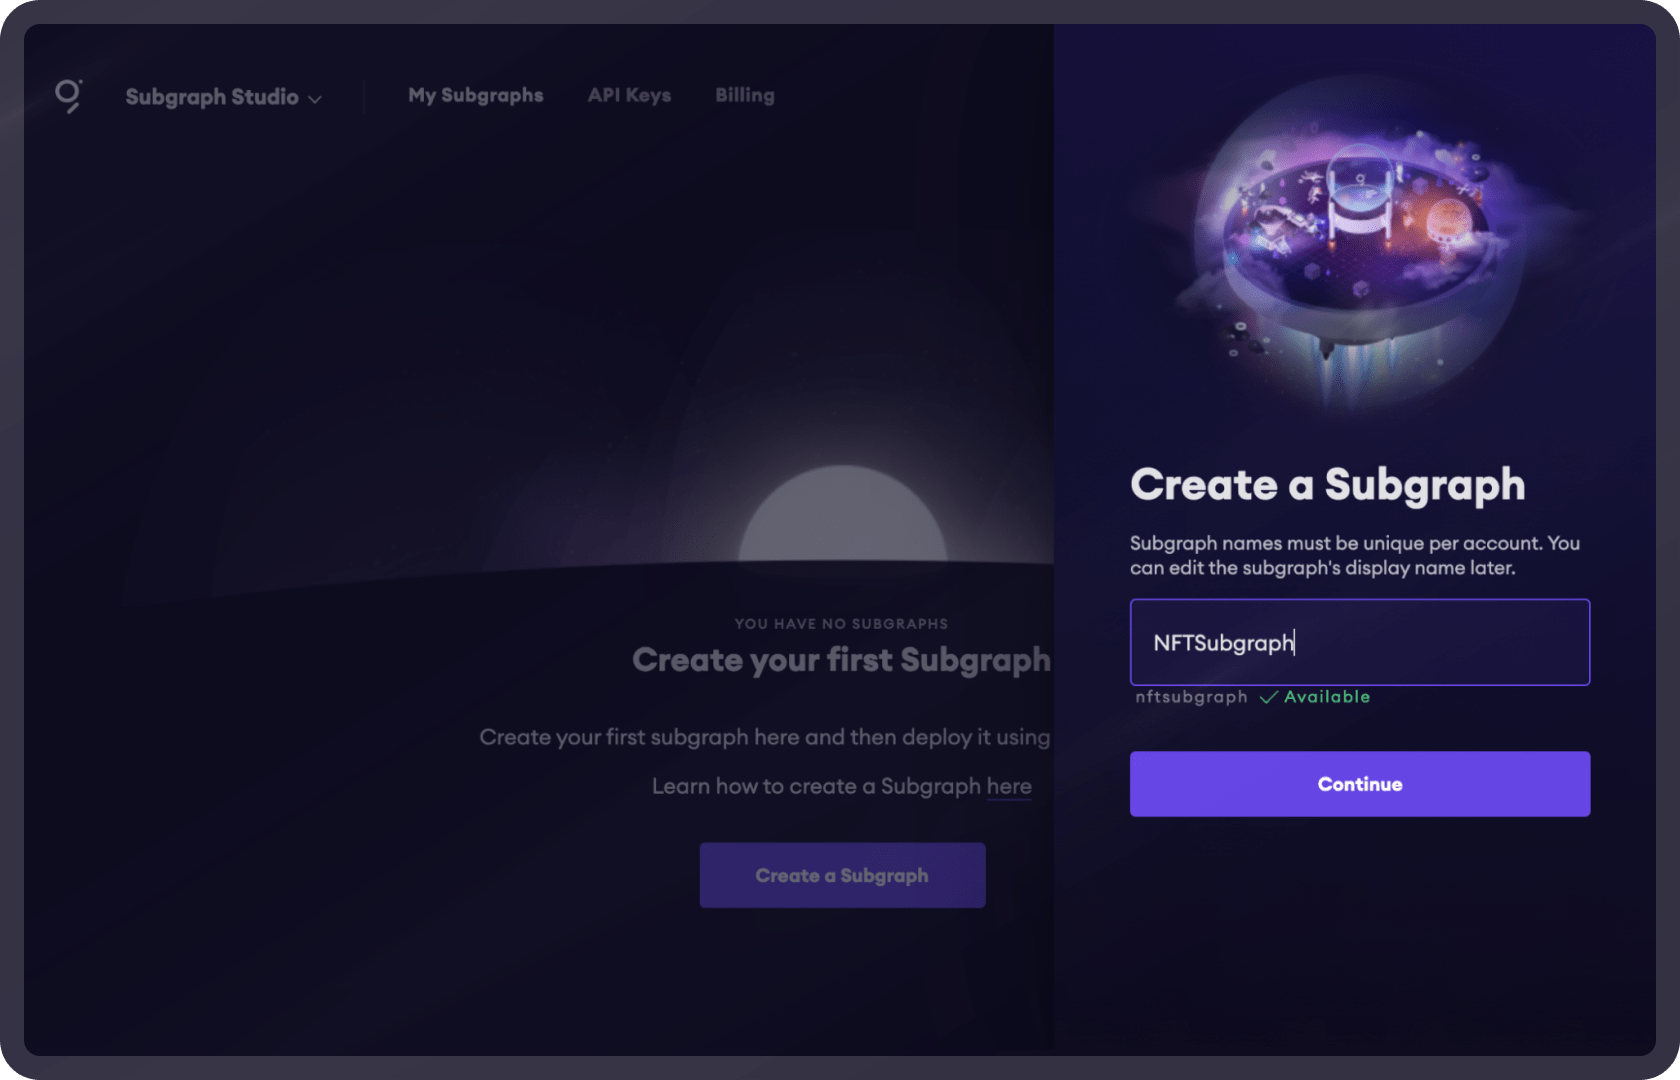
Here, give the subgraph a name and click Continue.
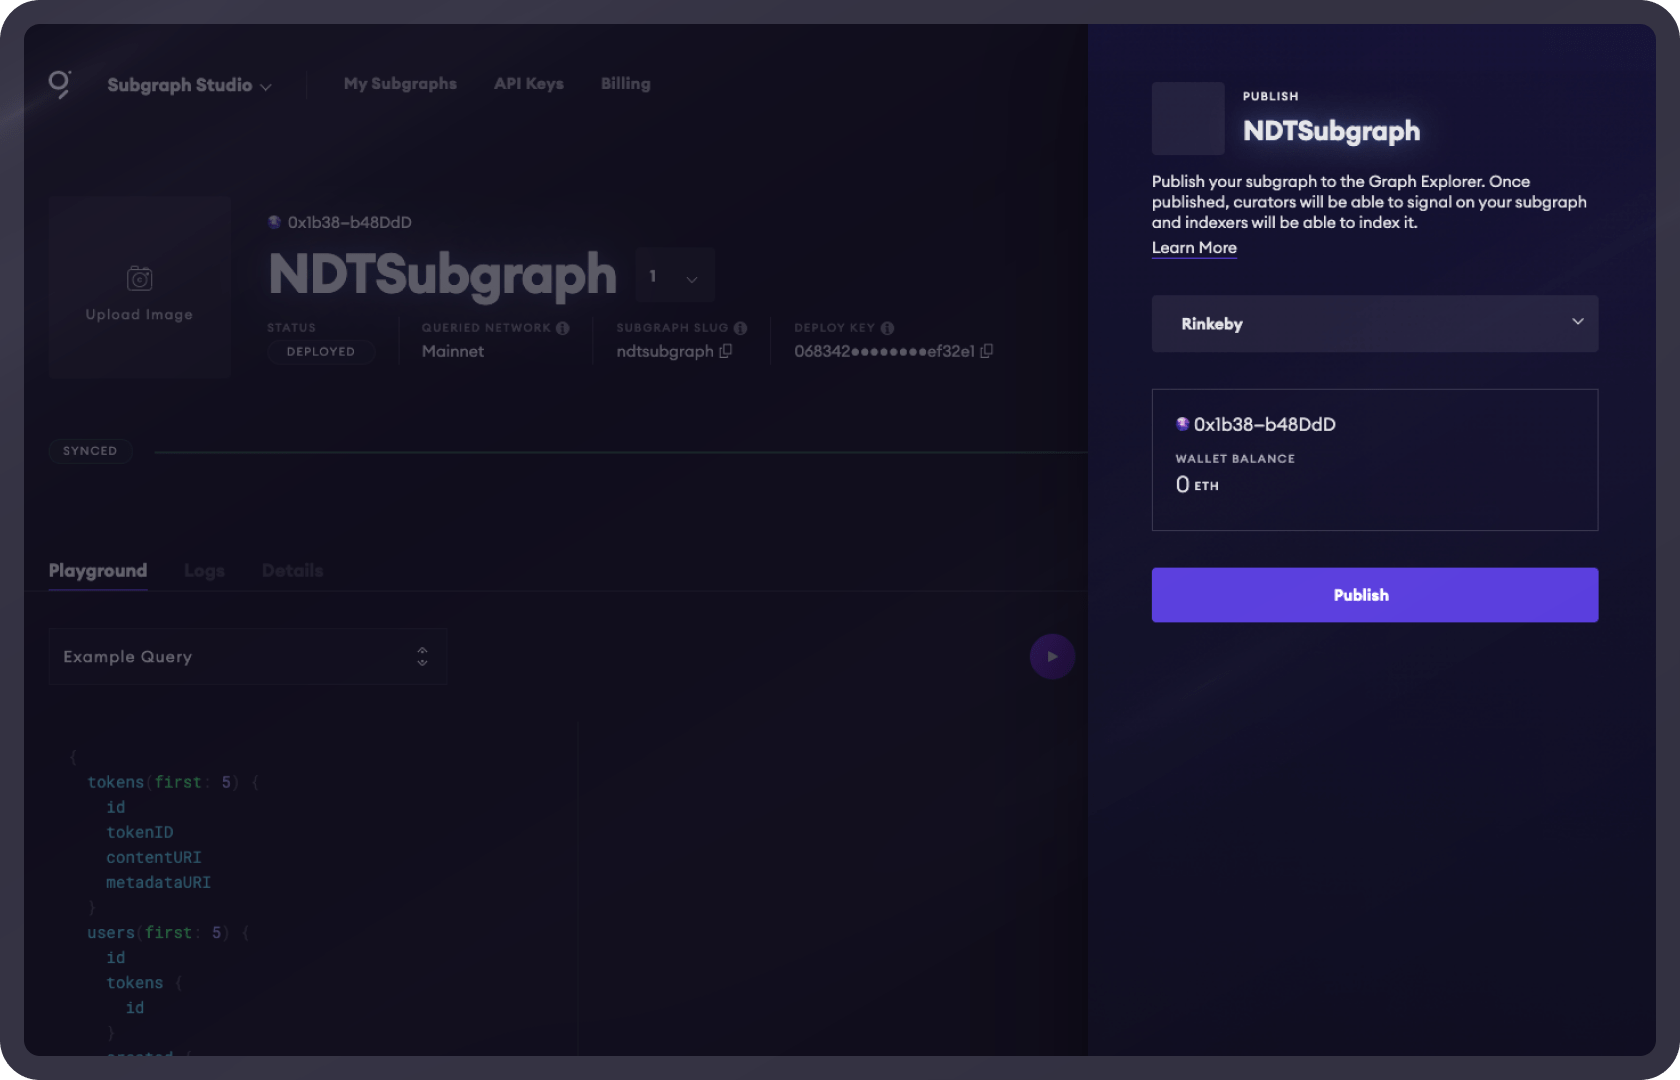
Next, you will see a view of your subgraph that enables you to add optional metadata like the subgraph description and image as well as view some useful information like the deploy key, slug, and status of the subgraph.
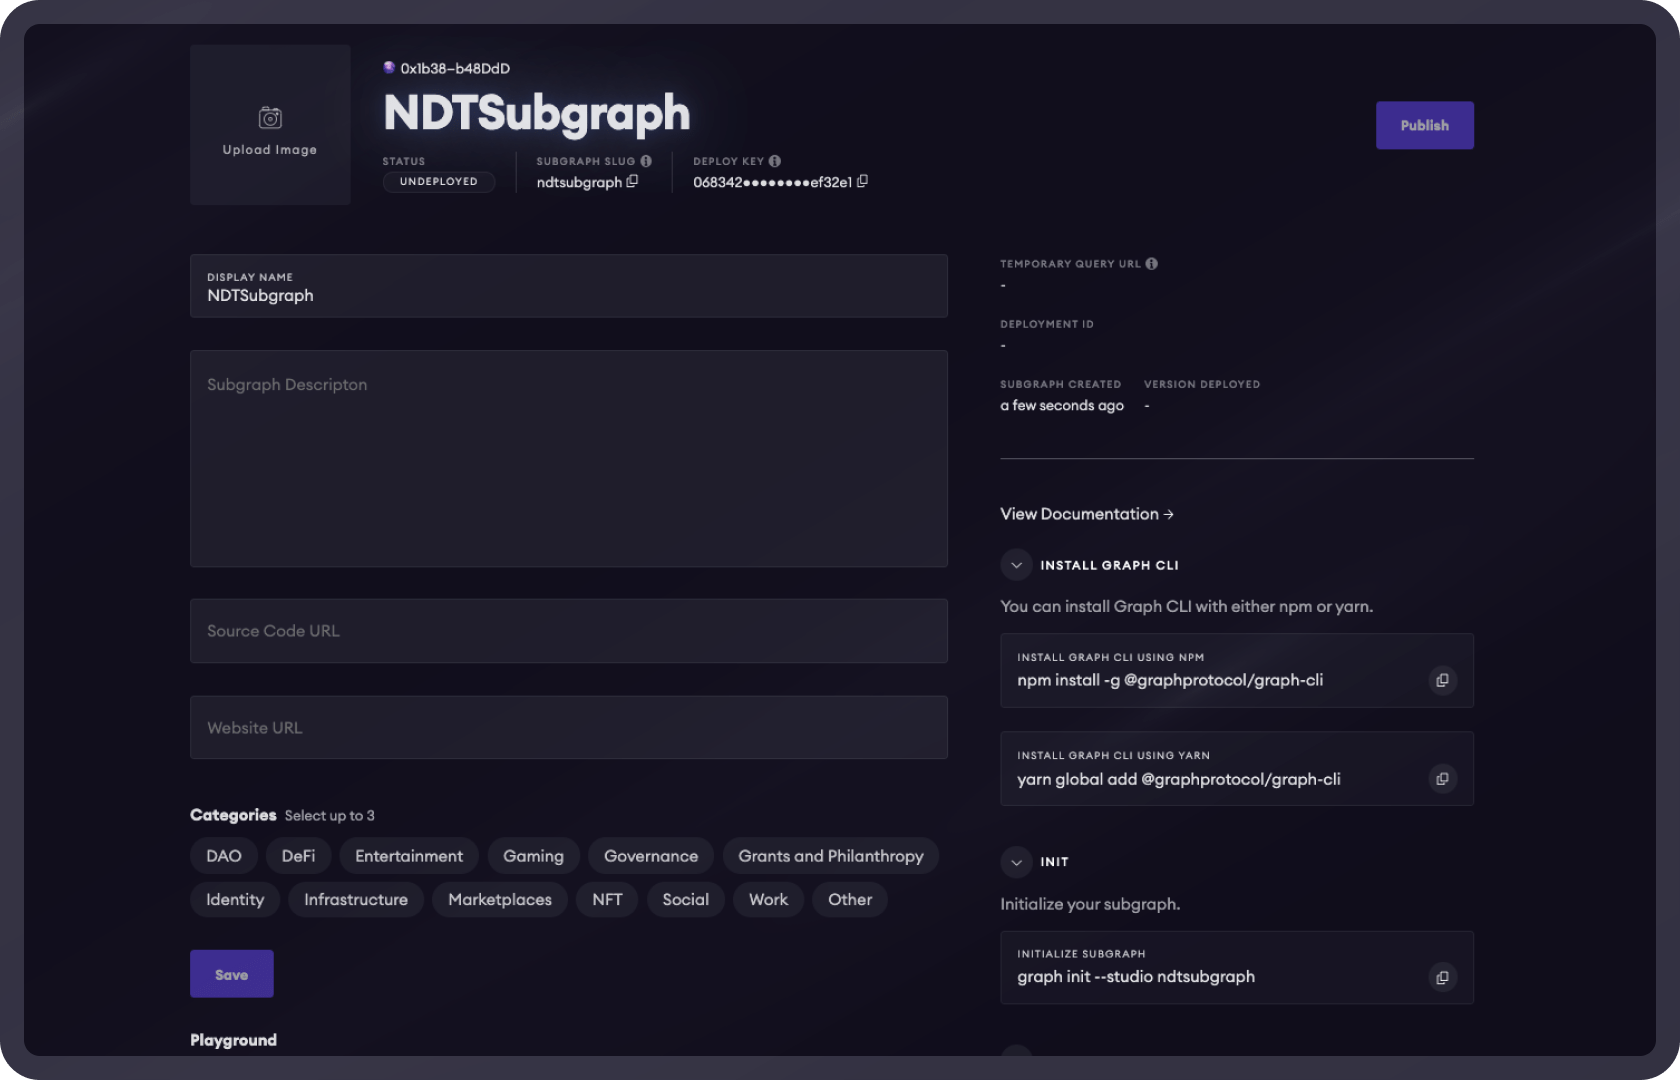
Now that your subgraph project has been created in the Studio, you can continue by going into your local development environment and opening your terminal.
Next, change into or create an empty directory and install the Graph CLI using NPM:
npm install -g @graphprotocol/graph-cli
Once the Graph CLI has been installed you can initialize a new subgraph with the Graph CLI init command:
graph init --contract-name Token \--index-events --studio \--from-contract 0xabEFBc9fD2F806065b4f3C237d4b59D9A97Bcac7
You will then be prompted with the following:
- ✔ Subgraph slug ·
- ✔ Directory to create the subgraph in ·
- ✔ Ethereum network · mainnet
- ✔ Contract address · 0xabEFBc9fD2F806065b4f3C237d4b59D9A97Bcac7
- ✔ Fetching ABI from Etherscan
- ✔ Contract Name › Token
This will generate a basic subgraph based off of the contract address passed in as the argument to --from-contract. By using this contract address, the CLI will initialize a few things in your project to get you started (including fetching the and saving them in the ABIs directory).
By passing in the --index-events flag the CLI will automatically populate some code and configuration for us in schema.graphql, subgraph.yaml, and src/mapping.ts based on the emitted from the contract.
The subgraph codebase consists of a few files:
- subgraph.yaml: a YAML file containing the subgraph manifest. The main configuration and definition for a subgraph lives in subgraph.yaml.
- schema.graphql: a GraphQL schema that defines what data is stored for your subgraph, and how to query it via GraphQL AssemblyScript Mappings: AssemblyScript code that translates from the event data in Ethereum to the entities defined in your schema (e.g. mapping.ts in this tutorial)
The entries in subgraph.yaml that you will be working with are:
- dataSources.source: the address of the smart contract, the subgraph sources, and the ABI of the smart contract you’re using. The address is optional; omitting it allows to index matching events from all contracts.
- dataSources.source.startBlock (optional): the number of the block that the data source starts indexing from. In most cases we suggest using the block in which the contract was created, if not then the indexer will start from the genesis block.
- dataSources.mapping.entities : the entities that the data source writes to the store. The schema for each entity is defined in the schema.graphql file.
- dataSources.mapping.abis: one or more named ABI files for the source contract as well as any other smart contracts that you interact with from within the mappings.
- dataSources.mapping.eventHandlers: lists the smart contract events this subgraph reacts to and the handlers in the mapping — ./src/mapping.ts in the example — that transform these events into entities in the store.
Defining the entities:
With The Graph, you define entity types in schema.graphql, and Graph Node will generate top level fields for querying single instances and collections of that entity type. Each type that should be an entity is required to be annotated with an @entity directive.
The entities / data we will be indexing are Token and User. This way we can index the Tokens created by the users as well as the user metadata.
To do this, update schema.graphql with the following code:
type Token @entity {id: ID!tokenID: BigInt!contentURI: String!metadataURI: String!createdAtTimestamp: BigInt!creator: User!owner: User!}type User @entity {id: ID!tokens: [Token!]! @derivedFrom(field: "owner")created: [Token!]! @derivedFrom(field: "creator")}
Relationships via @derivedFrom:
Reverse lookups can be defined on an entity through the @derivedFrom field. This creates a virtual field on the entity that may be queried but cannot be set manually through the mappings API. Rather, it is derived from the relationship defined on the other entity. For such relationships, it rarely makes sense to store both sides of the relationship, and both indexing and query performance will be better when only one side is stored and the other is derived.
For one-to-many relationships, the relationship should always be stored on the ‘one’ side, and the ‘many’ side should always be derived. Storing the relationship this way, rather than storing an array of entities on the ‘many’ side, will result in dramatically better performance for both indexing and querying the subgraph. In general, storing arrays of entities should be avoided as much as is practical.
Code generation
Next run the following command:
graph codegen
In order to make working smart contracts, events, and entities easy and type-safe, the Graph CLI generates types from a combination of the subgraph’s GraphQL schema and the contract ABIs included in the data sources.
Updating the subgraph with the entities and mappings
Now you can update the main configuration in subgraph.yaml to use the entities that you have just created as well as configure their mappings.
To do so, first update the dataSources.mapping.entities field with the User and Token entities:
entities:- Token- User
Next, update the dataSources.mapping.eventHandlers to include only the following two event handlers:
eventHandlers:- event: TokenMetadataURIUpdated(indexed uint256,address,string)handler: handleTokenMetadataURIUpdated- event: TokenURIUpdated(indexed uint256,address,string)handler: handleTokenURIUpdated- event: Transfer(indexed address,indexed address,indexed uint256)handler: handleTransfer
These event handlers will map the Ethereum event to a function in the local project. In that function, we will be able to interact with and write to the Graph node.
Finally, update the configuration to add the startBlock:
source:address: "0xabEFBc9fD2F806065b4f3C237d4b59D9A97Bcac7"abi: TokenstartBlock: 11565020
The final subgraph.yaml file should look like this:
specVersion: 0.0.2schema:file: ./schema.graphqldataSources:- kind: ethereum/contractname: Tokennetwork: mainnetsource:address: '0xabEFBc9fD2F806065b4f3C237d4b59D9A97Bcac7'abi: TokenstartBlock: 11565020mapping:kind: ethereum/eventsapiVersion: 0.0.4language: wasm/assemblyscriptentities:- Token- Userabis:- name: Tokenfile: ./abis/Token.jsoneventHandlers:- event: TokenURIUpdated(indexed uint256,address,string)handler: handleTokenURIUpdated- event: Transfer(indexed address,indexed address,indexed uint256)handler: handleTransferfile: ./src/mapping.ts
Assembly Script Mappings
Next, we can configure the AssemblyScript mappings for handling the events defined in subgraph.yaml.
Open src/mappings.ts to write the mapping logic for the event mappings that we defined in the subgraph.yaml eventHandlers.
The mappings are written in AssemblyScript which is very much like TypeScript in its syntax. These mappings allow us to read from, and save data to, the Graph Node. You can also read data from smart contracts by interacting directly with a blockchain.
Two kinds of APIs are ready to use at this point: the Graph TypeScript library () and code generated from subgraph files by graph codegen.
The @graphprotocol/graph-ts library provides the following APIs:
- An API for working with smart contracts, events, blocks, transactions, and blockchain values.
- A store API to load and save entities from and to the Graph Node store.
- A log API to log messages to the Graph Node output and the Graph Explorer.
- An IPFS API to load files from IPFS.
- A JSON API to parse JSON data.
- A crypto API to use cryptographic functions.
- Low-level primitives to translate between different type systems such as Ethereum, JSON, GraphQL and AssemblyScript.
Update src/mappings.ts with the following code:
import {TokenURIUpdated as TokenURIUpdatedEvent,TokenMetadataURIUpdated as TokenMetadataURIUpdatedEvent,Transfer as TransferEvent,Token as TokenContract} from "../generated/Token/Token"import {Token, User} from '../generated/schema'export function handleTransfer(event: TransferEvent): void {let token = Token.load(event.params.tokenId.toString());if (!token) {token = new Token(event.params.tokenId.toString());token.creator = event.params.to.toHexString();token.tokenID = event.params.tokenId;token.createdAtTimestamp = event.block.timestamp;let tokenContract = TokenContract.bind(event.address);token.contentURI = tokenContract.tokenURI(event.params.tokenId);token.metadataURI = tokenContract.tokenMetadataURI(event.params.tokenId);}token.owner = event.params.to.toHexString();token.save();let user = User.load(event.params.to.toHexString());if (!user) {user = new User(event.params.to.toHexString());user.save();}}export function handleTokenURIUpdated(event: TokenURIUpdatedEvent): void {let token = Token.load(event.params._tokenId.toString());if (!token) return;token.contentURI = event.params._uri;token.save();}export function handleTokenMetadataURIUpdated(event: TokenMetadataURIUpdatedEvent): void {let token = Token.load(event.params._tokenId.toString());if (!token) return;token.metadataURI = event.params._uri;token.save();}
The handleTransfer function will be called any time a token is created or transferred from one part to another.
The handleTokenURIUpdated function will be called any time an owner of a token updates the content URI of a token.
The handleTokenMetadataURIUpdated function will be called any time an owner of a token updates the metadata of a token.
Deploying and Testing the Subgraph
Now that the subgraph is completed, it’s ready to be deployed to the Studio for testing.
Before we deploy, we first need to authenticate. To do so, copy the DEPLOY KEY to your clipboard. Next, open your CLI and run the following command:
graph auth --studio
When prompted, paste in your DEPLOY KEY.
Now you can deploy your subgraph using the deploy command:
graph deploy --studio <subgraph-name>
When prompted for a version label, choose a version for the subgraph.
Once the subgraph is deployed, the Studio should update with a new UI allowing you to test queries in the GraphQL playground as well as view logs and other details.
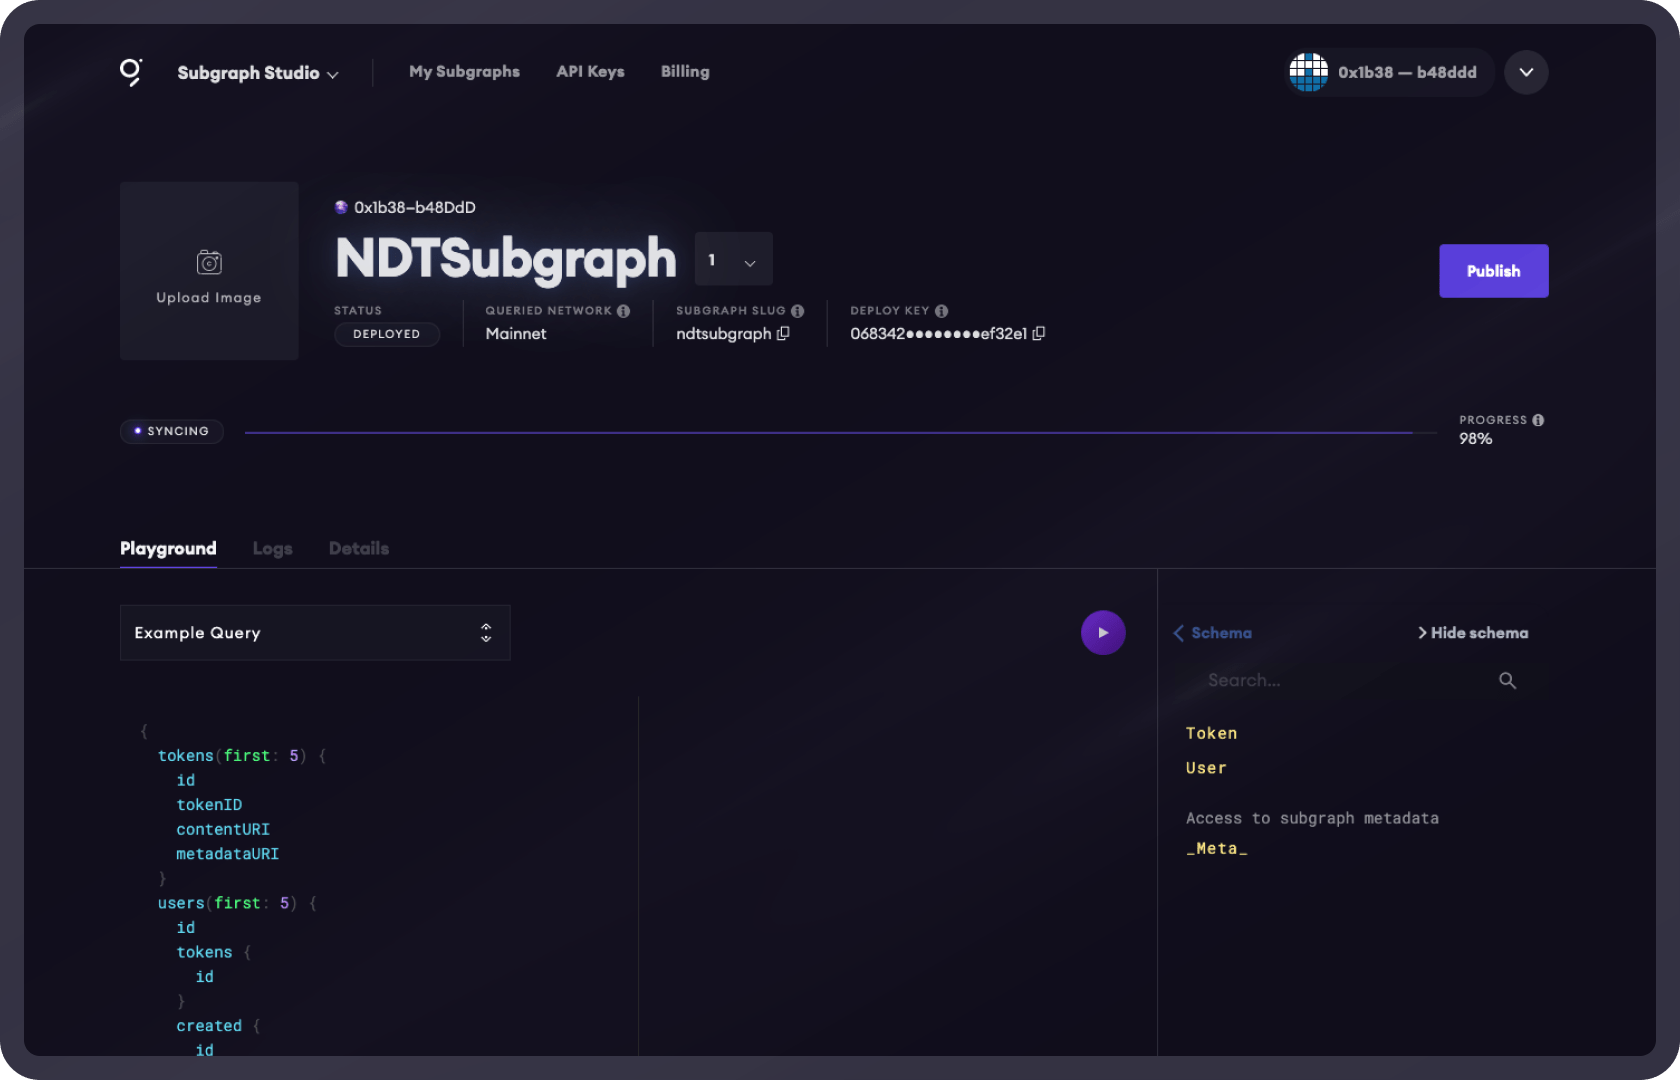
Now that the subgraph has been deployed successfully, we can begin querying for data.
To do so, you can run GraphQL queries for both Users and Tokens, as well as relational data between Users and Tokens. To test it out, let’s run the following query. This query will return an array of NFT data including the content URIs, token IDs, contentURI, and metadata URI for each token:
{tokens {idtokenIDcontentURImetadataURI}}
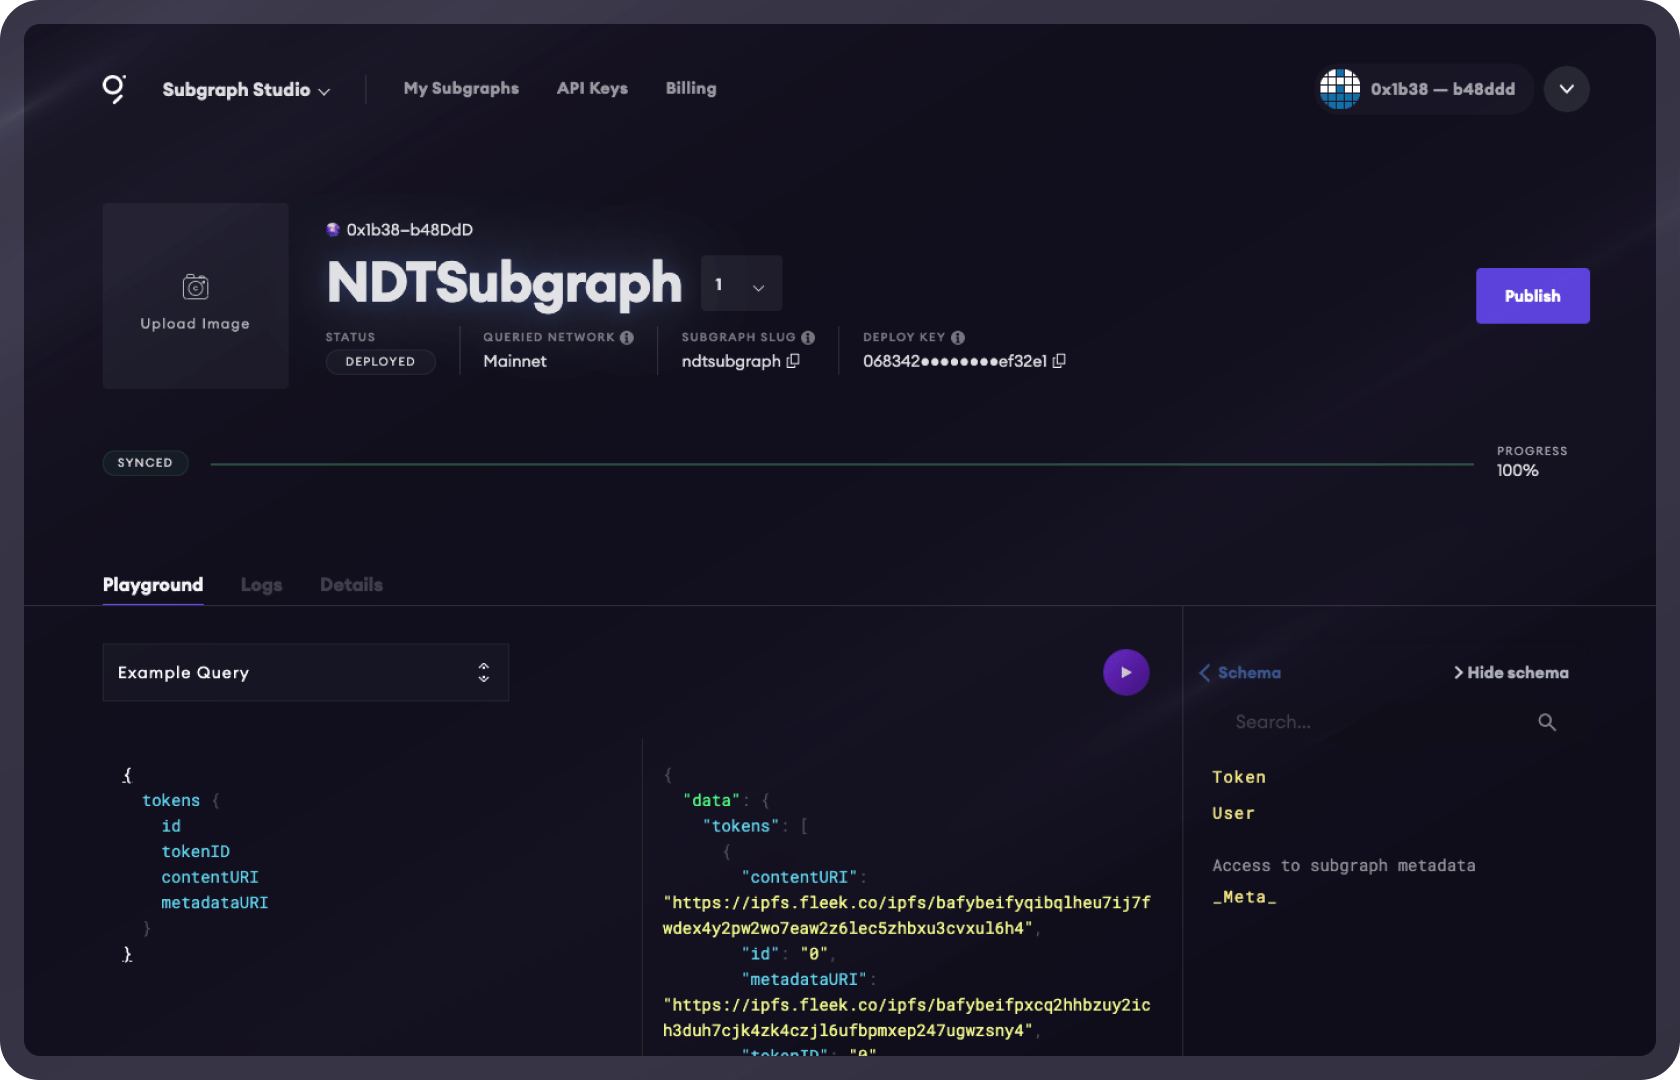
You can also pass in arguments for returning different selection sets, like filters and . For instance, let’s order items by their creation date and return them in a descending order:
{tokens(orderBy:createdAtTimestamp,orderDirection: desc) {idtokenIDcontentURImetadataURI}}
At this point, the subgraph has only been deployed to the Studio which can be thought of as a testing or staging environment. The next steps would be to deploy to either a testnet or mainnet.
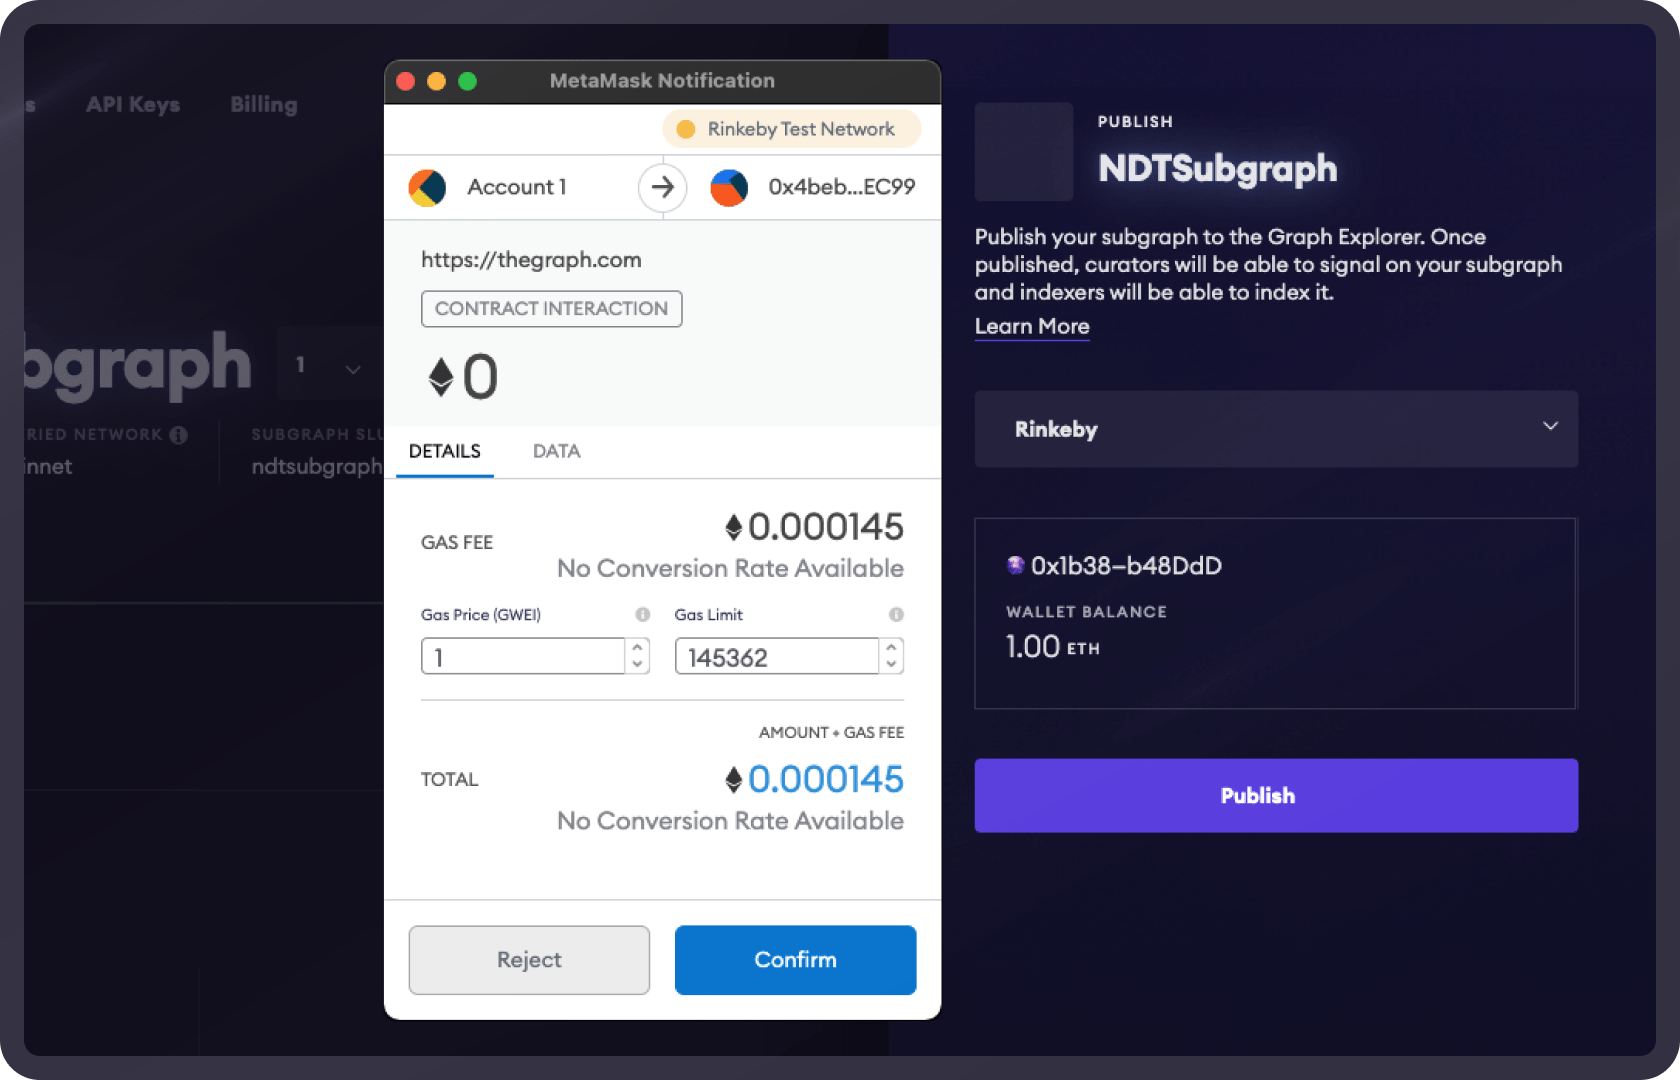
To deploy to a network, click the Publish button. Here, you will be prompted to choose which network you would like to deploy to.
Let’s test this out by switching to the Rinkeby testnet and publishing the subgraph there. Be sure you are connected to the right network with your MetaMask wallet.
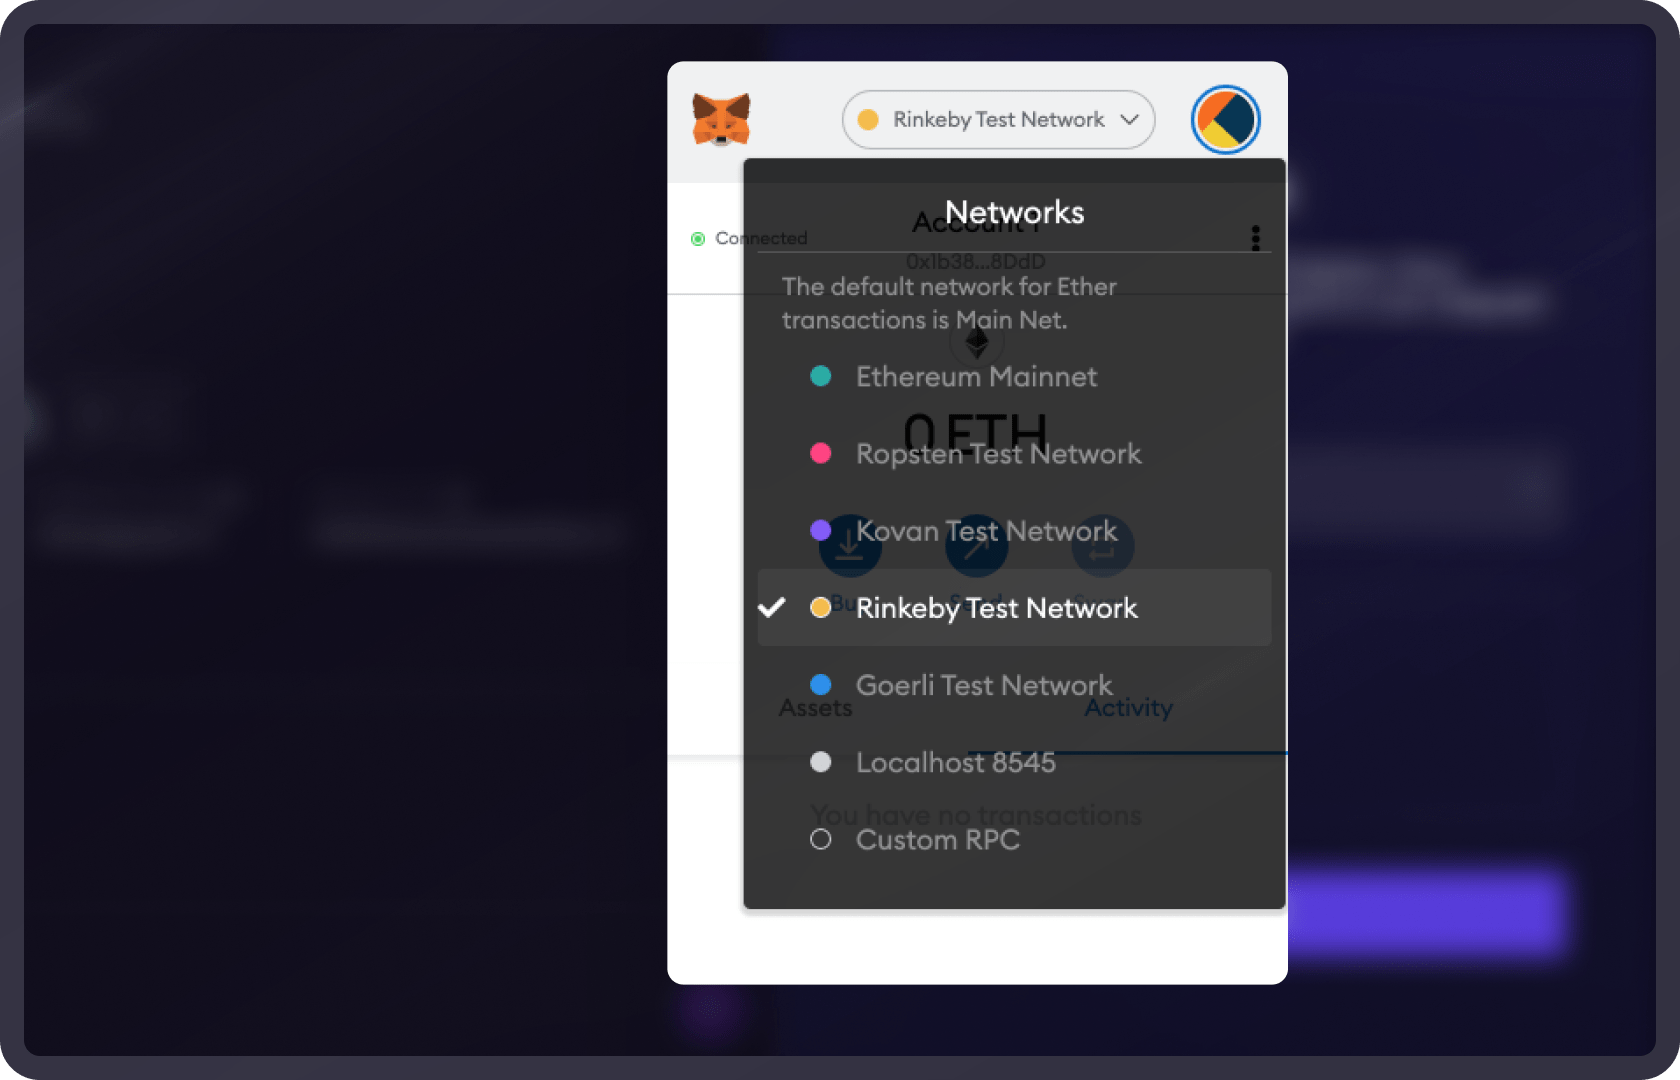
To deploy to Rinkeby, you will need to have some test funds in your wallet. If you do not have any, head over to and get some first.
Once you have received the test funds in your wallet, try publishing the subgraph to the Rinkeby Network.
You should next be prompted to approve the gas price to publish the subgraph.
Once the subgraph is successfully published, you should see confirmation as well as a link to view it in the Graph Explorer:
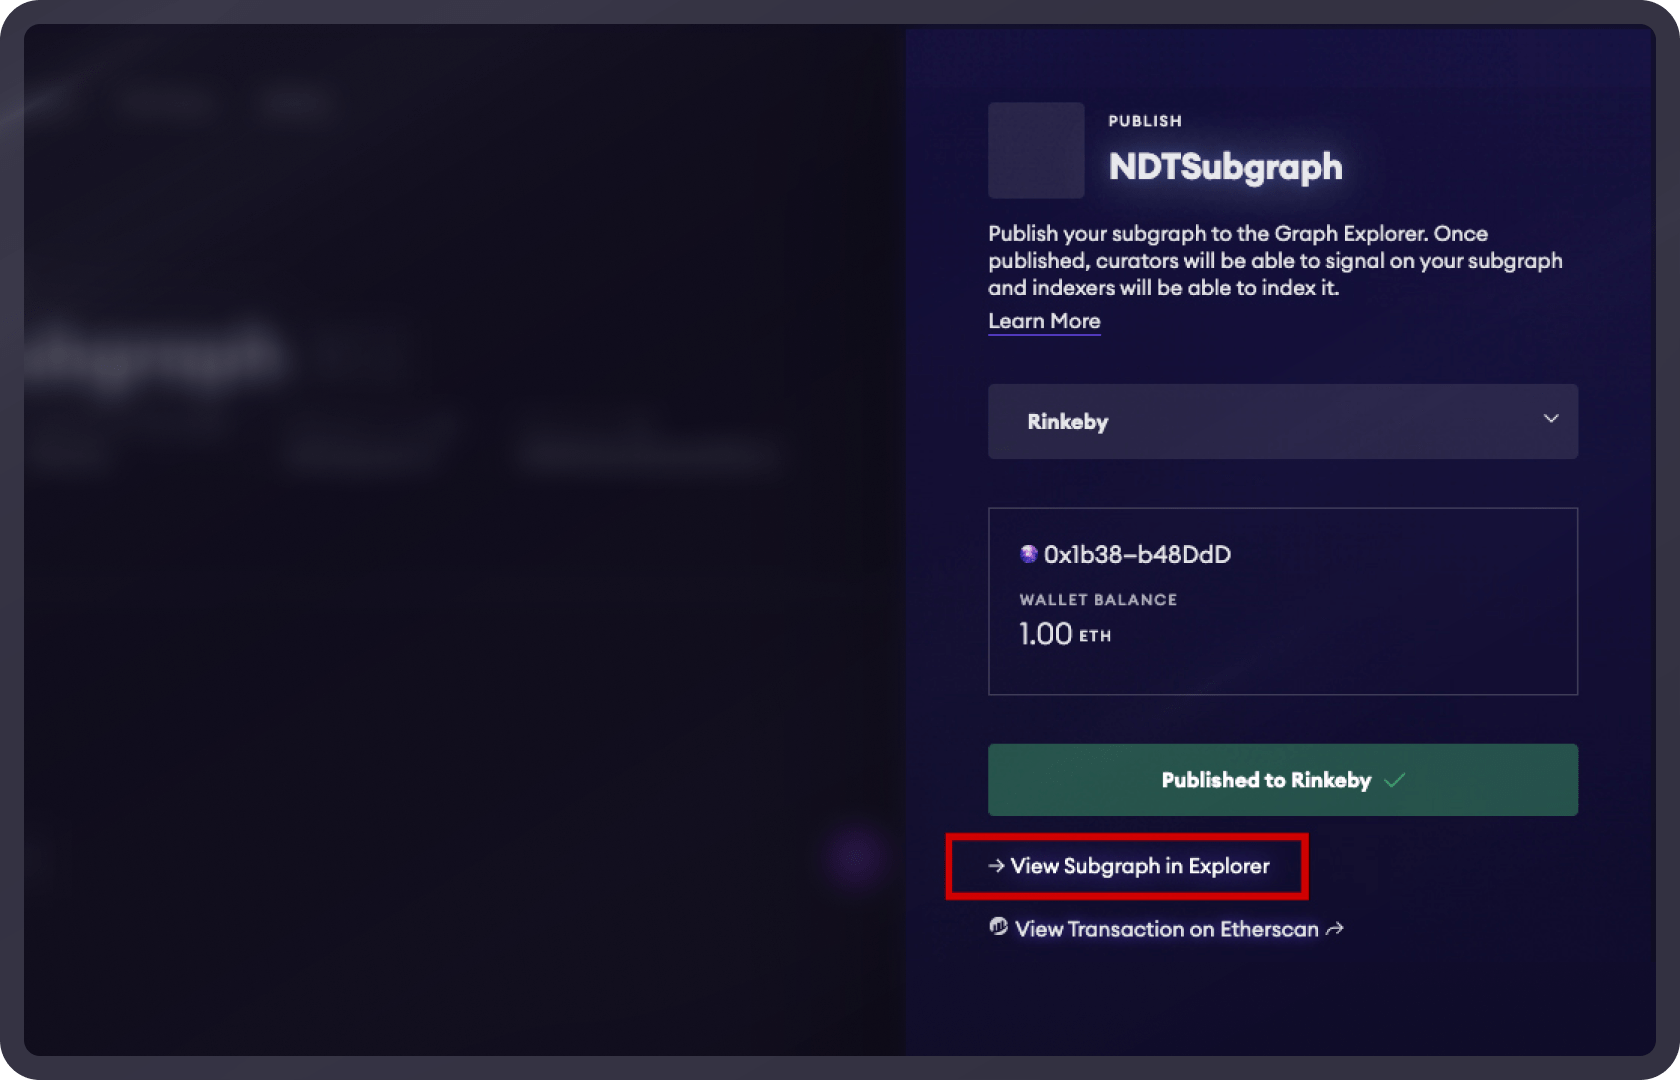
When you click on the link to view in Explorer, you should see a new view of your Subgraph with the ability to simulate queries as well as signaling.
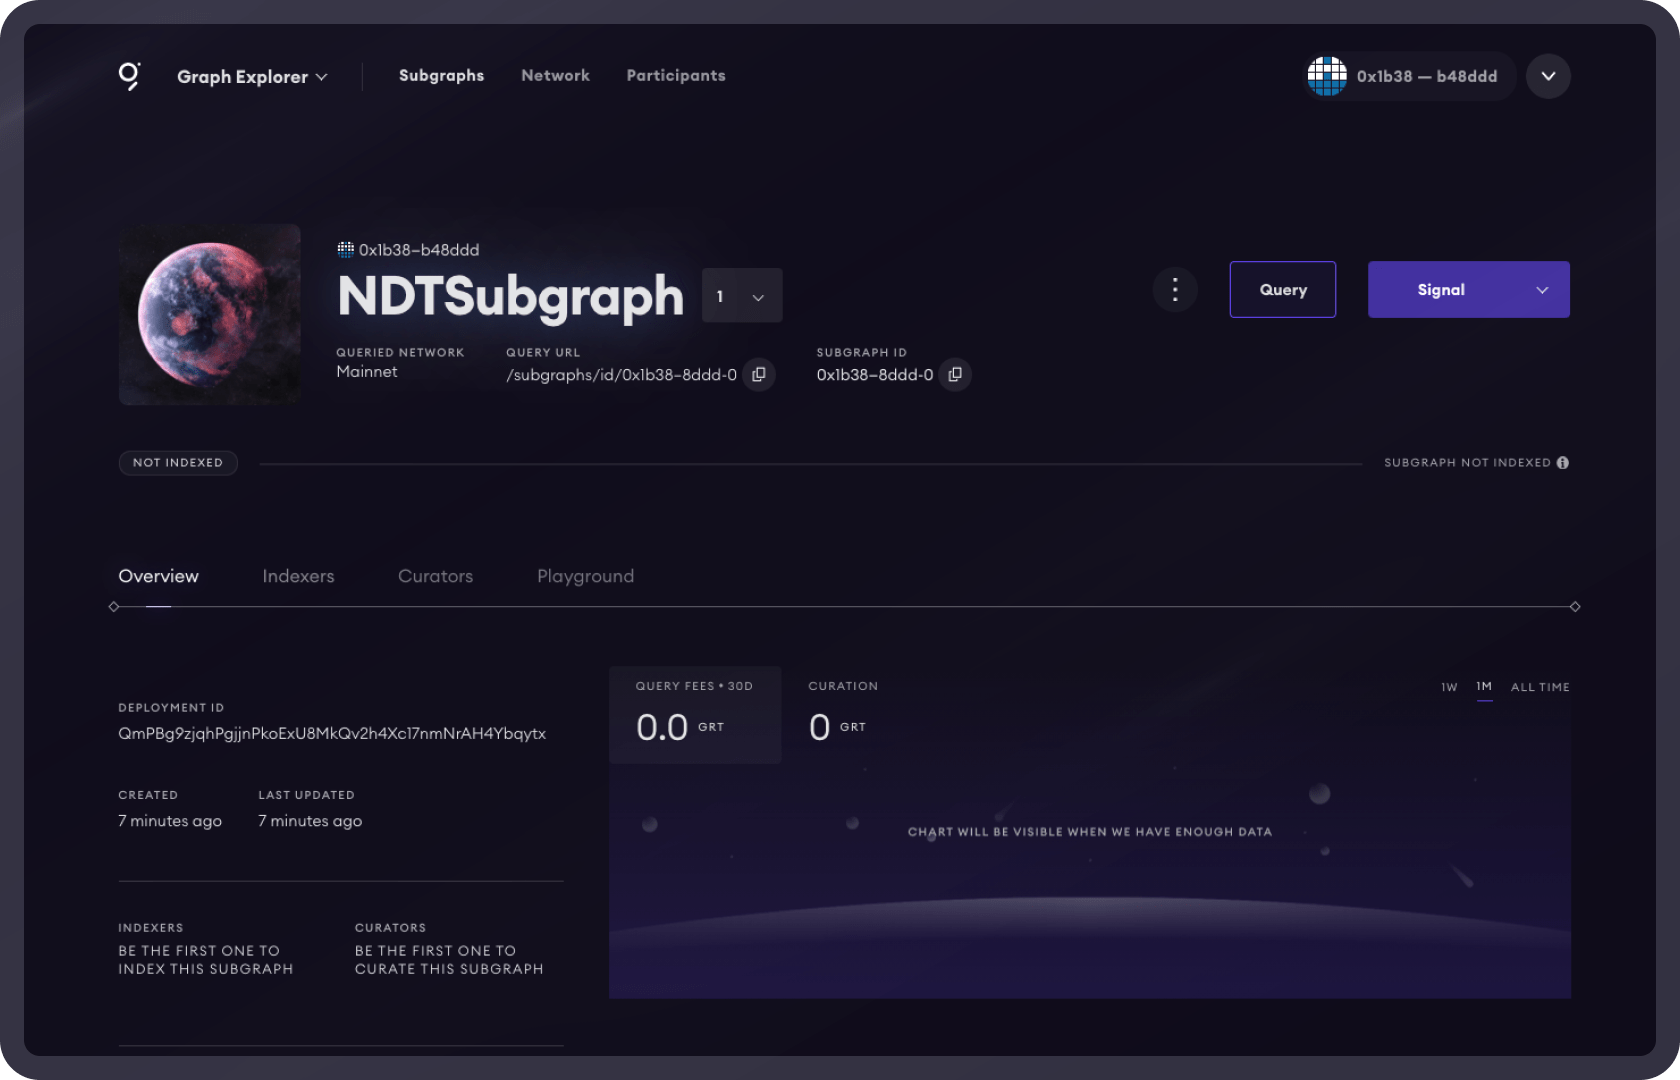
Curate on your subgraph!
Now that you’ve built and published your subgraph, you can also be rewarded for curating on it by signalling on your subgraph with GRT. To signal on your subgraph, you can use test Graph Tokens (GRT). To get test Graph Tokens, you can join and request tokens in the 🚰-testnet-faucet channel. When you’re ready you can signal on your subgraph on mainnet.
If you have any questions about building subgraphs, hop into to ask other developers or post on to start a discussion!
About The Graph
The Graph is a suite of blockchain data infrastructure products that extract, process, and deliver scalable blockchain data solutions across 60+ networks. The Graph enables application developers, data analysts, AI agents, and enterprise teams that need structured, real-time access to blockchain data. Products include Subgraphs, Firehose, Substreams, and Amp. As of early 2026, The Graph has served over 1.27 trillion queries to more than 75,000 projects, powered by a network of independent Indexers around the world.
Follow The Graph on , , , and . Join the community on The Graph’s , join technical discussions on The Graph’s .