How to Migrate Your Ethereum Subgraph to the Decentralized Network: A Step-by-Step Guide
Ethereum subgraphs to The Graph’s decentralized network. As web3 adoption grows, so does demand for scale and performance. Developers are faced with a major decision: to continue to rely on centralized tech or to switch to decentralized infrastructure.
For longevity and reliability, nothing beats decentralization. By eschewing centralized points of failure, you are offering your users a web3 app they can access consistently. Many projects have already validated the network in production and now is the perfect time for your project to migrate over. To help you migrate, here’s a step-by-step guide.
Assumptions
- You have already deployed a subgraph on the hosted service
- The subgraph is indexing Ethereum mainnet
- The subgraph does not have IPFS or full-text search dependencies (these are currently not supported on the decentralized network)
Resources
It’s also recommended to familiarize yourself with The Graph Network & its resources:
1. Review the role of each participant in the network.
- - Node operators in The Graph Network that stake Graph Tokens (GRT) in order to index subgraphs and serve queries to consumers
- - Curators use their knowledge of the web3 ecosystem to assess and signal on the subgraphs that should be indexed by Indexers in The Graph Network
- - Network participants who delegate (i.e., “stake”) GRT to one or more Indexers, thereby increasing the amount of queries they can serve
Note - Indexers select subgraphs to index based on the subgraph’s curation signal as it is best for their incentives. Read more about it . Therefore it is recommended to self-curate at least 10k GRT to have a sufficient number of Indexers to index the subgraph. As a dapp developer curating on your subgraph, it is recommended you leave this amount signaled for at least 1 - 2+ years for longevity of the subgraph on the network. You may also consider curating at the moment the subgraph is deployed to avoid risk of being front-run.
2. - This is a launchpad that lets you create subgraphs, add metadata, deploy and test them before publishing them to the Decentralized Network. Learn more about here.
3. - This is an organized view into the world of decentralized network subgraphs and network participant data. It also lets you interact with the protocol. With the Graph Explorer you can explore the network, its subgraphs, signal on subgraphs, view a subgraph’s Curators, see each subgraph’s Indexers, delegate to Indexers and much more. Learn more about Graph Explorer .
How to Migrate your subgraph from the Hosted Service to the Decentralized Network
Open a terminal (CLI) and navigate to the folder where the source code for the subgraph that you are trying to deploy, and follow these steps:
- Run
yarn installto install all of the subgraph dependencies - Make sure you have the latest versions of and installed. As the time of writing it is @graphprotocol/[email protected] and @graphprotocol/[email protected]
- Ensure your
apiVersionin subgraph.yaml is greater than or equal to 0.0.5. The latest version is 0.0.6. - Run
graph codegenwith the changes that you might have to make with the new version - Run
graph buildto check if your subgraph still builds. If there are build errors, please refer to the - Then, sign in to with your Wallet (e.g. MetaMask) or Gnosis Safe Multisig followed by one of the EOAs (externally owned address) of the multisig
- Create a subgraph. Select “Ethereum Mainnet” as the indexed network and give it a meaningful name. One name example is “Yearn Vaults” — it’s better to use simple, descriptive words.
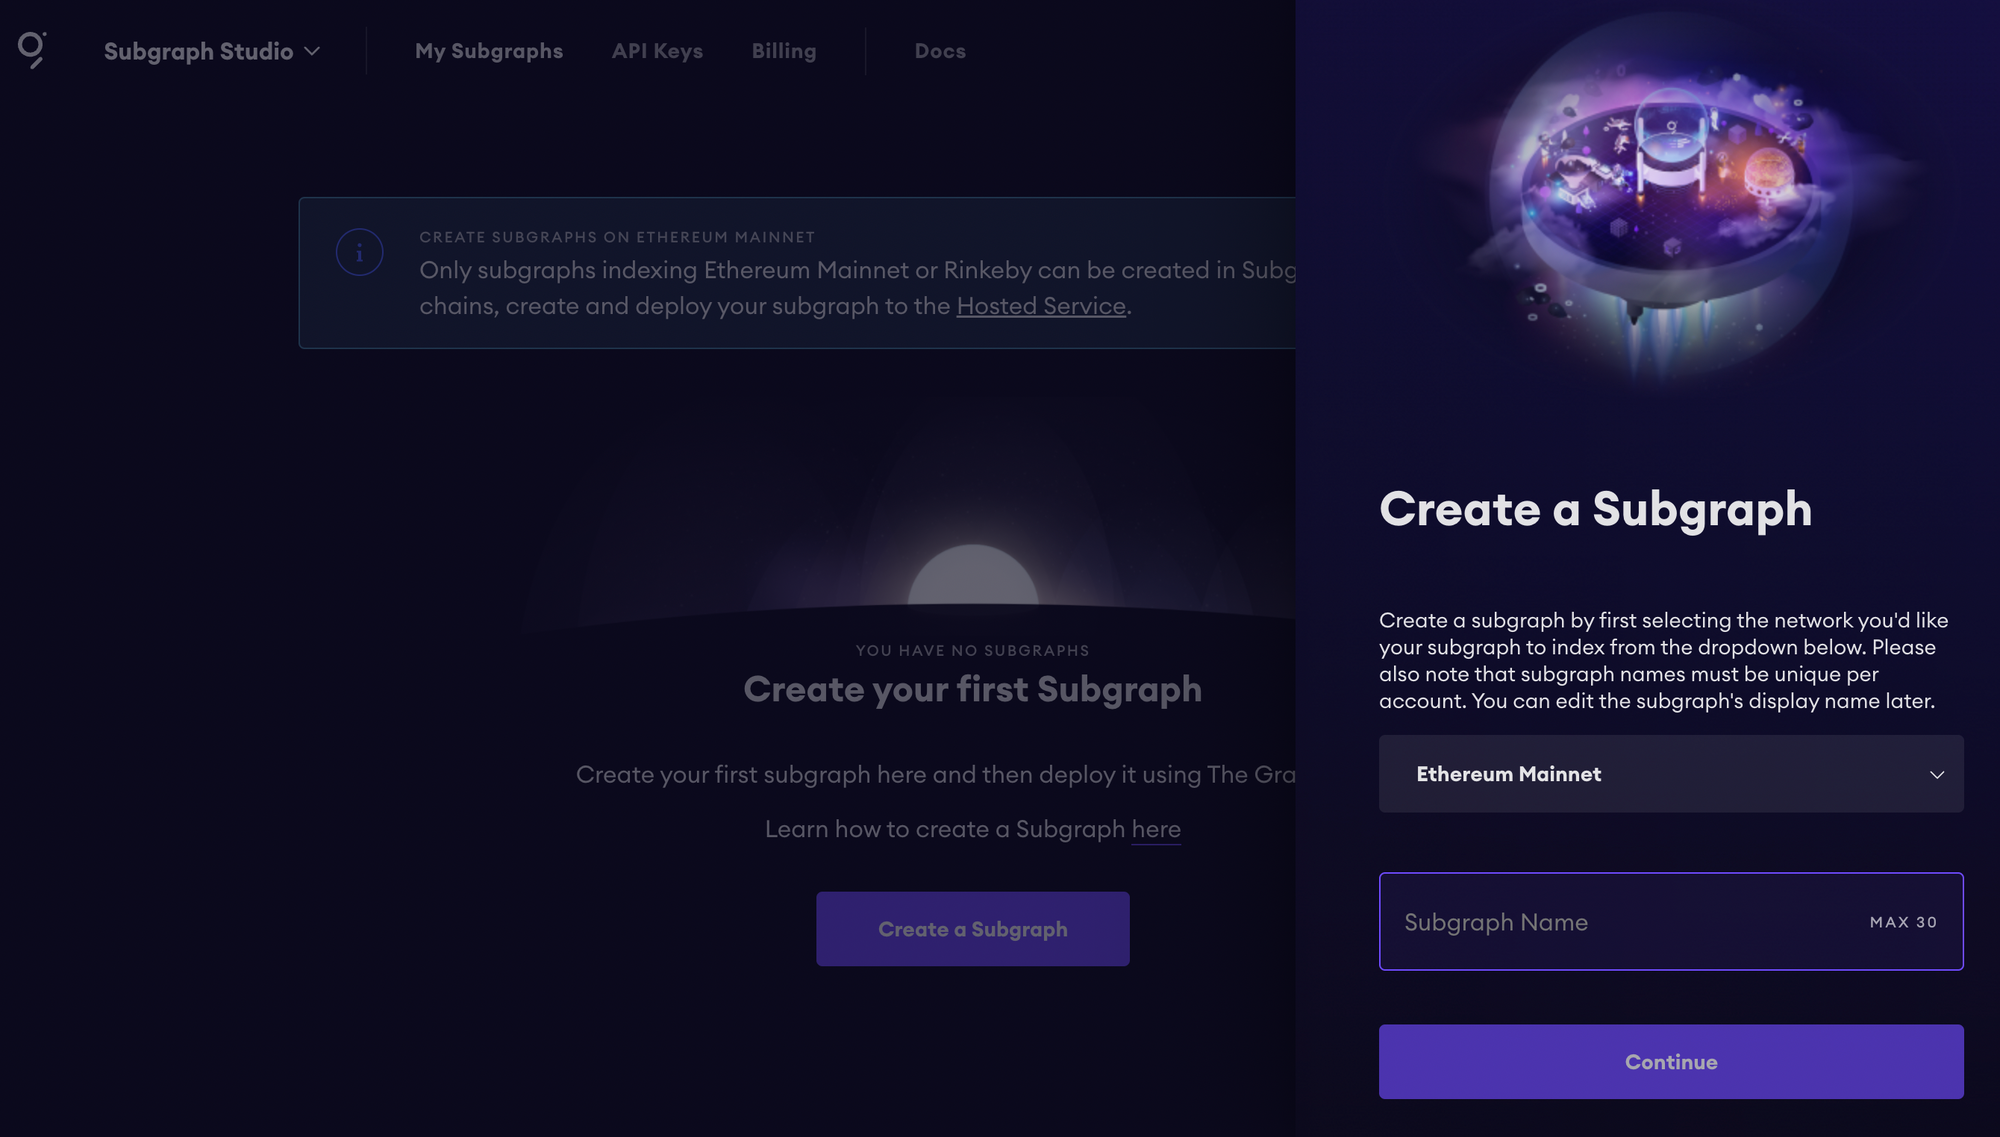
- Fill in the details once the subgraph is created, including the subgraph’s description, display name, and the image of the project. An informative description will give Curators more context and potentially attract more signal on your subgraph.

- In the right column in the subgraph studio as seen in the image above, there are instructions on how to create a new subgraph. Since we are migrating an existing subgraph, we are only interested in two commands: Auth and deploy. You can copy/paste those by clicking on the
 symbol.
 - Go back to your terminal and paste these commands:graph auth --studio <deploy-key>graph deploy --studio <subgraph-slug>
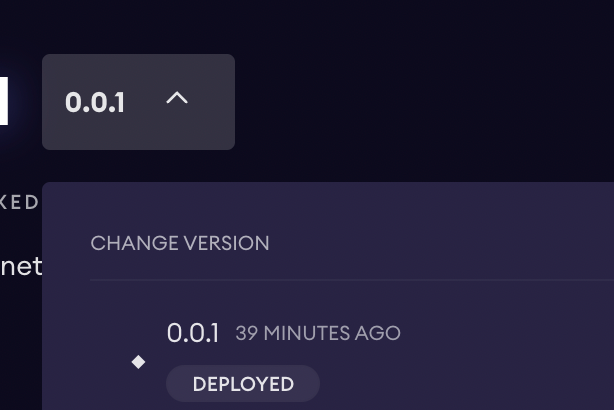
- Enter the initial subgraph version label. For example:
v0.0.1
At this point, your subgraph is now deployed on Subgraph Studio, but not yet published to the decentralized network.
You can now test the subgraph to make sure it is working as intended using the temporary query URL as seen on top of the right column above. As this name already suggests, this is a temporary URL and should not be used in production.
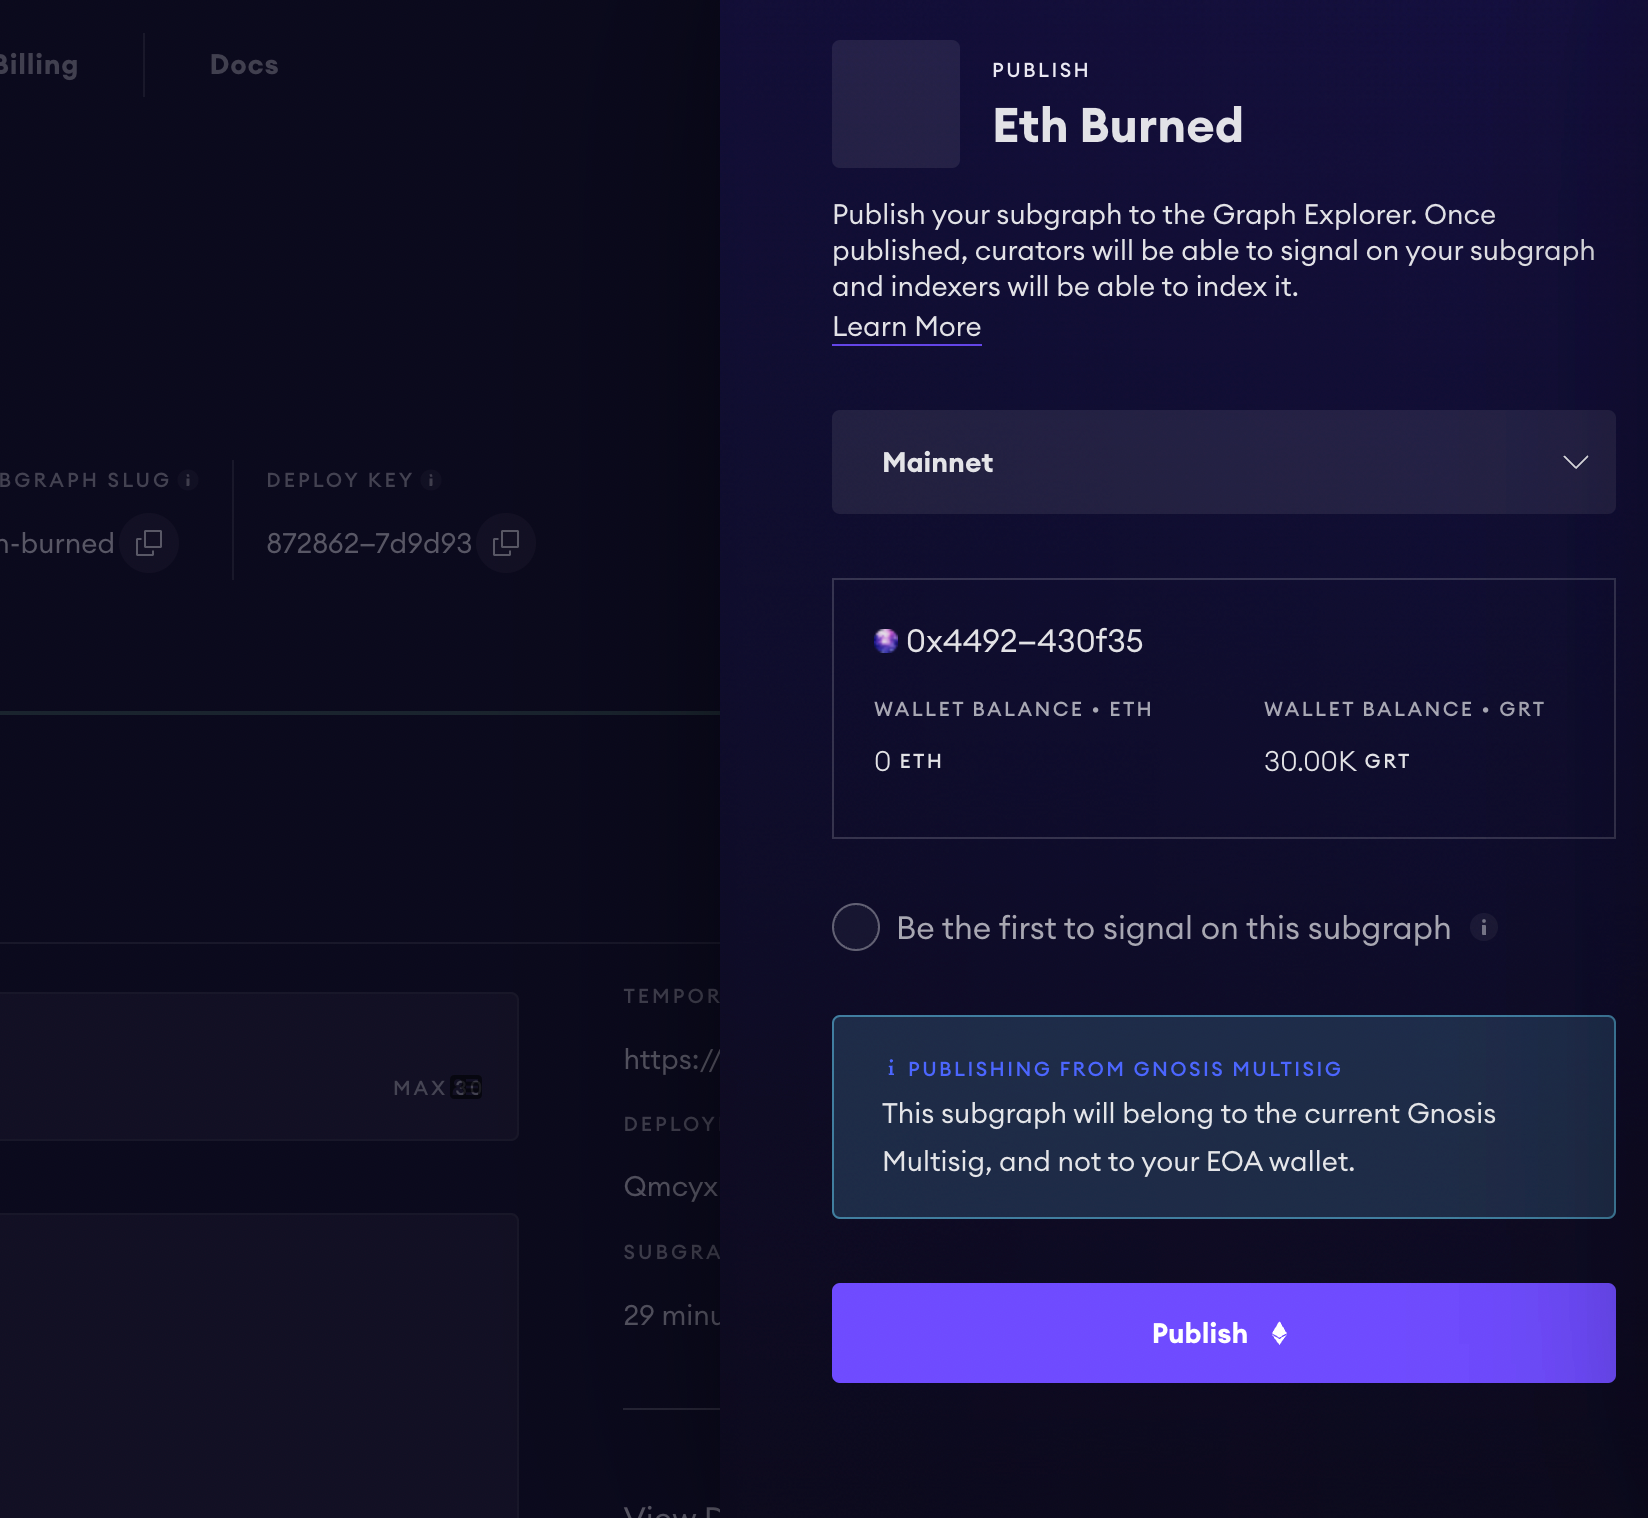
Once you are ready for your subgraph to be discoverable in Graph Explorer by Curators and Indexers, you may do so using the Publish button.
You will also have the option to combine signaling and publishing your subgraph to the network — which is recommended for attracting Indexers and being the first Curator on your Subgraph.
For developers in need of assistance migrating their subgraphs, applications for migration grants are being accepted for a limited time. Note: a 1% curation tax is incurred upon initial curation signal of a subgraph. Example: If you signal 10,000 GRT on your subgraph, your subgraph will have 9,900 GRT signal. 100 GRT are burnt.
Once a subgraph is published to the decentralized network and has enough curation signal, indexers will start indexing your subgraph. Depending on the complexity and efficiency of your subgraph, this can take a while. In the meantime, you can create your API key.
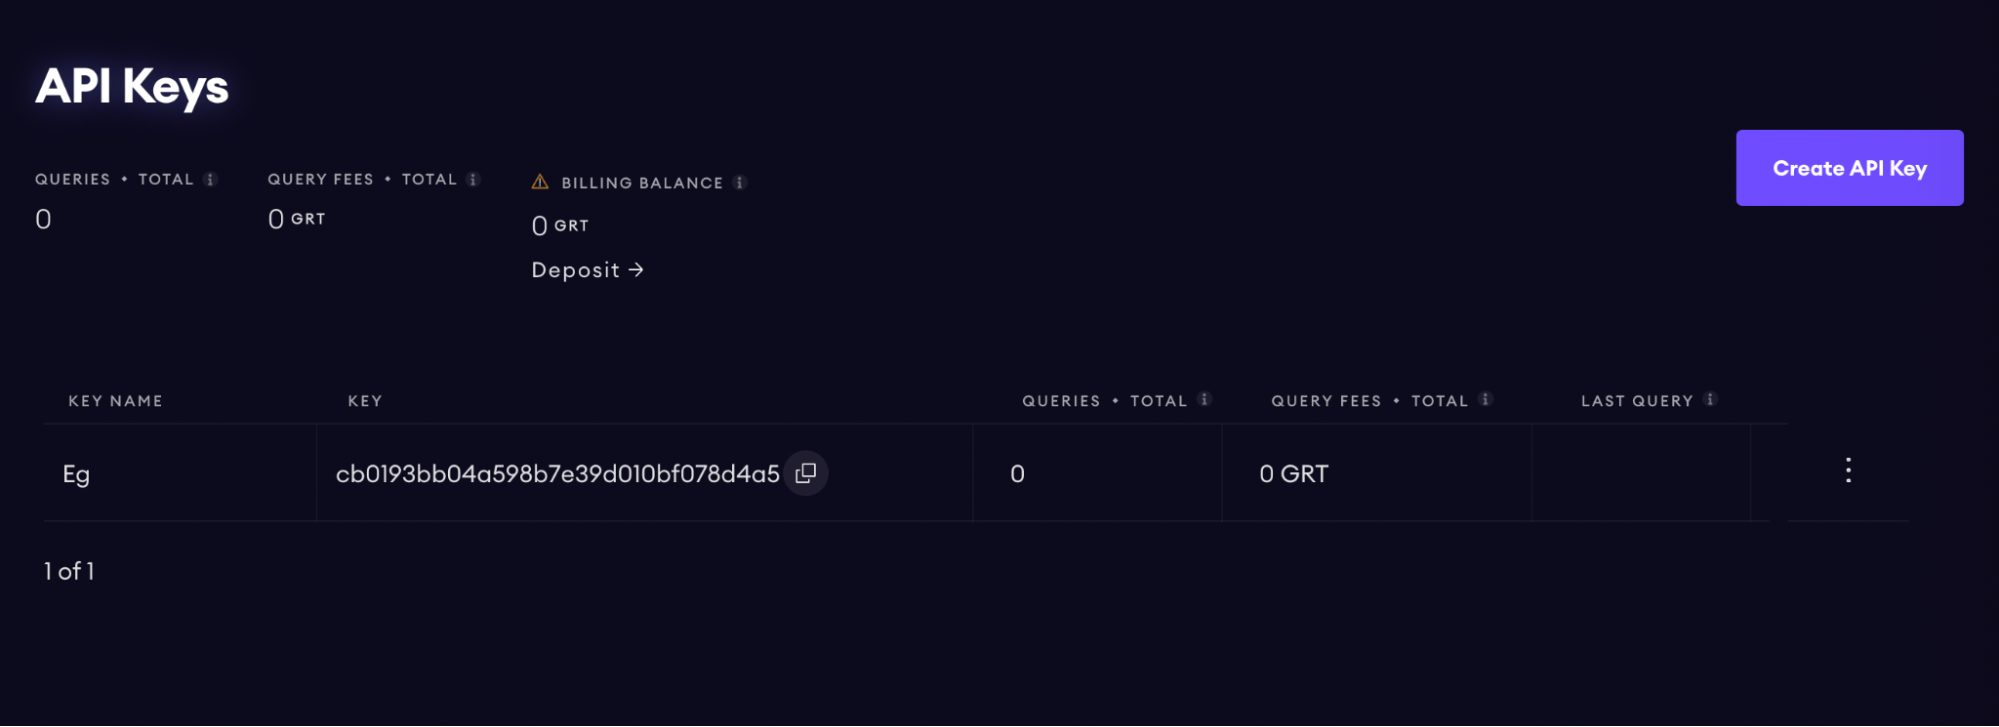
Create an API key
You can generate an API key in Subgraph Studio .
At the end of each week, an invoice will be generated based on the query fees that have been incurred during this period. This invoice will be paid automatically using the GRT available in your balance. Your balance will be updated after the cost of your query fees are withdrawn. Query fees are paid in GRT via the Polygon network. You will need to add GRT to the Polygon billing contract to enable your API key via the following steps:
- Purchase GRT on an exchange of your choice
- Send the GRT to your wallet
- On the Billing page in Studio, click on Add GRT
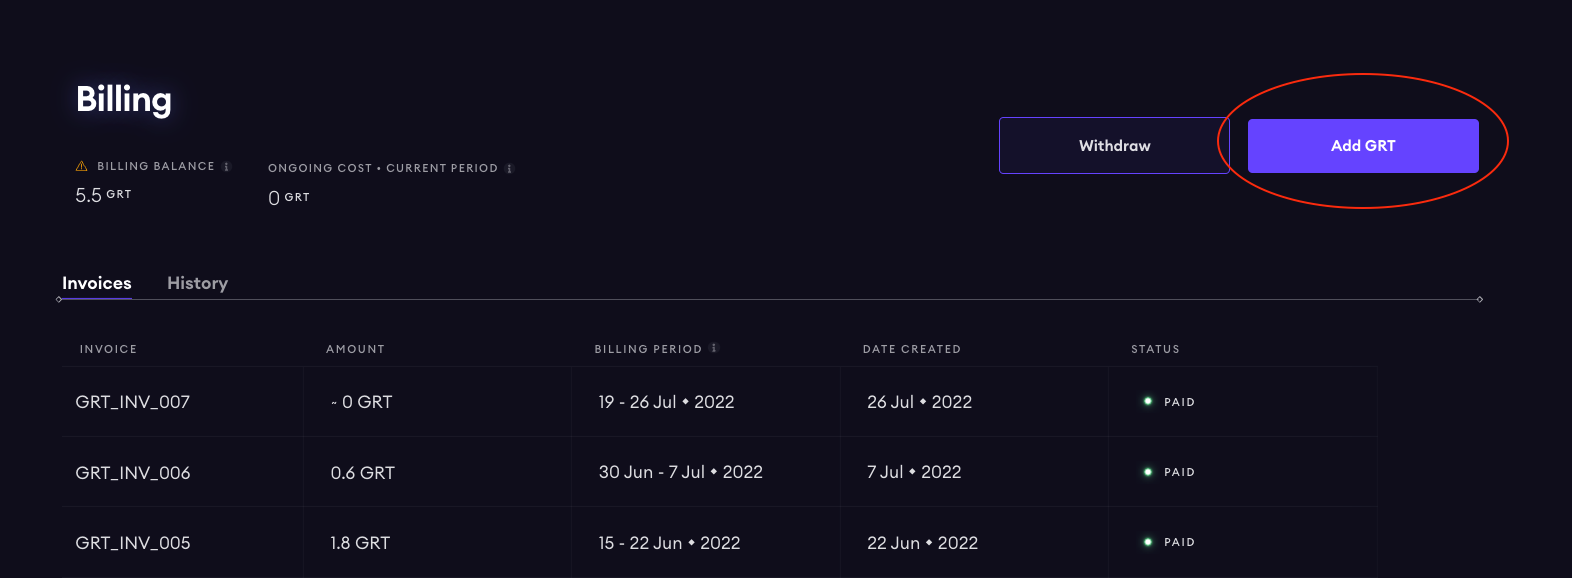
- Follow the steps to bridge the GRT to Polygon. Once bridged, add the GRT to your billing balance
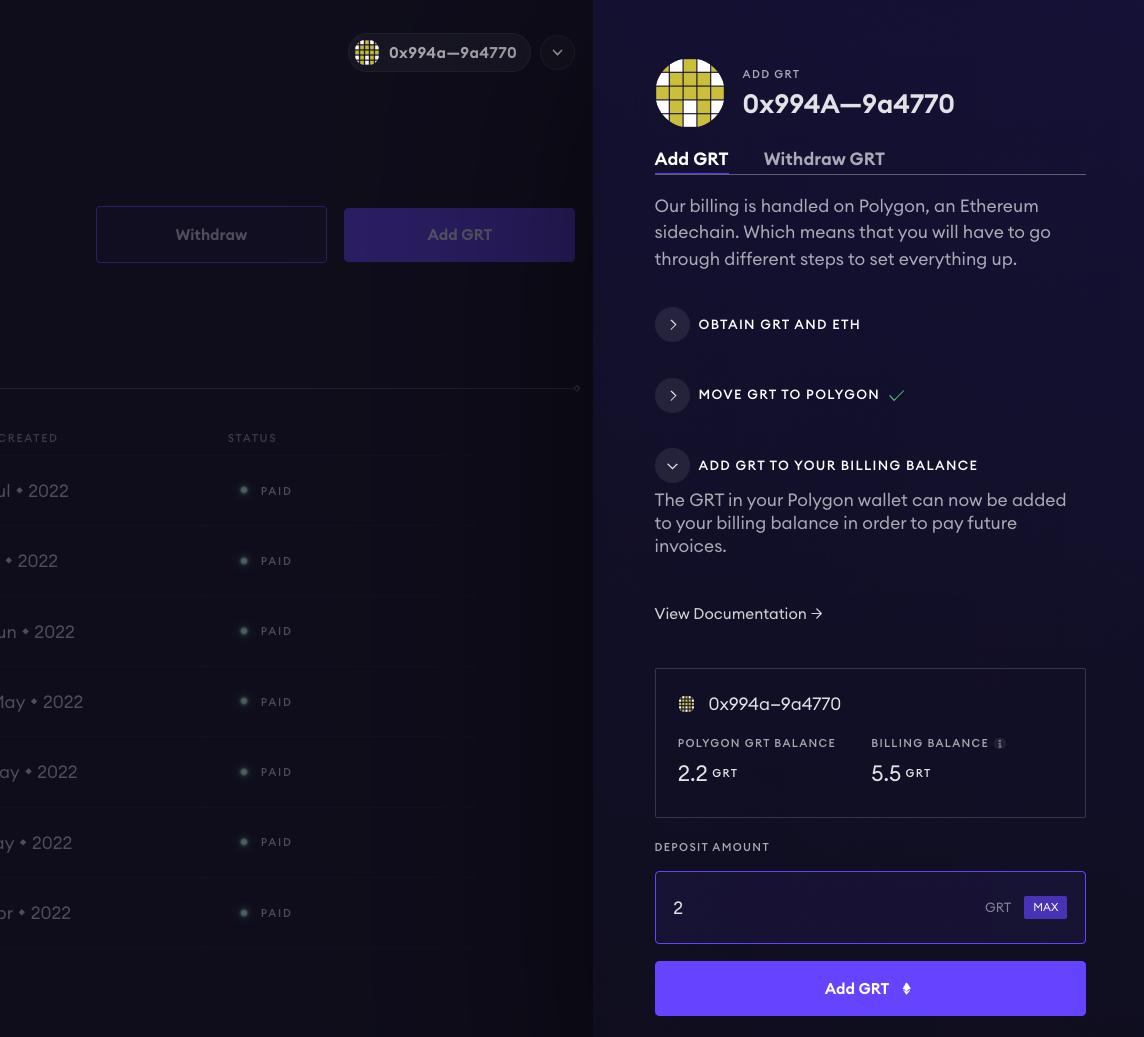
Note: This process is slightly different if you are using a multisig since you can not bridge GRT to Polygon with a multisig. You would need to send the GRT to an EOA (externally owned address) and bridge it from there to Polygon. Once on Polygon, you can load the multisig address. We have created a special tool to help you through these steps:
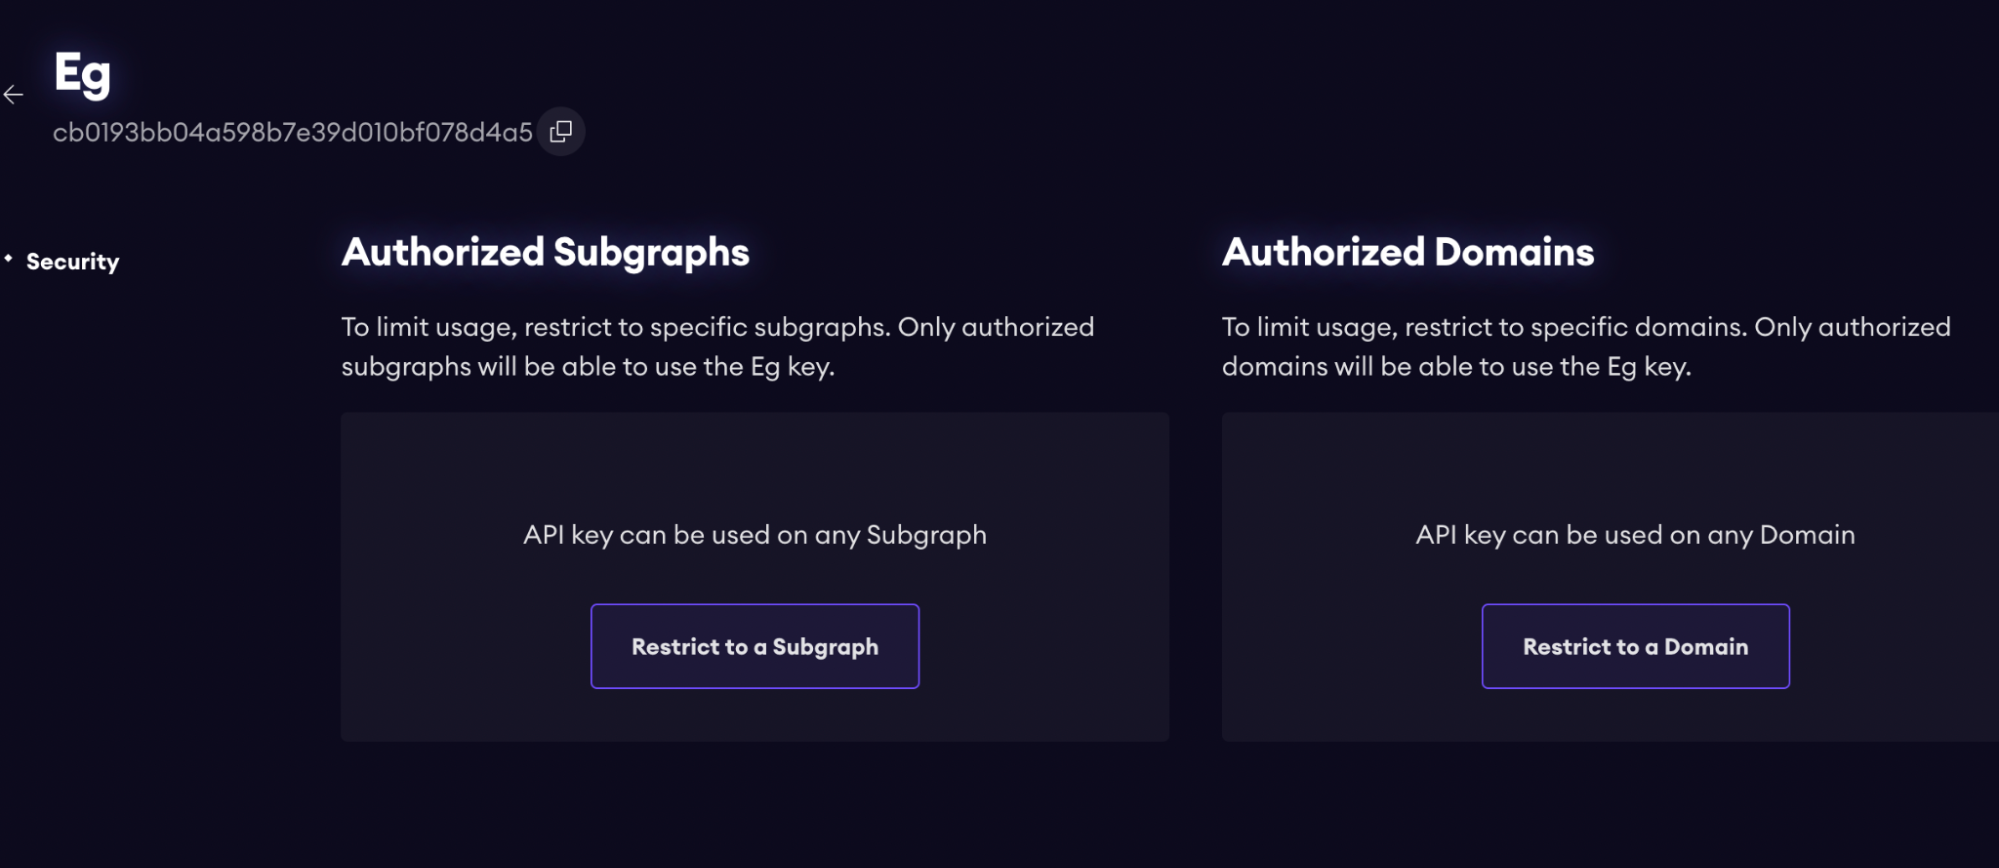
We recommend locking down the API by limiting its usage in two ways:
- Authorized Subgraphs
- Authorized Domain
Querying your subgraph on the decentralized network
Now you can check the indexing status of the indexers on the network in Graph Explorer (example ). The green line at the top indicates that at the time of posting 8 Indexers successfully indexed that subgraph. Also in the Indexer tab you can see which indexers picked up your subgraph.
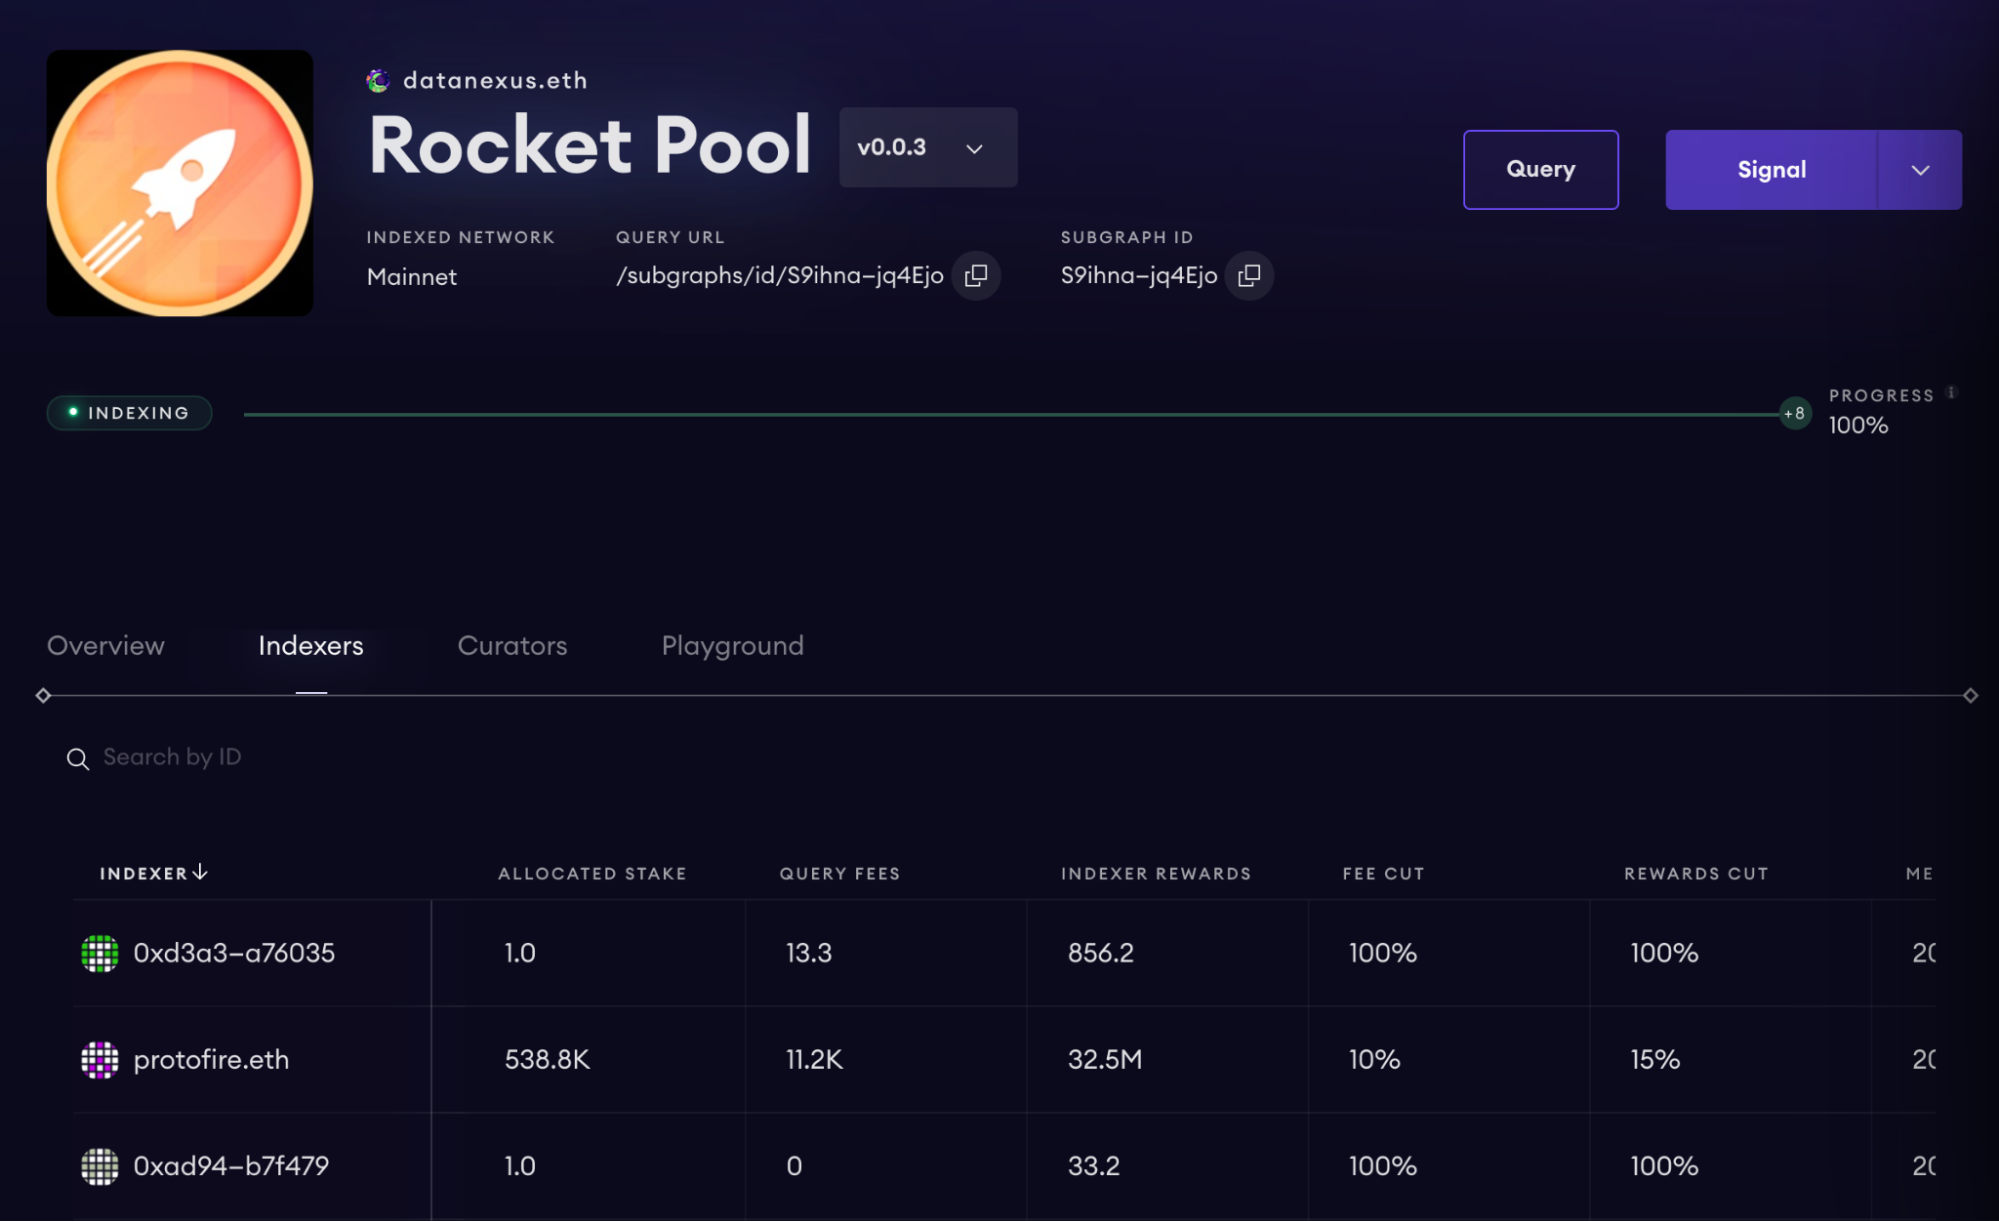
As soon as the first indexer has fully indexed your subgraph you can start to query the subgraph on the decentralized network. In order to retrieve the query URL for your subgraph, you can copy/paste it by clicking on the symbol next to the query URL. You will see something like this:
Important: Make sure to replace with an actual API key generated in the section above.
You can now use that Query URL in your dapp to send your GraphQL requests to.
Congratulations! You are now a pioneer of decentralization!
Note: Due to the distributed nature of the network it might be the case that different Indexers have indexed up to different blocks. In order to only receive fresh data you can specify the minimum block an indexer has to have indexed in order to serve your query with the block: { number_gte: $minBlock } field argument as shown in the example below:
{ stakers(block: { number_gte: 14486109 }) { id } }
More information about the nature of the network and how to handle re-orgs are described in the documentation article .
Updating your subgraph on the decentralized network
Make the updates to the code as usual and then deploy the new subgraph to the studio with the same command as discussed above:
graph deploy --studio <subgraph-slug>
It will ask for a version label for this new version. It should be sequential to the previous version. For example: v0.0.2
Once the updated subgraph is deployed to the studio you can test it using the temporary query URL as discussed above.
You might want to deploy a new version to the studio without publishing to the network while developing your subgraph and use the temporary query URL to test it. Once your new version is ready for production you can publish only that version network.
Please note that a total of 0.5% of the curation amount is charged as update tax when a new version is published. This tax is split evenly between subgraph developers and Curators. So you provide 0.25% of the total curation while publishing a new version.
Calculation example:
A subgraph has 10,000 GRT signal and a new version is published.
- You need to have 25 GRT in your wallet which will be burned during that transaction as curation fee.
- The other 25 GRT will be deducted from the signal: The subgraph will only have 9,975 GRT curation signal after the update.
Most Indexers will index the latest version of a subgraph and the version before to provide stability. Most Curators have set their signal to auto-migrate to the latest version.
Thanks for migrating your subgraph to the decentralized network! You’re joining a community of like-minded pioneers working to distribute power from centralized authorities. We hope you enjoy the better reliability and faster performance from the network. Don’t hesitate to reach out if you need support — send an email to [email protected] for assistance migrating, whether you’re running into a technical issue, are interested in grants to cover migration costs (available for a limited time) or anything else related to subgraph migration.
About The Graph
The Graph is a suite of blockchain data infrastructure products that extract, process, and deliver scalable blockchain data solutions across 60+ networks. The Graph enables application developers, data analysts, AI agents, and enterprise teams that need structured, real-time access to blockchain data. Products include Subgraphs, Firehose, Substreams, and Amp. As of early 2026, The Graph has served over 1.27 trillion queries to more than 75,000 projects, powered by a network of independent Indexers around the world.
Follow The Graph on , , , and . Join the community on The Graph’s , join technical discussions on The Graph’s .