

The Complete Guide to Building a Full-Stack Web3 Dapp on Base L2
Get started and build a full stack web3 dapp on Coinbase’s powerful L2, . Follow this tutorial and check out all the code for this project .
We’ll start with , a statically-typed programming language designed for implementing on Ethereum & EVM-compatible blockchains. We’ll use to deploy our smart contract to , a testnet that provides a sandbox environment for developers to test their dapps for Base.
To interact with blockchain data, we’ll use a on , a decentralized protocol for indexing and querying blockchain data. Subgraphs are open APIS that allow us to efficiently extract the data we need from the Base Sepolia blockchain. We’ll harness the power of to interact with the blockchain and our application's front-end will be built using .
By the end of this tutorial, you will:
- Fully understand these technologies.
- Use them to create a fully functional web3 dapp.
Whether you're a seasoned developer looking to transition into web3 or an eager beginner ready to dive into decentralized applications, this tutorial will provide you with the knowledge and skills you need to start building your own web3 projects immediately.
Ether Coin Flip Overview
The dapp is called Ether Coin Flip. It is a simple betting game where two players can wager on the outcome of a “coin flip.” Here’s how it works:
- Player 1 calls the
newCoinFlip()function with any amount of Ether - A new coin flip is created, assigned an ID and it gets added to the EtherCoinFlipStructs mapping
- Player 2 calls the
endCoinFlip()function by passing the coin flip’s ID, and is required to use the same amount of Ether is player 1 - The smart contract uses pseudo-randomness to select a winner of the coin flip
- All the Ether is sent to the winner of the coin flip
It’s important to note that this is for tutorial purposes only and should not be deployed to mainnet. While pseudo-randomness can be useful for this tutorial, this smart contract could be manipulated by node validators if real funds were being used. In order to use randomness in a secure and verifiable way, consider using .
How to write a smart contract on Base
There are a number of powerful tools that enable you to write, test, and deploy smart contracts. We’ll be using , a web-based integrated development environment (IDE).
Before we deep dive into the contract, let's identify the license and declare the version of Solidity we’d like to use:
// SPDX-License-Identifier: MITpragma solidity ^0.8.27;
Next, we can initialize the contract. We declare the EtherCoinFlip contract and all the Solidity code inside this contract will be inside these brackets.
contract EtherCoinFlip {}
To establish the basic structure of the game with all the necessary components, we can define a struct named EtherCoinFlipStruct. This struct will represent the details of each coin flip and will be mapped to a unique coin flip ID. The struct should contain the following information:
- The public key addresses of both players
- The wager amount
- The total amount of Ether involved
- The addresses of the winner and the loser
- A bool representing if the coin flip is active or not
struct EtherCoinFlipStruct {uint256 ID;address payable betStarter;uint256 startingWager;address payable betEnder;uint256 endingWager;uint256 etherTotal;address payable winner;address payable loser;bool isActive;}
We can initialize a uint256 variable for the number of coin flips. For the sake of clarity, we can call it numberOfCoinFlips and set it to 1 to keep track of the total number of coin flips that have happened.
uint256 numberOfCoinFlips = 1;
Next, we can create a mapping to link every coin flip ID to its corresponding EtherCoinFlipStruct. This way, a coin flip ID will be associated with all the correct details.
mapping(uint256 => EtherCoinFlipStruct) public EtherCoinFlipStructs;
Now before we start writing the main functions that will power Ether Coin Flip, we first need to create that emit the necessary data. These events will be important later on when we build a subgraph on The Graph. If you’re unfamiliar with the difference between events & functions, you can read .
We can declare two events: StartedCoinFlip and FinishedCoinFlip. These events will emit information about the coin flip when the respective function finishes. We’ll make sure that only the most important information is being emitted. For the StartedCoinFlip event, we can emit the following:
- The coin flip ID
- Who started the coin flip
- The wager
- Whether it is active or not
We can write the StartedCoinFlip event like this:
event StartedCoinFlip(uint256 indexed theCoinFlipID, address indexed theBetStarter, uint256 theStartingWager, bool isActive);
Next, we’ll need the FinishedCoinFlip event, which will emit the following:
- The coin flip ID
- The winner of the coin flip
- The loser
- The coin flip’s activity status (which will now be set to false)
We can write the FinishedCoinFlip like this:
event FinishedCoinFlip(uint256 indexed theCoinFlipID, address indexed winner, address indexed loser, bool isActive);
Now that we've set up the basic structure of our EtherCoinFlip contract, it's time to implement the core functionality that will allow players to start and end coin flips. We'll create three main functions:
newCoinFlip()- Allows a player to start a new coin flip.endCoinFlip()- Allows another player to end a coin flip. The smart contract determines the winner and distributes the total Ether to them.getActiveCoinFlips()- Returns a list of all active coin flips.
Let's explore each of these functions, understand how they work, and clarify the Solidity code involved!
Starting a Coin Flip
The newCoinFlip() function allows a player to start a new coin flip by sending Ether to the contract. Here's how it's defined:
function newCoinFlip() public payable returns (uint256 coinFlipID) {address payable player1 = payable(msg.sender);coinFlipID = numberOfCoinFlips++;EtherCoinFlipStructs[coinFlipID] = EtherCoinFlipStruct(coinFlipID,player1,msg.value,payable(address(0)),0,0,payable(address(0)),payable(address(0)),true);emit StartedCoinFlip(coinFlipID, player1, msg.value, true);}
Notice how this function is both public **and** payable. This means that anyone can view it and also send Ether to it. The function will return the coin flip’s ID so that the player can identify their coin flip.
Let’s walk through what is happening in this function:
- The wallet address sending the Ether (msg.sender) is being assigned to player1
- The
coinFlipIDis being assigned an ID that is 1 more than the current number of coin flips (numberOfCoinFlips++) - The
coinFlipIDis the key associated with the struct we wrote earlier (EtherCoinFlipStructs) and assigned values for the available details. - Our
StartedCoinFlip()event is emitting thecoinFlipID, player1, the wager in Ether, and theisActiveboolean is being assigned true.
Ending a Coin Flip
Next, we can explore the endCoinFlip() function. Here it is:
function endCoinFlip(uint256 coinFlipID) public payable {EtherCoinFlipStruct storage currentCoinFlip = EtherCoinFlipStructs[coinFlipID];require(currentCoinFlip.isActive, "Coin flip already finished");address payable player2 = payable(msg.sender);require(msg.value >= (currentCoinFlip.startingWager * 99 / 100) &&msg.value <= (currentCoinFlip.startingWager * 101 / 100),"Ending wager must be within 1% of the starting wager");require(coinFlipID == currentCoinFlip.ID, "Invalid coin flip ID");currentCoinFlip.betEnder = player2;currentCoinFlip.endingWager = msg.value;currentCoinFlip.etherTotal = currentCoinFlip.startingWager + currentCoinFlip.endingWager;bytes32 randomHash = keccak256(abi.encodePacked(block.chainid, block.gaslimit, block.number, block.timestamp, msg.sender));uint256 randomResult = uint256(randomHash);if ((randomResult % 2) == 0) {currentCoinFlip.winner = currentCoinFlip.betStarter;currentCoinFlip.loser = currentCoinFlip.betEnder;} else {currentCoinFlip.winner = currentCoinFlip.betEnder;currentCoinFlip.loser = currentCoinFlip.betStarter;}(bool sent, ) = currentCoinFlip.winner.call{value: currentCoinFlip.etherTotal}("");require(sent, "Failed to send Ether to the winner");currentCoinFlip.isActive = false;emit FinishedCoinFlip(currentCoinFlip.ID, currentCoinFlip.winner, currentCoinFlip.loser, false);}
Again, the function is public and payable.
Let's walk through what is happening in this function:
- Retrieve the Coin Flip Struct: The function accesses the coin flip associated with the provided
coinFlipIDfrom theEtherCoinFlipStructsmapping.EtherCoinFlipStruct storage currentCoinFlip = EtherCoinFlipStructs[coinFlipID]; - Check if the Coin Flip is Active: It ensures that the coin flip hasn't already been finished.require(currentCoinFlip.isActive, "Coin flip already finished");
- Assign Player 2: The address of the caller (
msg.sender) is assigned toplayer2.address payable player2 = payable(msg.sender); - Validate the Wager Amount: It checks that the amount of Ether sent (
msg.value) is within 1% of the starting wager, ensuring both players have similar stakes.require(msg.value >= (currentCoinFlip.startingWager * 99 / 100) &&msg.value <= (currentCoinFlip.startingWager * 101 / 100),"Ending wager must be within 1% of the starting wager"); - Verify the Coin Flip ID: It confirms that the provided
coinFlipIDmatches the ID stored in the struct.require(coinFlipID == currentCoinFlip.ID, "Invalid coin flip ID"); - Update the Coin Flip Struct with Player 2's Details: Assigns
player2tobetEnder, records their wager, and calculates the total Ether involved.currentCoinFlip.betEnder = player2;currentCoinFlip.endingWager = msg.value;currentCoinFlip.etherTotal = currentCoinFlip.startingWager + currentCoinFlip.endingWager; - Generate Pseudo-Randomness: Creates a pseudo-random hash using blockchain properties and the caller's address to determine the winner.bytes32 randomHash = keccak256(abi.encodePacked(block.chainid, block.gaslimit, block.number, block.timestamp, msg.sender));uint256 randomResult = uint256(randomHash);
- Determine the Winner and Loser: Based on the random result, it assigns the winner and loser.if ((randomResult % 2) == 0) {currentCoinFlip.winner = currentCoinFlip.betStarter;currentCoinFlip.loser = currentCoinFlip.betEnder;} else {currentCoinFlip.winner = currentCoinFlip.betEnder;currentCoinFlip.loser = currentCoinFlip.betStarter;}
- Transfer Ether to the Winner: Sends the total Ether from both wagers to the winner's address.(bool sent, ) = currentCoinFlip.winner.call{value: currentCoinFlip.etherTotal}("");require(sent, "Failed to send Ether to the winner");
- Deactivate the Coin Flip: Sets the
isActiveflag tofalseto indicate the coin flip is finished.currentCoinFlip.isActive = false; - Emit the
FinishedCoinFlipEvent: Emits an event with the coin flip ID, winner's address, loser's address, and the updatedisActivestatus.emit FinishedCoinFlip(currentCoinFlip.ID, currentCoinFlip.winner, currentCoinFlip.loser, false);
Getting Active Coin Flips
The getActiveCoinFlips() function allows anyone to retrieve a list of all active coin flips. Here's how it's defined:
function getActiveCoinFlips() public view returns (EtherCoinFlipStruct[] memory) {uint256 activeCount = 0;for (uint256 i = 1; i < numberOfCoinFlips; i++) {if (EtherCoinFlipStructs[i].isActive) {activeCount++;}}EtherCoinFlipStruct[] memory activeFlips = new EtherCoinFlipStruct[](activeCount);uint256 currentIndex = 0;for (uint256 i = 1; i < numberOfCoinFlips; i++) {if (EtherCoinFlipStructs[i].isActive) {activeFlips[currentIndex] = EtherCoinFlipStructs[i];currentIndex++;}}return activeFlips;}
This function is public and view, meaning it can be called externally and doesn't modify the state of the contract. It returns an array of EtherCoinFlipStruct representing the active coin flips.
Let's walk through what is happening in this function:
- Initialize Active Coin Flip Counter: Starts by initializing a counter
activeCountto zero.uint256 activeCount = 0; - Count the Active Coin Flips: Iterates through all coin flips from ID 1 up to
numberOfCoinFlips - 1and incrementsactiveCountfor each active coin flip.for (uint256 i = 1; i < numberOfCoinFlips; i++) {if (EtherCoinFlipStructs[i].isActive) {activeCount++;}} - Create an Array to Hold Active Coin Flips: Creates a new in-memory array
activeFlipswith a size equal to the number of active coin flips.EtherCoinFlipStruct[] memory activeFlips = new EtherCoinFlipStruct[](activeCount); - Initialize an Index for the Array: Initializes a variable
currentIndexto zero to track the array index.uint256 currentIndex = 0; - Populate the Array with Active Coin Flips: Iterates through the coin flips again, adding each active coin flip to the
activeFlipsarray and incrementingcurrentIndex.for (uint256 i = 1; i < numberOfCoinFlips; i++) {if (EtherCoinFlipStructs[i].isActive) {activeFlips[currentIndex] = EtherCoinFlipStructs[i];currentIndex++;}} - Return the Array of Active Coin Flips: Returns the
activeFlipsarray containing all active coin flips.return activeFlips;
By understanding these functions, you're now ready to use the Ether Coin Flip smart contract! You can start new coin flips, end coin flips, and retrieve active coin flips—all essential for building the front-end of your dapp.
To wrap up this section, here is the complete smart contract:
// SPDX-License-Identifier: MITpragma solidity ^0.8.27;contract EtherCoinFlip {struct EtherCoinFlipStruct {uint256 ID;address payable betStarter;uint256 startingWager;address payable betEnder;uint256 endingWager;uint256 etherTotal;address payable winner;address payable loser;bool isActive;}uint256 numberOfCoinFlips = 1;mapping(uint256 => EtherCoinFlipStruct) public EtherCoinFlipStructs;event StartedCoinFlip(uint256 indexed theCoinFlipID, address indexed theBetStarter, uint256 theStartingWager, bool isActive);event FinishedCoinFlip(uint256 indexed theCoinFlipID, address indexed winner, address indexed loser, bool isActive);function newCoinFlip() public payable returns (uint256 coinFlipID) {address payable player1 = payable(msg.sender);coinFlipID = numberOfCoinFlips++;EtherCoinFlipStructs[coinFlipID] = EtherCoinFlipStruct(coinFlipID,player1,msg.value,payable(address(0)),0,0,payable(address(0)),payable(address(0)),true);emit StartedCoinFlip(coinFlipID, player1, msg.value, true);}function endCoinFlip(uint256 coinFlipID) public payable {EtherCoinFlipStruct storage currentCoinFlip = EtherCoinFlipStructs[coinFlipID];require(currentCoinFlip.isActive, "Coin flip already finished");address payable player2 = payable(msg.sender);require(msg.value >= (currentCoinFlip.startingWager * 99 / 100) &&msg.value <= (currentCoinFlip.startingWager * 101 / 100),"Ending wager must be within 1% of the starting wager");require(coinFlipID == currentCoinFlip.ID, "Invalid coin flip ID");currentCoinFlip.betEnder = player2;currentCoinFlip.endingWager = msg.value;currentCoinFlip.etherTotal = currentCoinFlip.startingWager + currentCoinFlip.endingWager;bytes32 randomHash = keccak256(abi.encodePacked(block.chainid, block.gaslimit, block.number, block.timestamp, msg.sender));uint256 randomResult = uint256(randomHash);if ((randomResult % 2) == 0) {currentCoinFlip.winner = currentCoinFlip.betStarter;currentCoinFlip.loser = currentCoinFlip.betEnder;} else {currentCoinFlip.winner = currentCoinFlip.betEnder;currentCoinFlip.loser = currentCoinFlip.betStarter;}(bool sent, ) = currentCoinFlip.winner.call{value: currentCoinFlip.etherTotal}("");require(sent, "Failed to send Ether to the winner");currentCoinFlip.isActive = false;emit FinishedCoinFlip(currentCoinFlip.ID, currentCoinFlip.winner, currentCoinFlip.loser, false);}function getActiveCoinFlips() public view returns (EtherCoinFlipStruct[] memory) {uint256 activeCount = 0;for (uint256 i = 1; i < numberOfCoinFlips; i++) {if (EtherCoinFlipStructs[i].isActive) {activeCount++;}}EtherCoinFlipStruct[] memory activeFlips = new EtherCoinFlipStruct[](activeCount);uint256 currentIndex = 0;for (uint256 i = 1; i < numberOfCoinFlips; i++) {if (EtherCoinFlipStructs[i].isActive) {activeFlips[currentIndex] = EtherCoinFlipStructs[i];currentIndex++;}}return activeFlips;}}
Next, we can begin testing the smart contract on testnet using Ethereum Remix!
Testing your Base smart contract in Ethereum Remix
Now that we have our smart contract code ready, it's time to test it and deploy it to the Base Sepolia testnet. We'll use Ethereum Remix, a powerful web-based IDE for Ethereum smart contract development. In this section, we'll cover:
- Testing the smart contract on Remix
- Deploying the contract to Base Sepolia using an injected Web3 provider (MetaMask)
- Interacting with the deployed contract using Remix's UI and your crypto wallet
Prerequisites
Before we begin, ensure you have the following:
- A crypto wallet installed on your web browser (, , , etc.)
- Base Sepolia set up on MetaMask ()
- Testnet Ether on the Base Sepolia network ()
You can also go ahead and paste the smart contract into a new Solidity file.
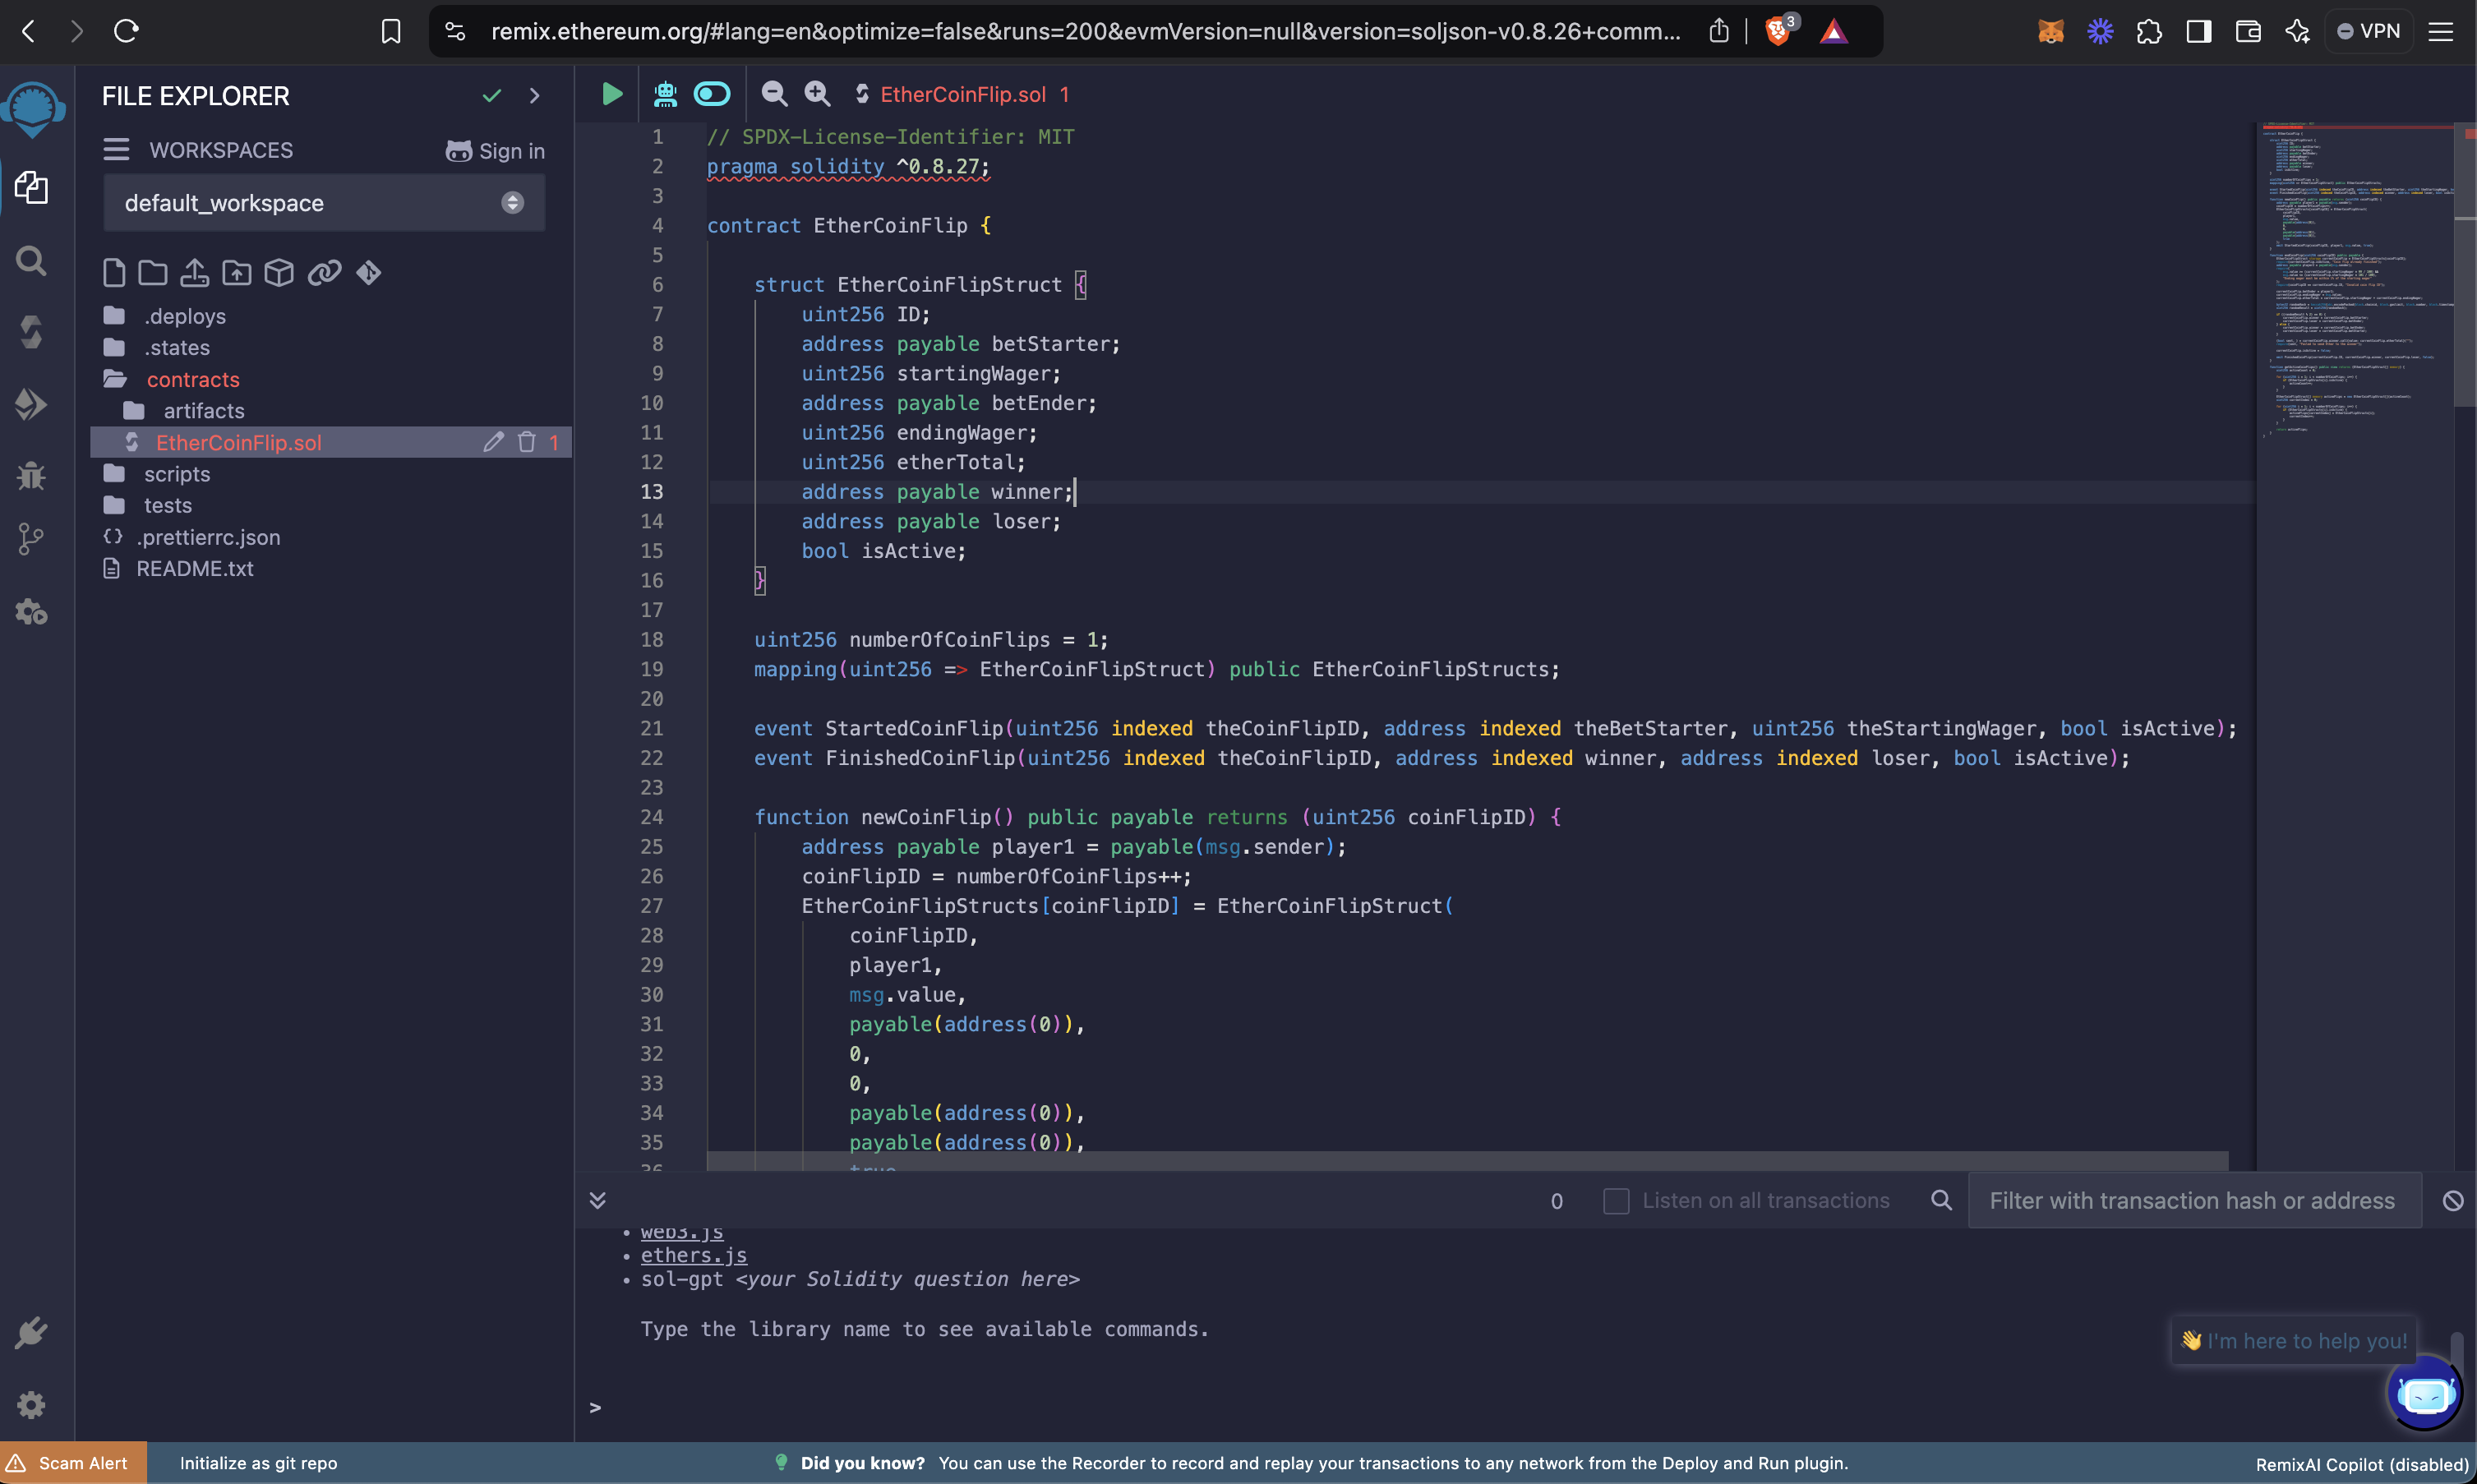
- Change the Solidity compiler to match the version of Solidity we used to write our smart contract and hit the “Compile EtherCoinFlip.sol” button!
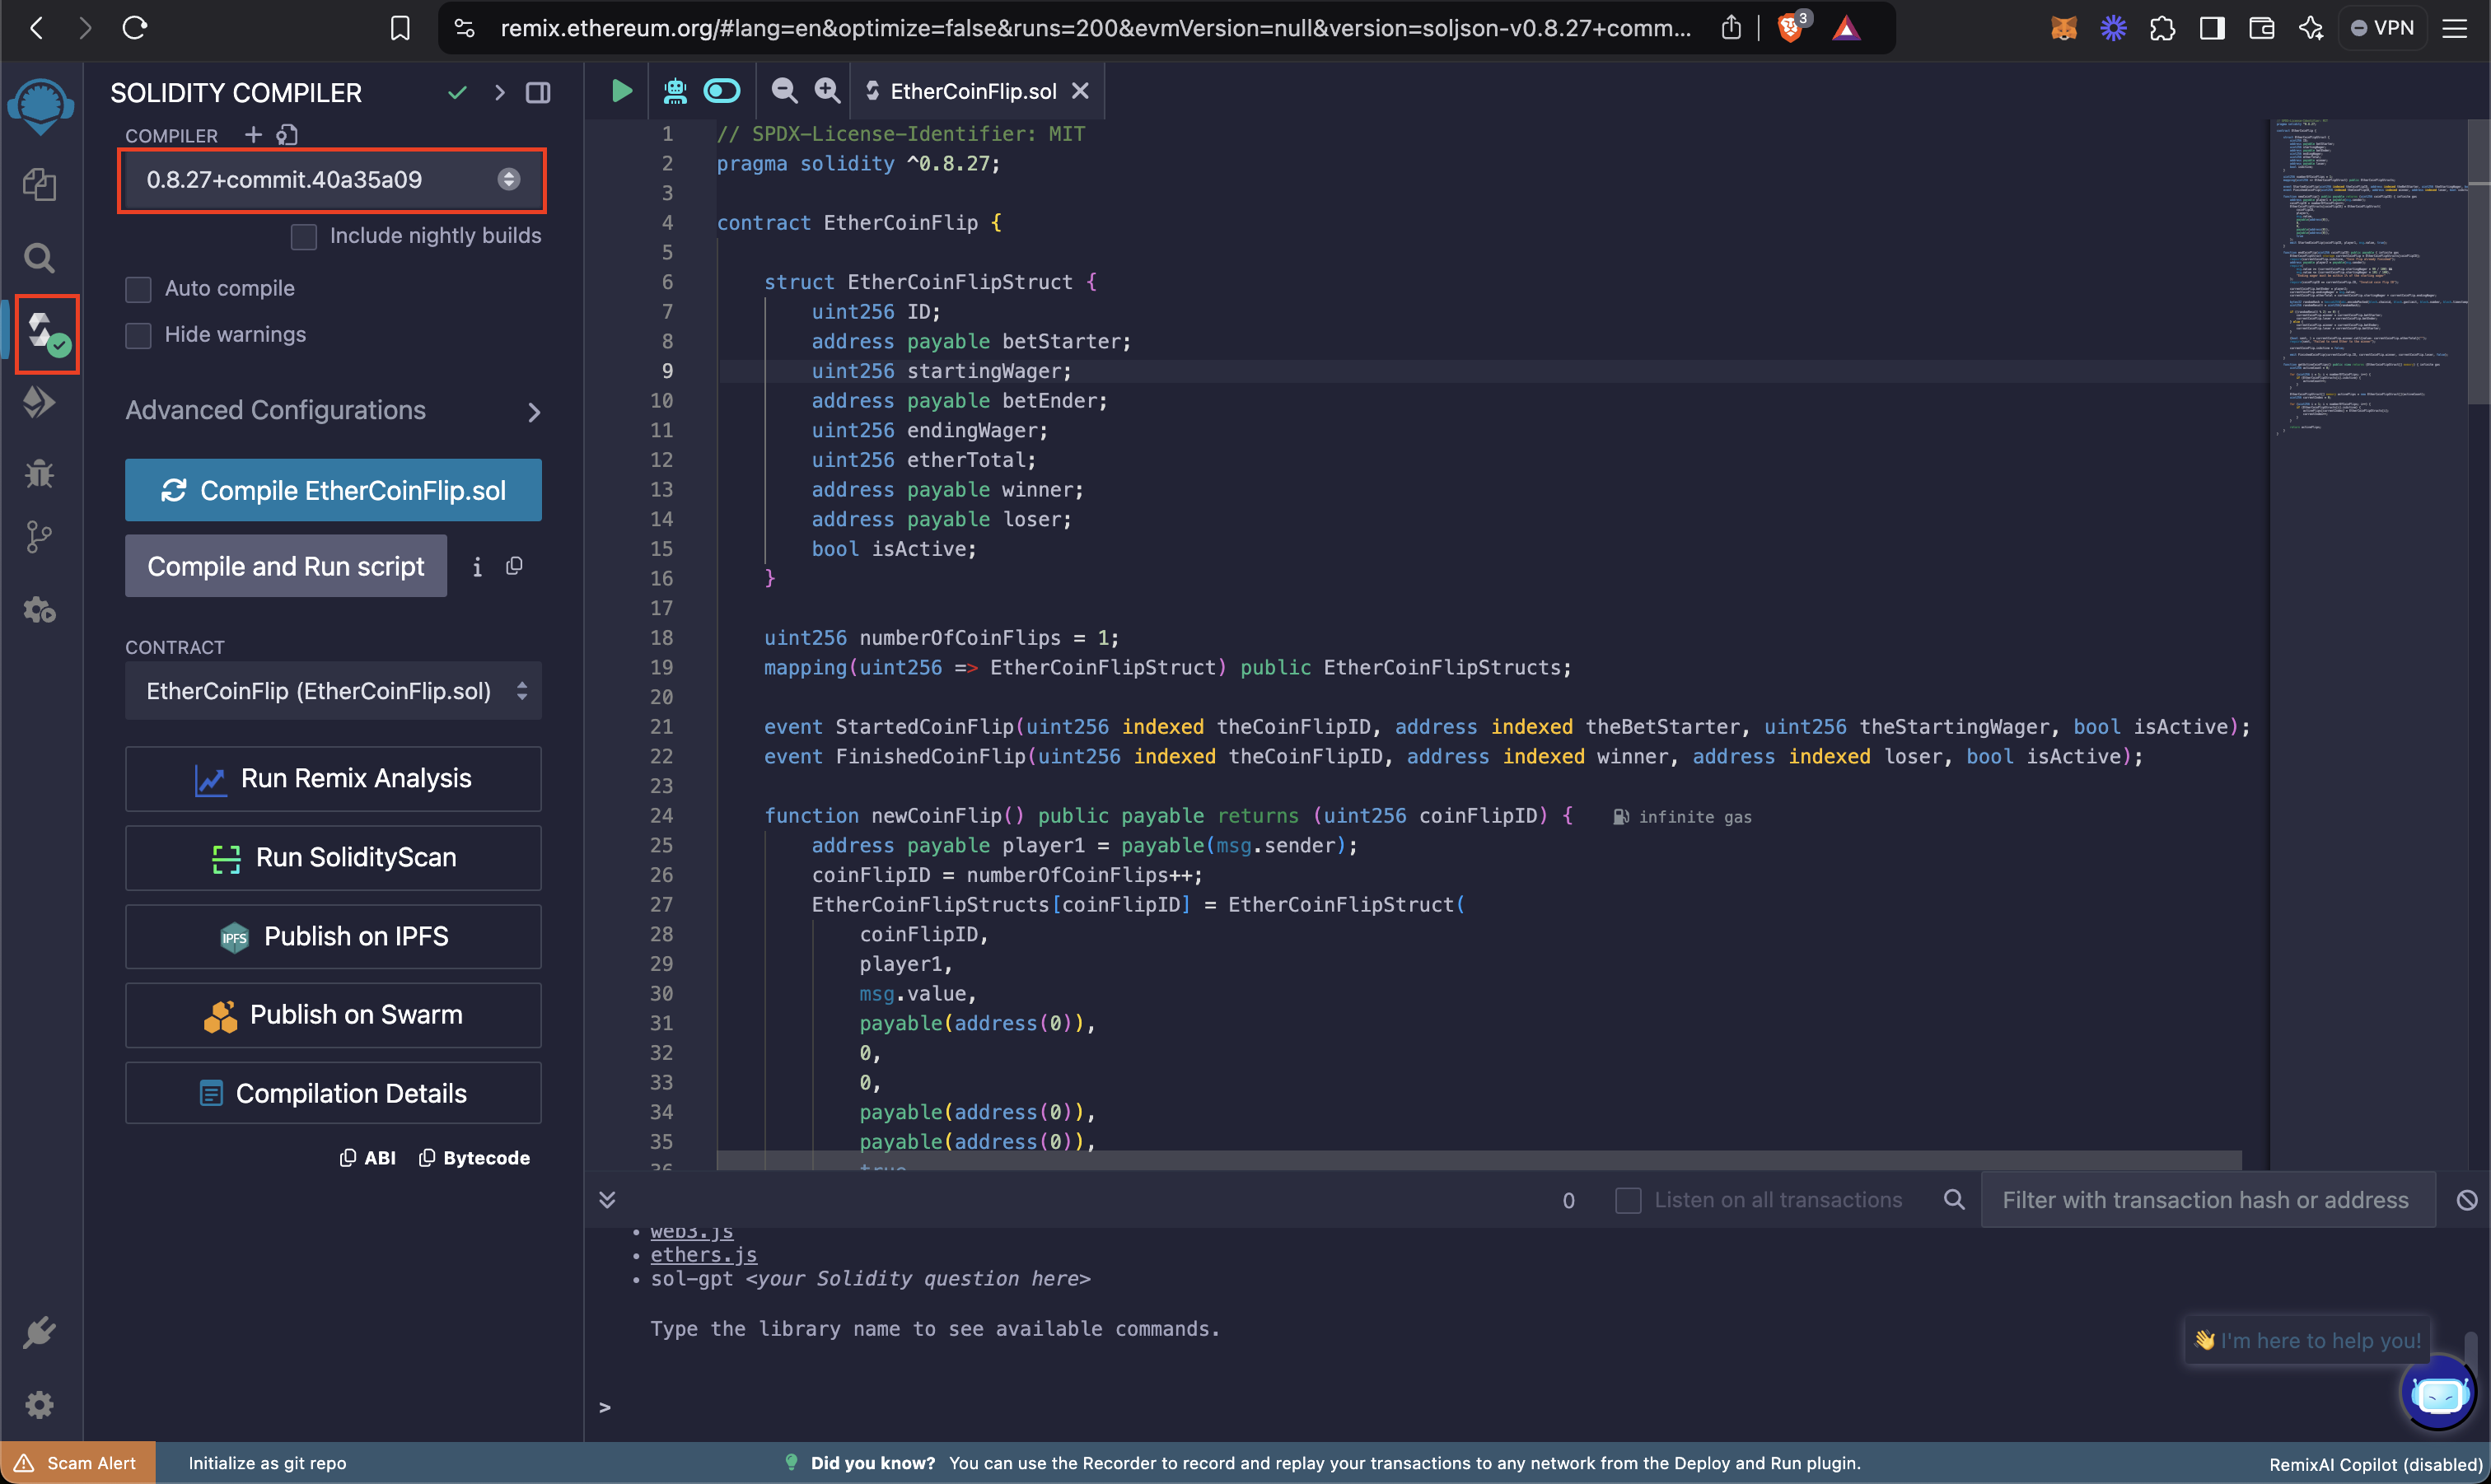
- Once you set the compiler to the correct version, and clicked compile, you’re ready to deploy it to testnet! This can be done with Remix’s built in testing feature, which allows you to .
We are going to test the smart contract using injected provider MetaMask.
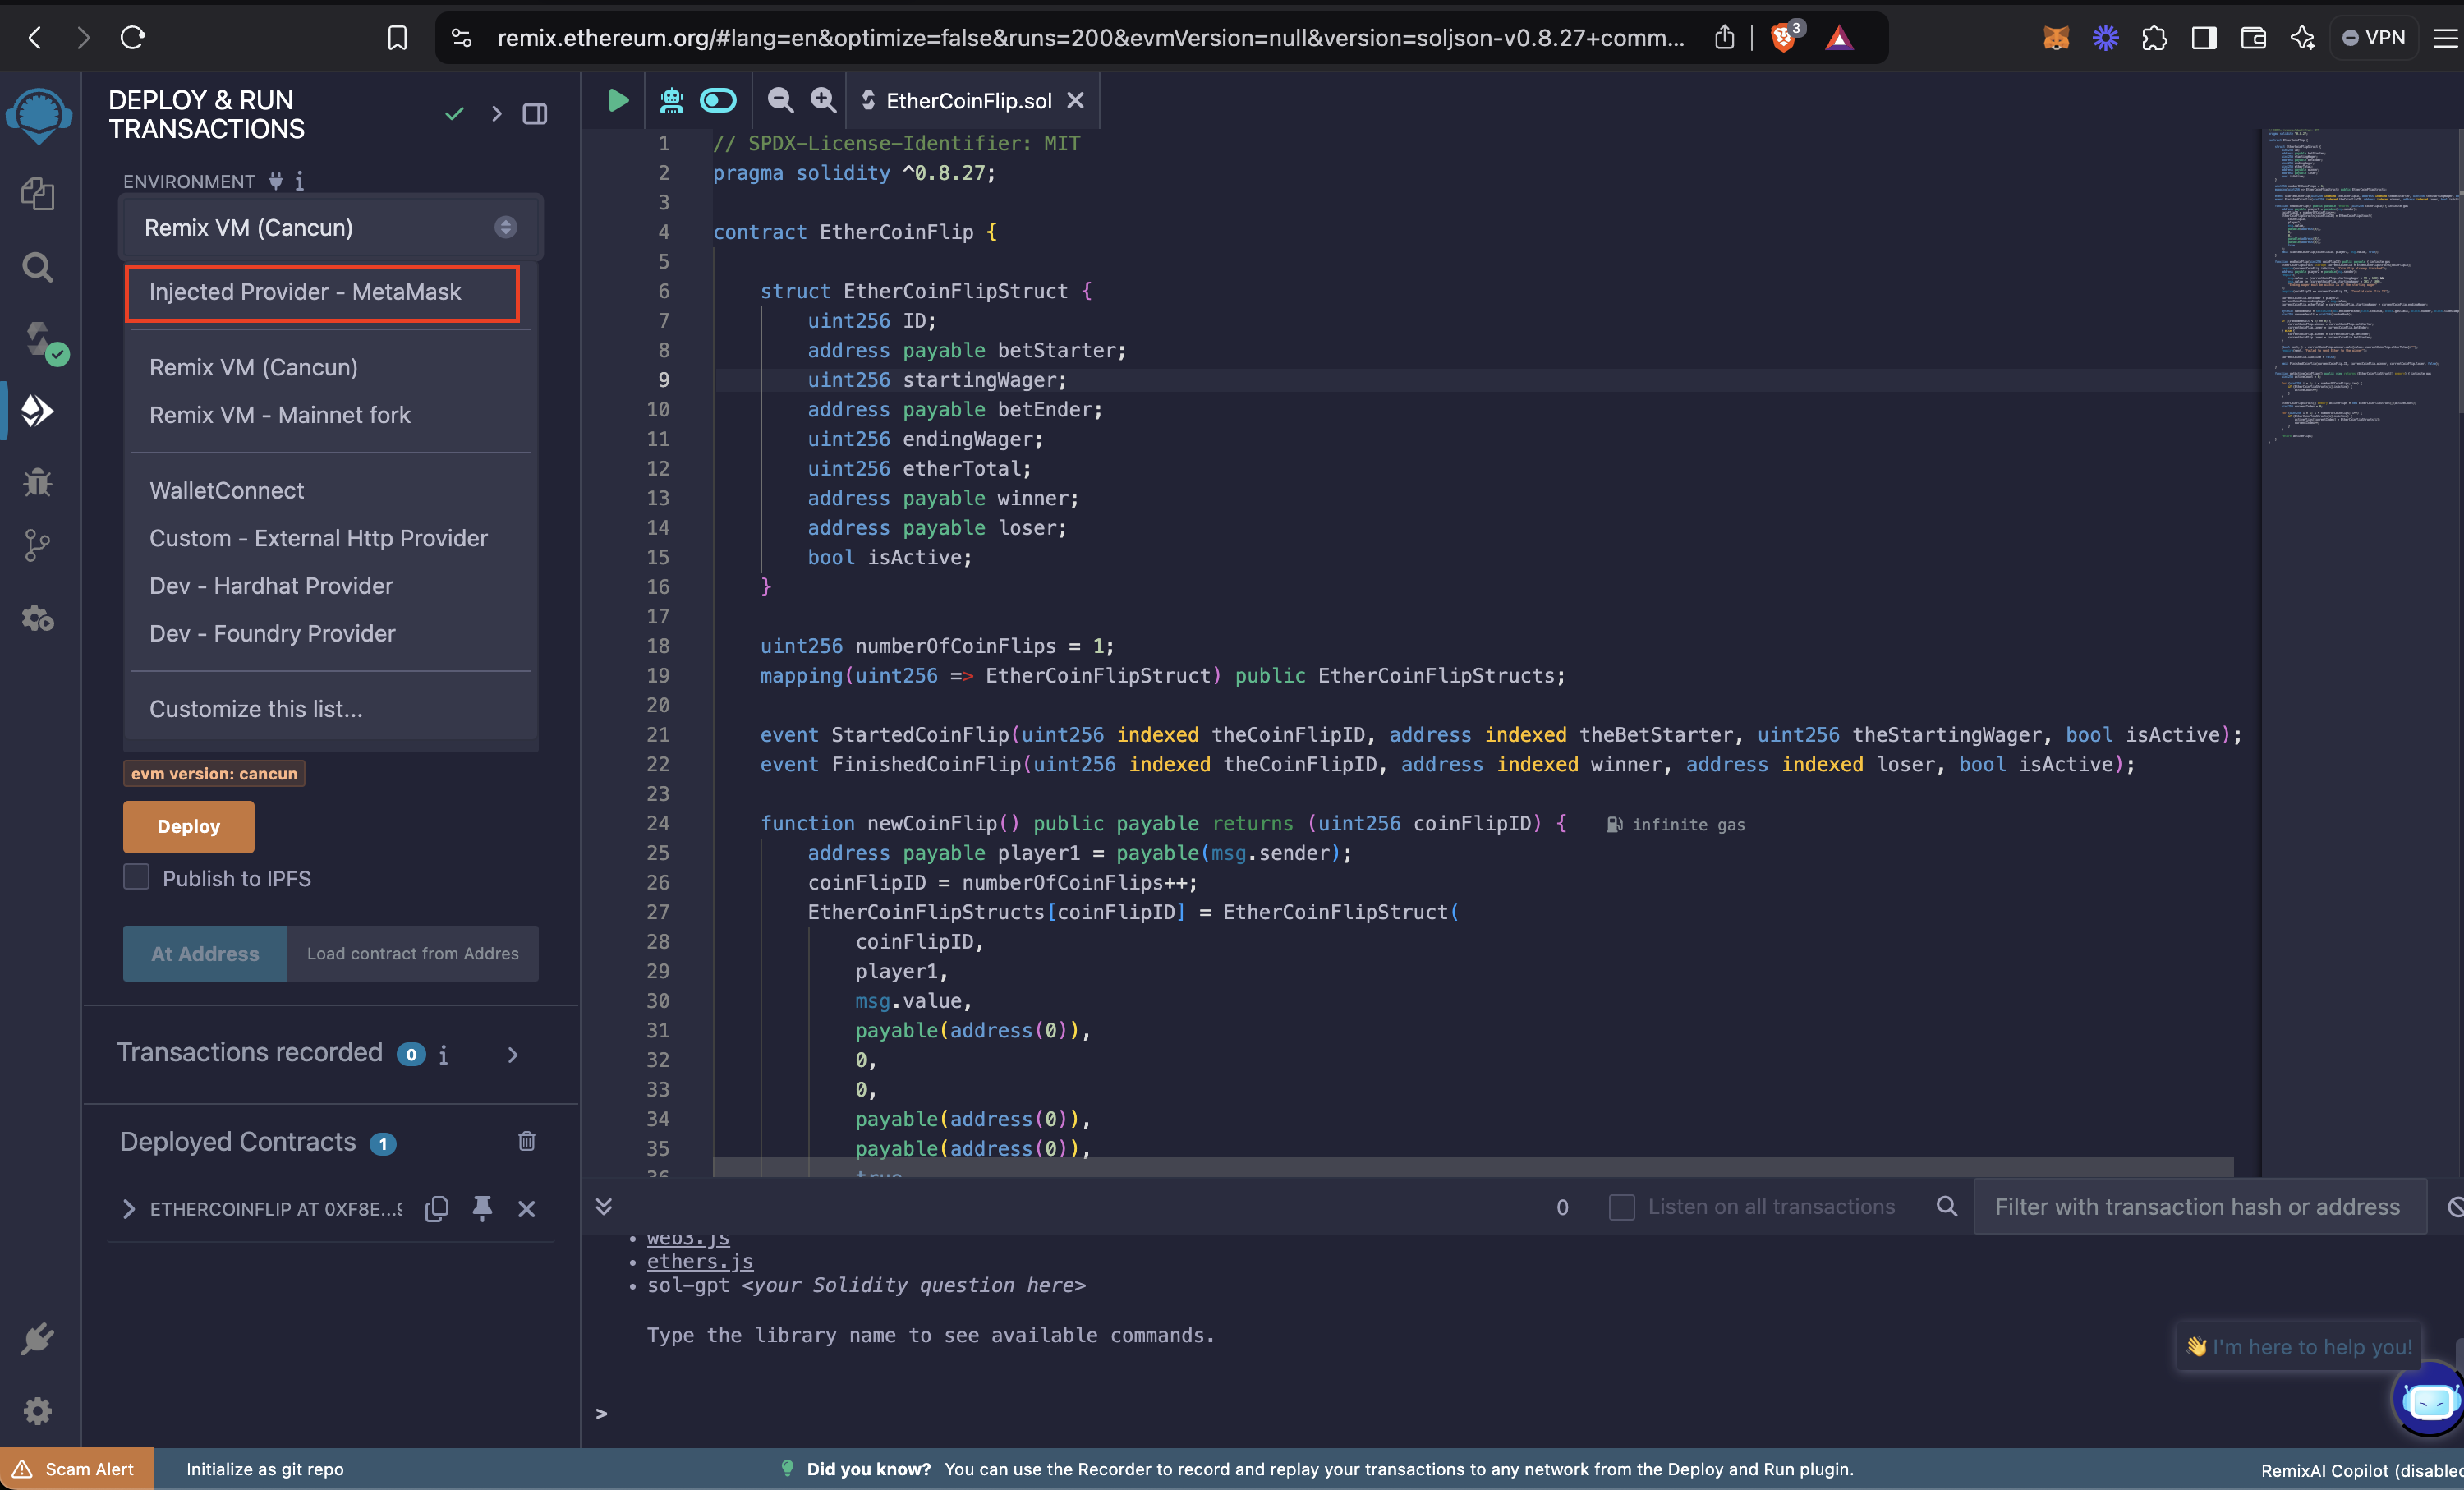
- Once you have your MetaMask connected, you can click the “Deploy” button to deploy
EtherCoinFlip.solto the blockchain!
Make sure your , and then approve the transaction.
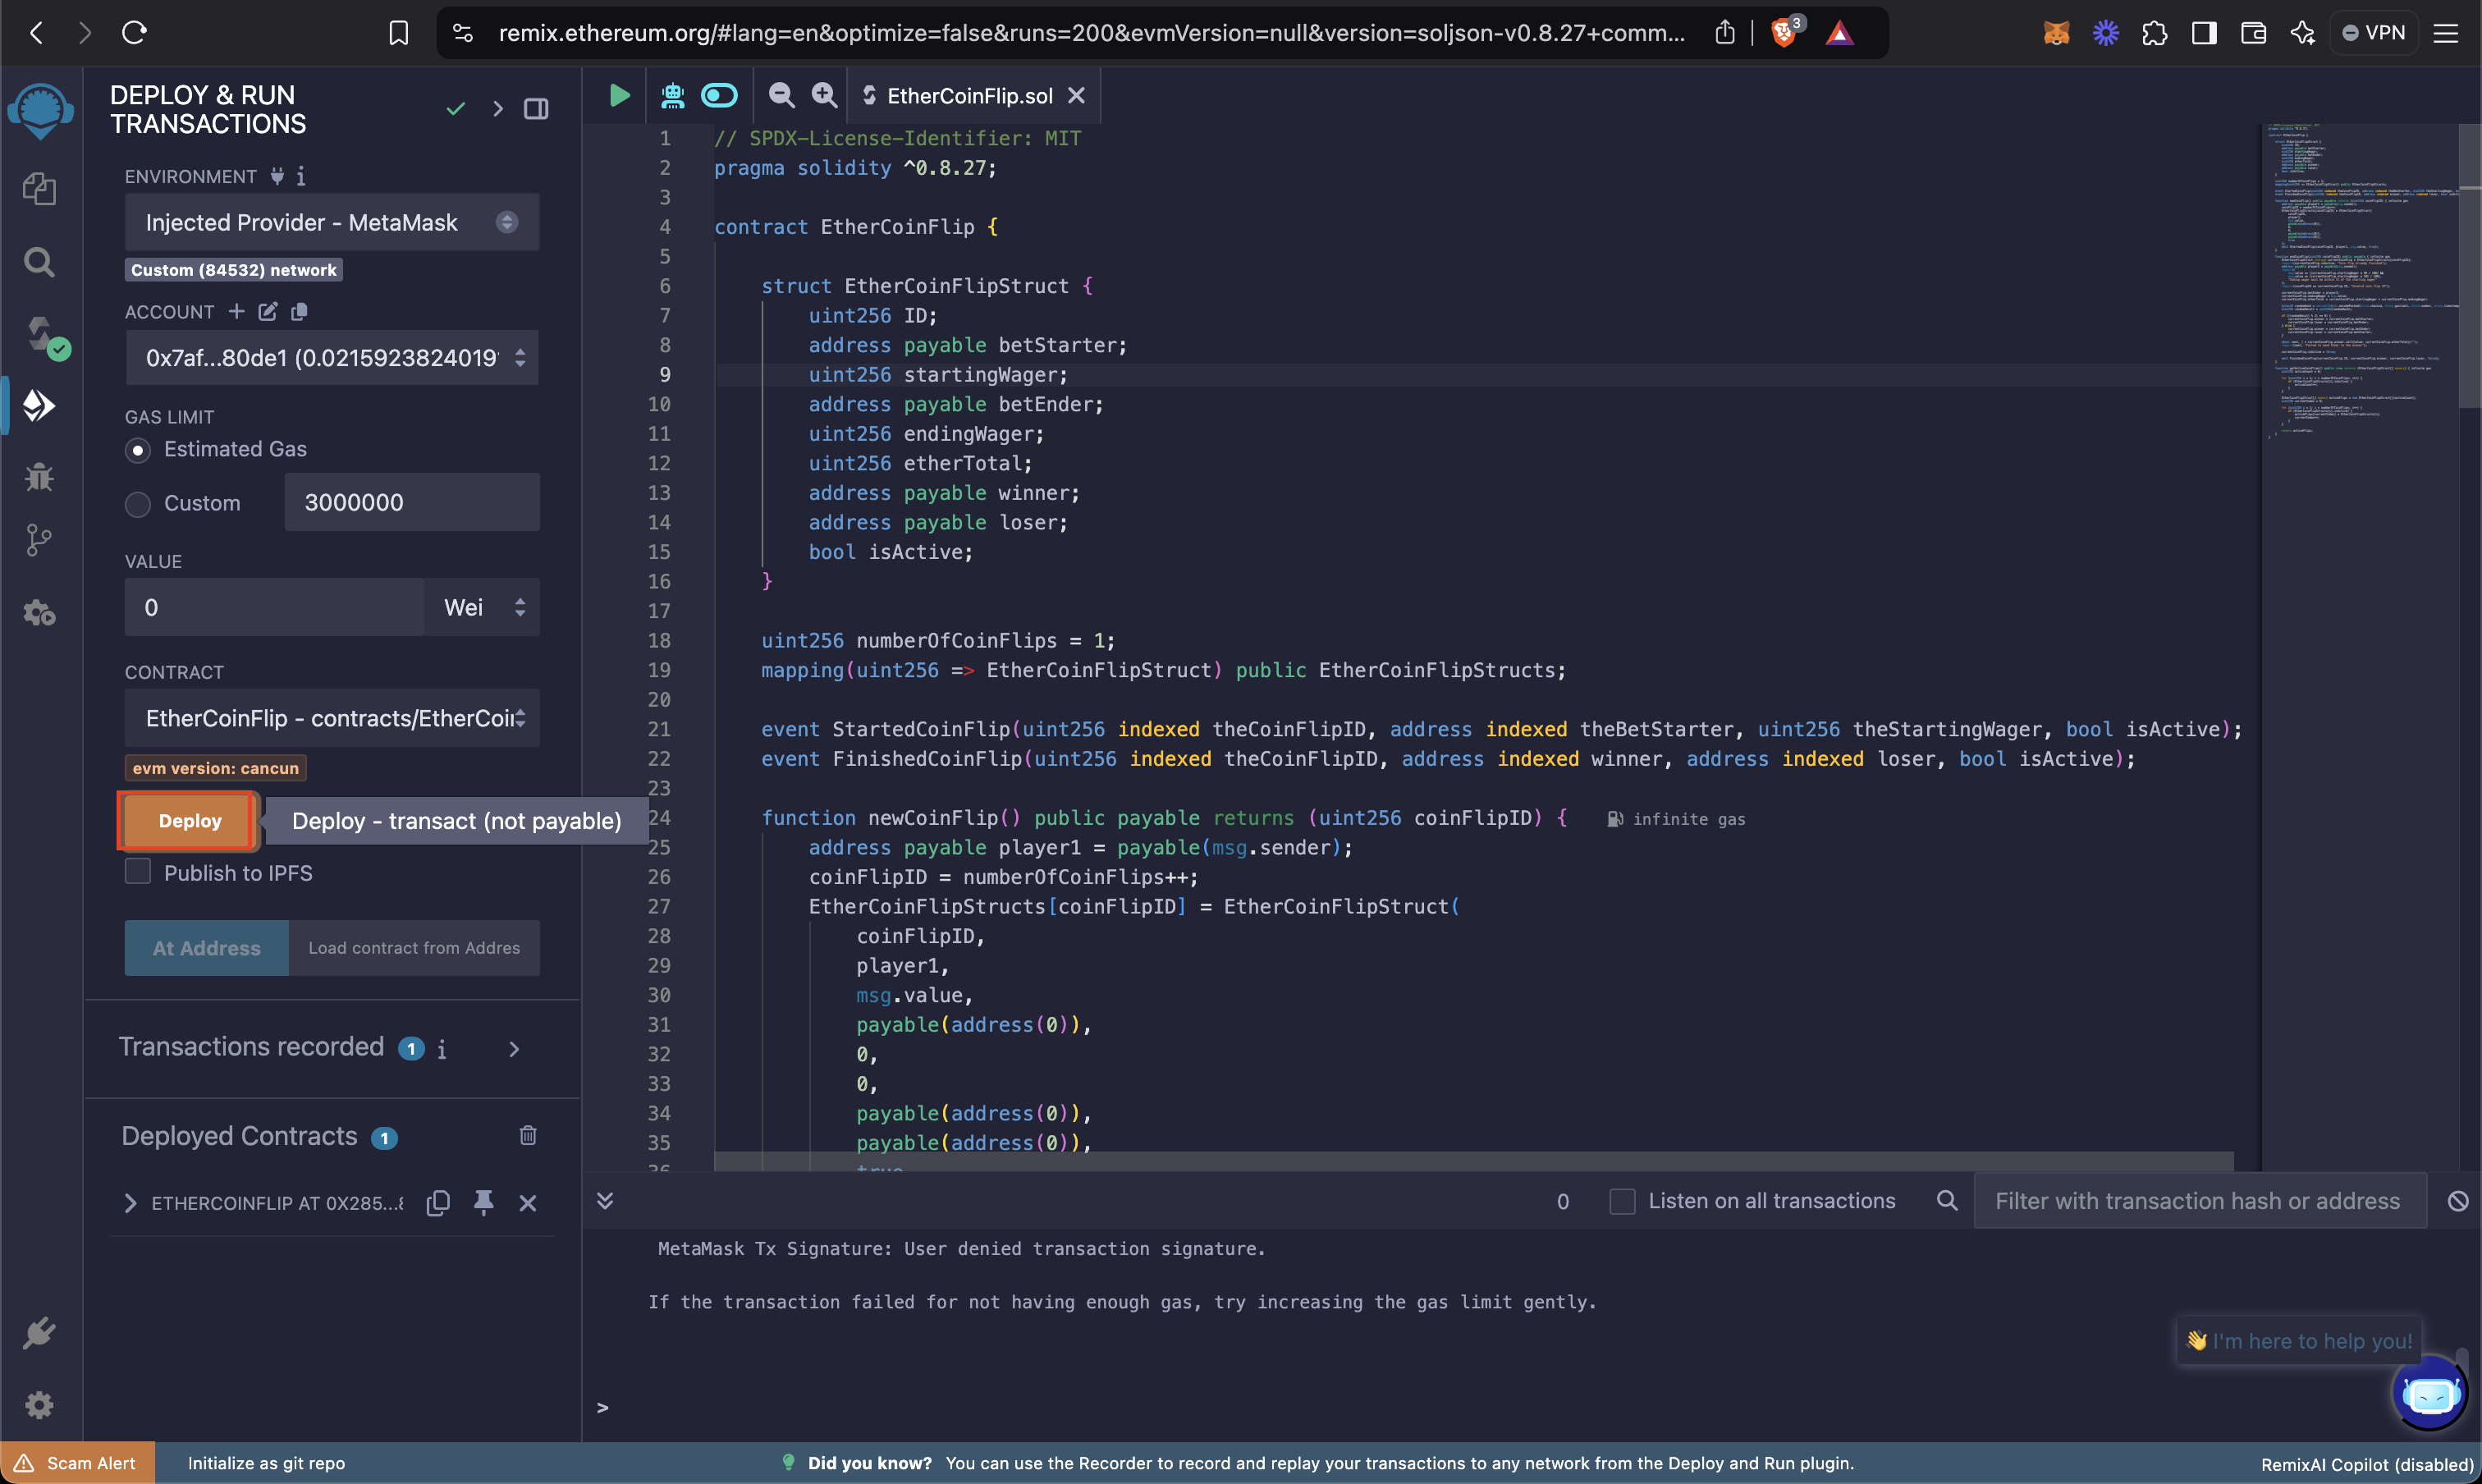
- Congratulations, you have deployed a smart contract to Base Sepolia! You can begin interacting with the smart contract under the “Deployed Contracts” tab, which will allow you to call the contract’s functions:
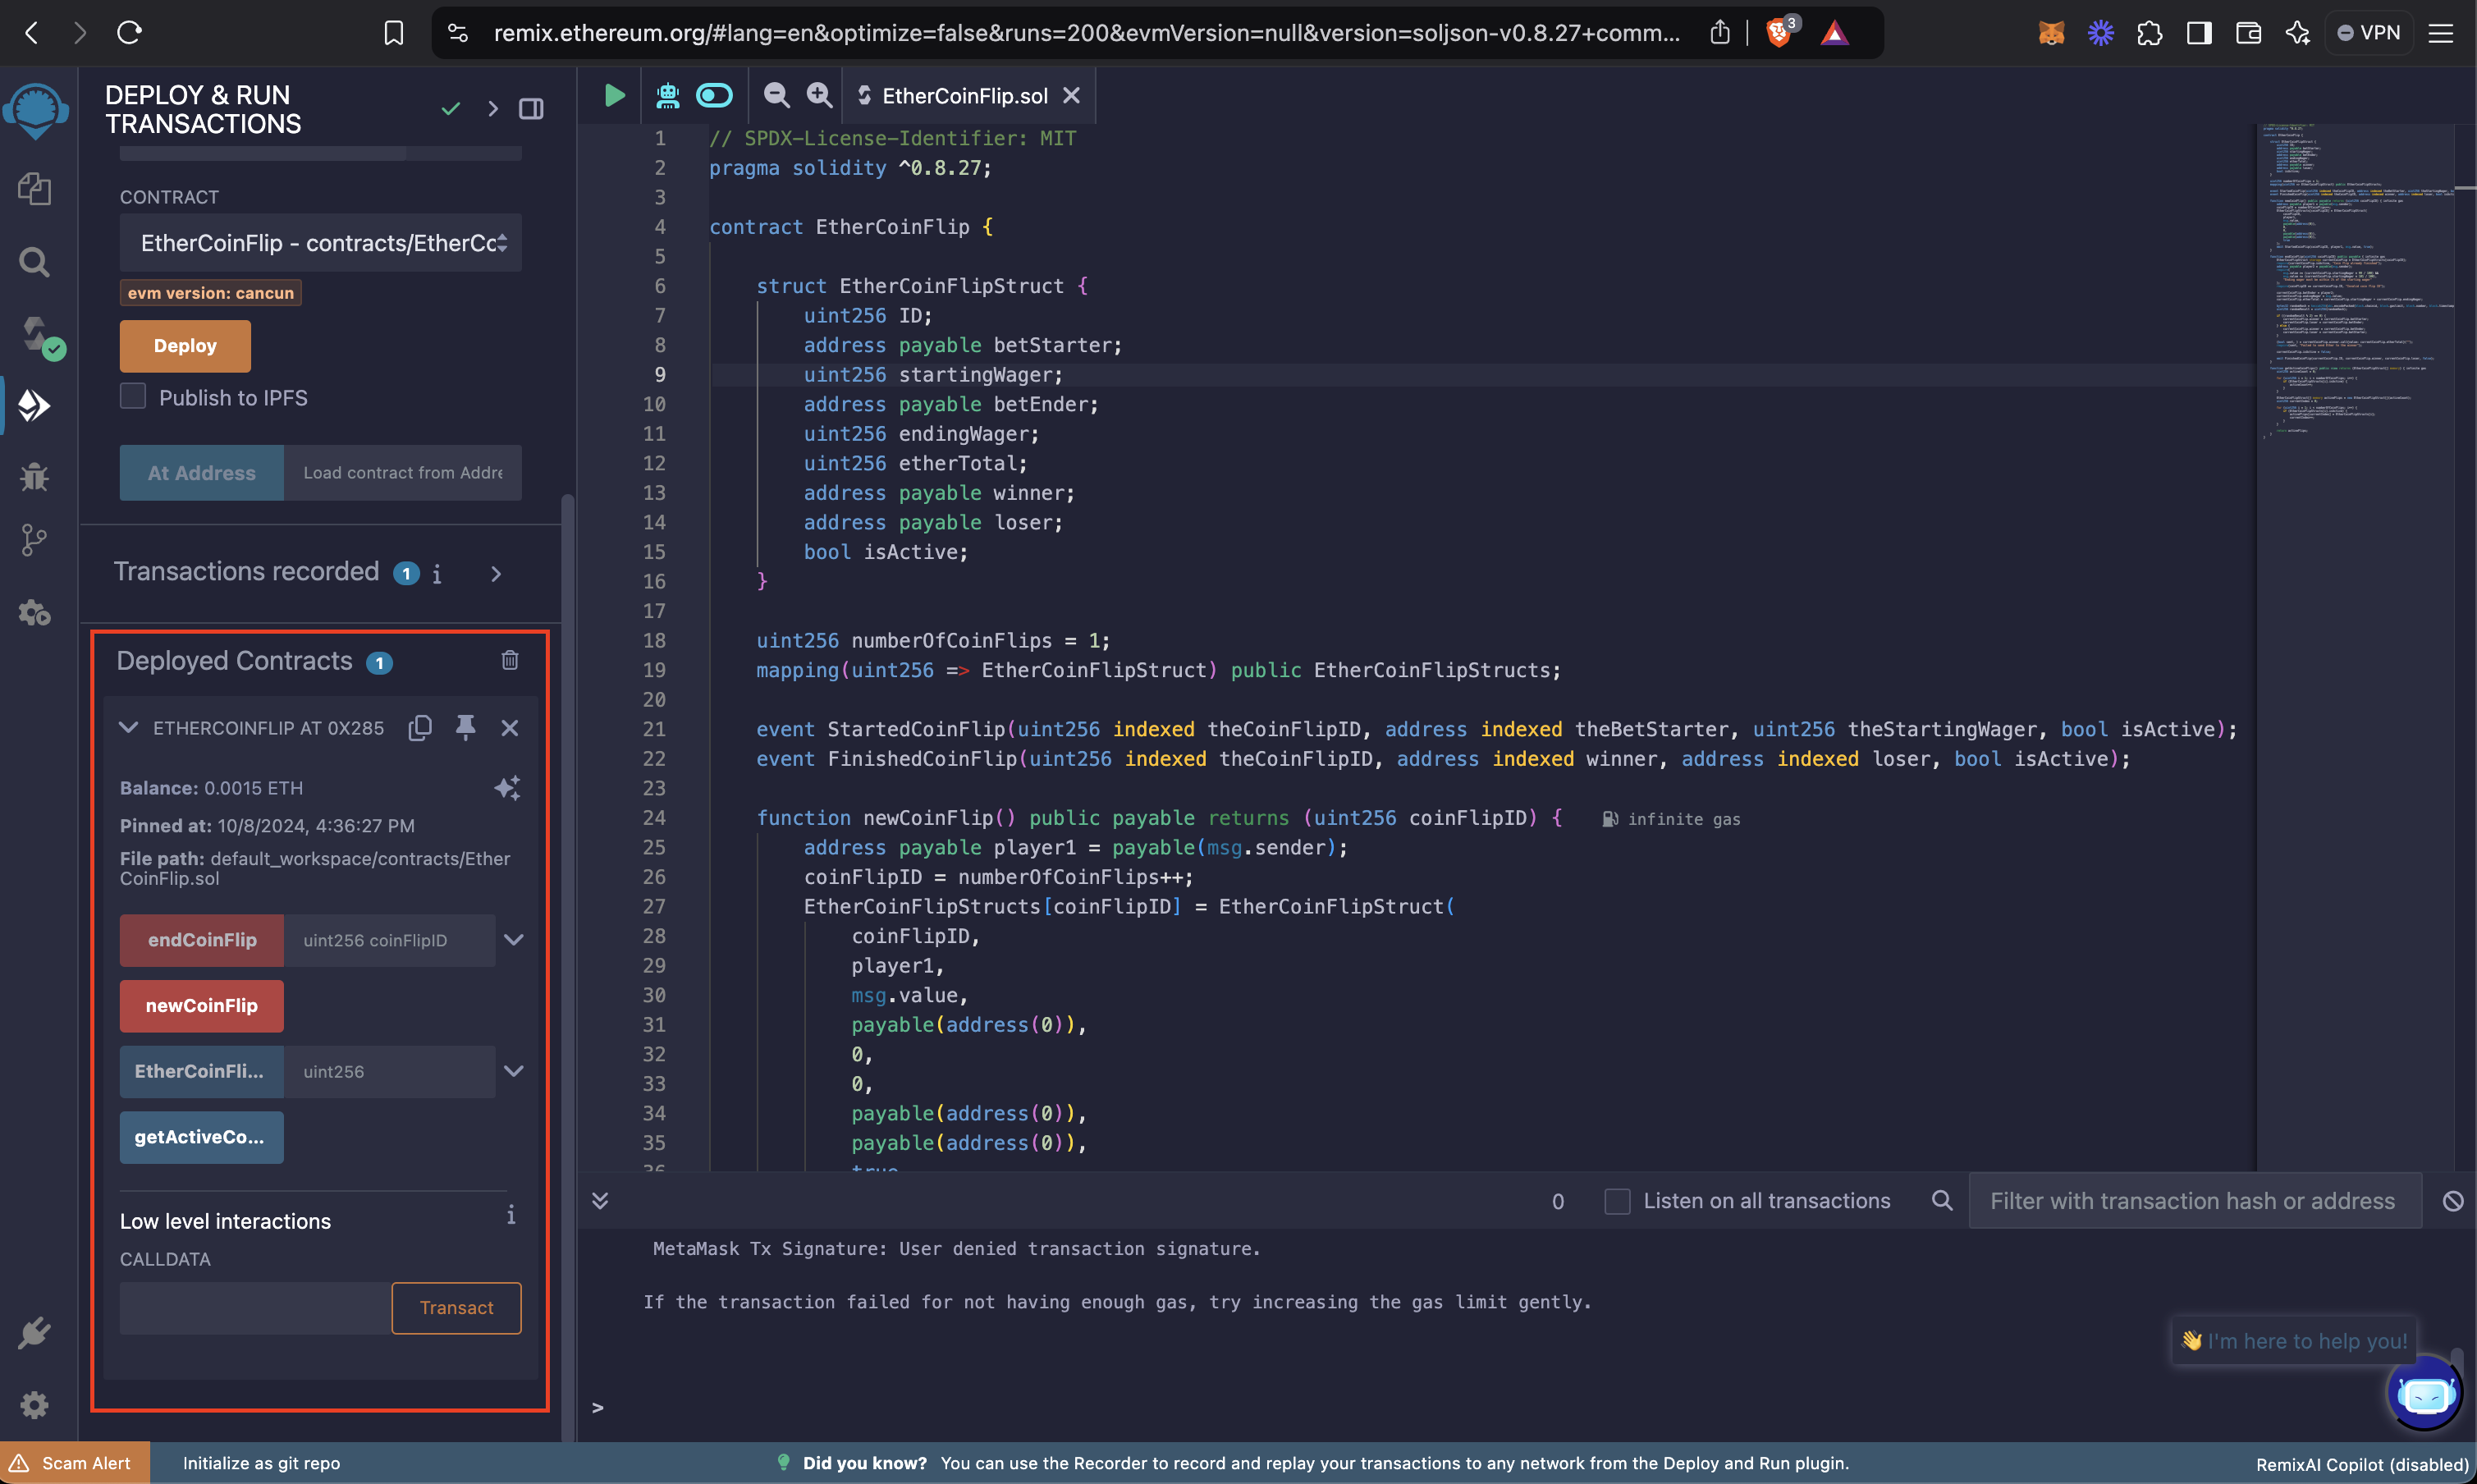
- When starting new coin flips with the
newCoinFlip()function, make sure you assign a value in Ether, which will be the wager (or msg.value).
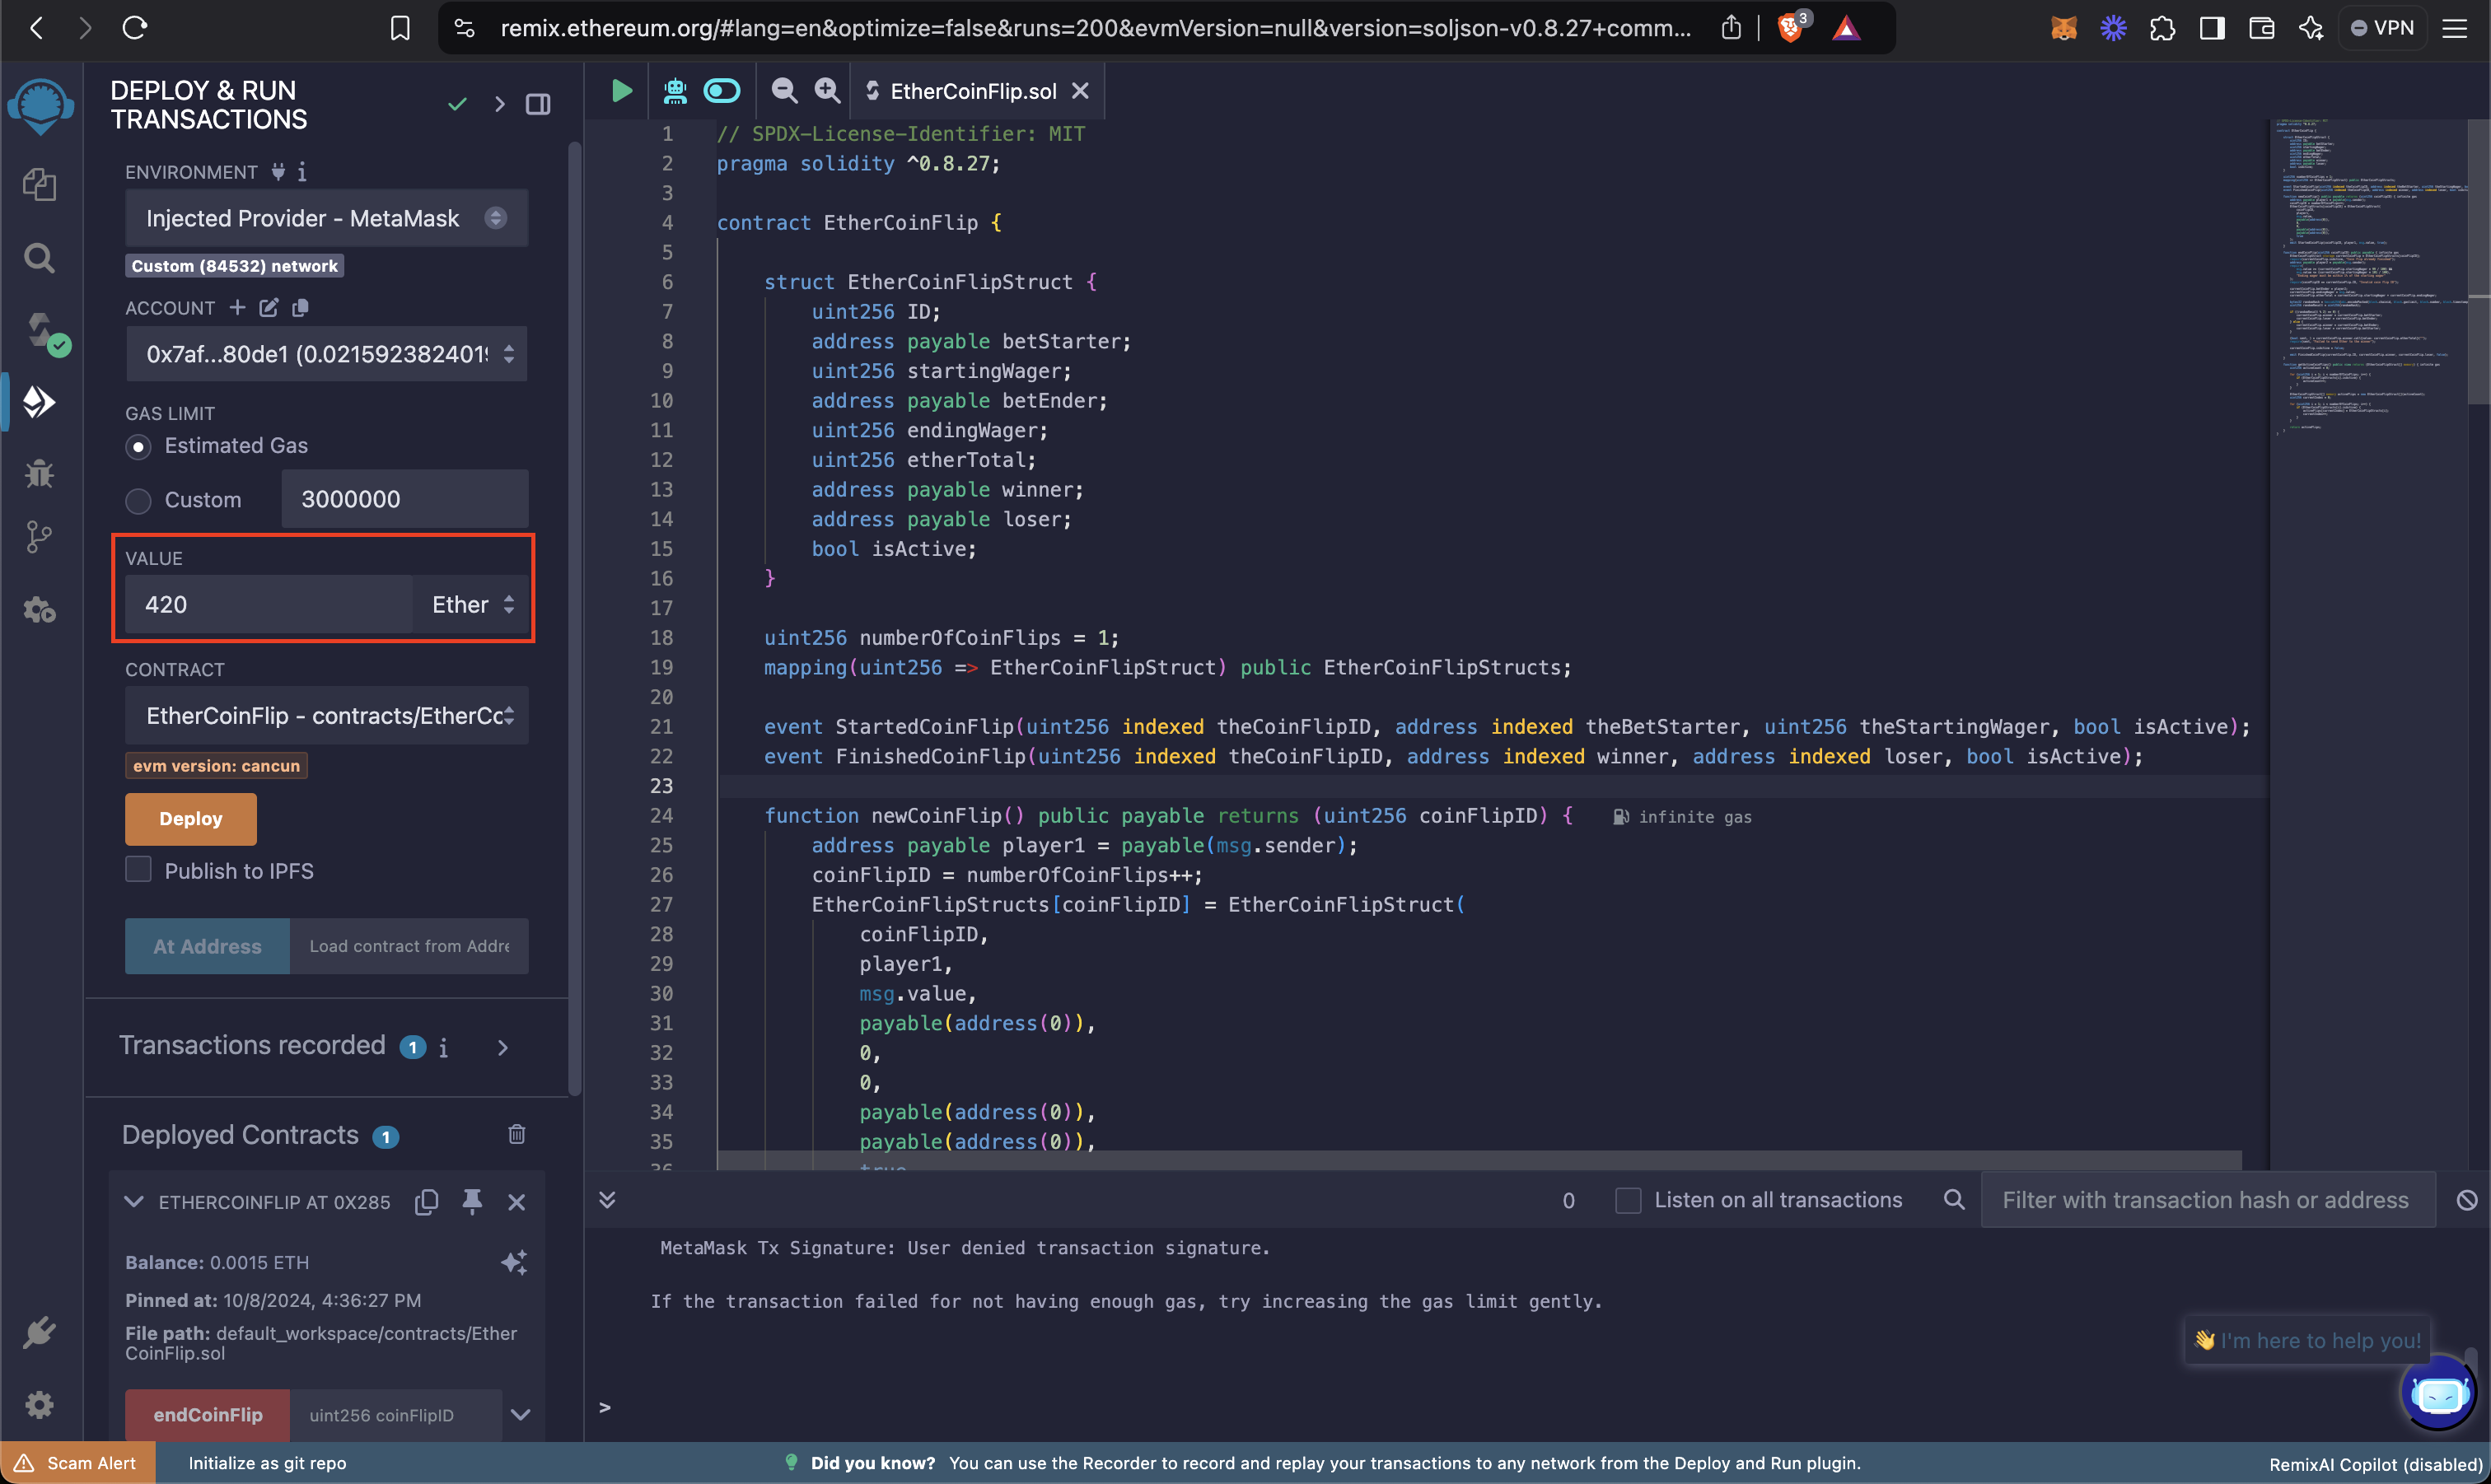
Once you have started a few coin flips, you can also end coin flips from another wallet. Simply call the endCoinFlip() function with the correct amount in the value field, and the correct coin flip ID.
Once you are satisfied with your smart contract, it is time to start building a subgraph to query blockchain data from our dapp.
Building a subgraph on Base Sepolia
Click the “Create a Subgraph” button to get started and name your subgraph.
Once you’ve created your Subgraph in Subgraph Studio, you can create your subgraph easily using the commands on the lower right of the page. Commands include CLI installation, initializing your subgraph, and deploying to Subgraph Studio!
Step-by-step
1. Install the Graph CLI
You must have and a package manager of your choice (npm, yarn or pnpm) installed to use the Graph CLI.
On your local machine, run one of the following commands:
npm install -g @graphprotocol/graph-cli@latest
yarn global add @graphprotocol/graph-cli
2. Create your subgraph
Subgraph Studio lets you create, manage, deploy, and publish subgraphs, as well as create and manage API keys.
Go to and connect your wallet.
Click "Create a Subgraph". It is recommended to name the subgraph in Title Case: "Subgraph Name Chain Name".
3. Initialize your subgraph
The following command initializes your subgraph from an existing contract:
graph init
Note: If your contract was verified on Etherscan, then the ABI will automatically be created in the CLI. Otherwise, you will need to provide the ABI while using the CLI.
You can find commands for your specific subgraph on the subgraph page in .
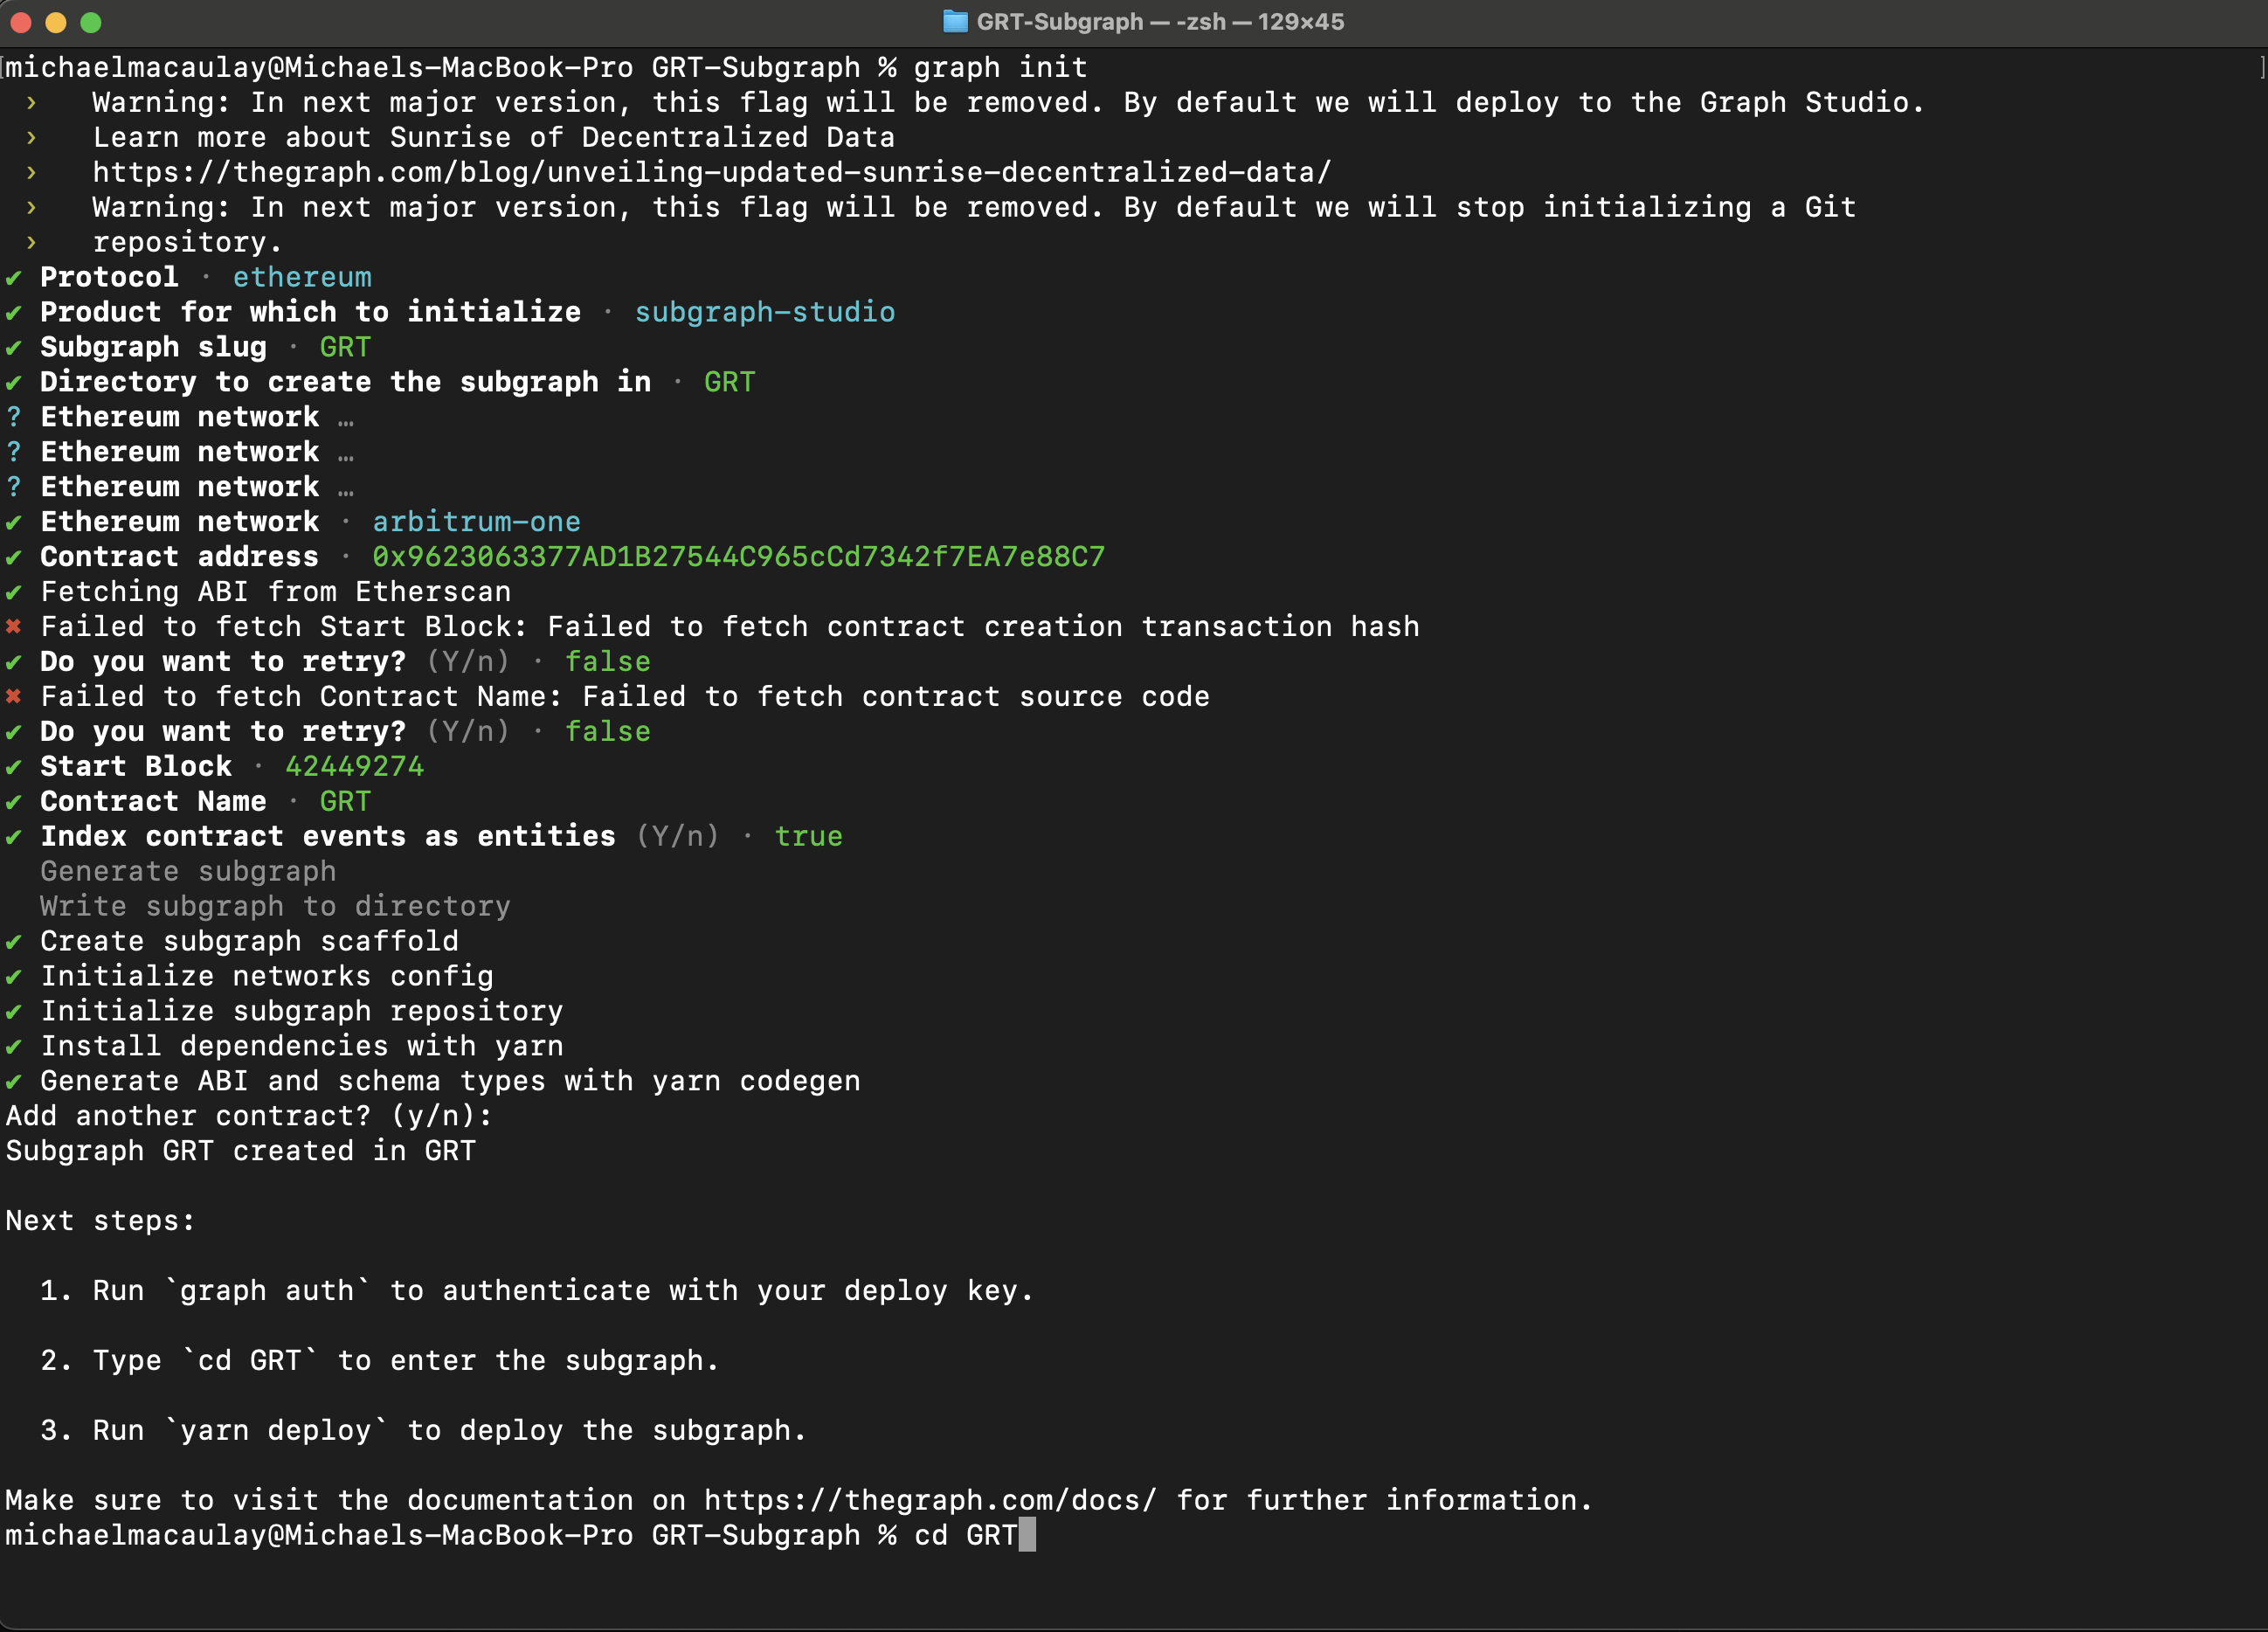
When you initialize your subgraph, the CLI will ask you for the following information:
- Protocol: Choose the protocol your subgraph will be indexing data from.
- Subgraph slug: Create a name for your subgraph. Your subgraph slug is an identifier for your subgraph.
- Directory: Choose a directory to create your subgraph in.
- Ethereum network (optional): You may need to specify which EVM-compatible network your subgraph will be indexing data from.
- Contract address: Locate the smart contract address you’d like to query data from.
- ABI: If the ABI is not auto-populated, you will need to input it manually as a JSON file.
- Start Block: You should input the start block to optimize subgraph indexing of blockchain data. Locate the start block by finding the block where your contract was deployed.
- Contract Name: Input the name of your contract.
- Index contract events as entities: It is suggested that you set this to true, as it will automatically add mappings to your subgraph for every emitted event.
- Add another contract (optional): You can add another contract.
See the following screenshot for an example for what to expect when initializing your subgraph:
4. Write your subgraph
The init command in the previous step creates a scaffold subgraph that you can use as a starting point to build your subgraph. By default, your subgraph will index all emitted events.
When making changes to the subgraph, you will mainly work with three files:
- Manifest (
subgraph.yaml) - defines what data sources your subgraph will index. - Schema (
schema.graphql) - defines what data you wish to retrieve from the subgraph. - AssemblyScript Mappings (
mapping.ts) - translates data from your data sources to the entities defined in the schema.
For a detailed breakdown on how to write your subgraph, check out .
5. Deploy your subgraph
Remember, deploying is not the same as publishing.
- When you deploy a subgraph, you push it to , where you can test, stage and review it.
- When you publish a subgraph, you are publishing it onchain to the decentralized network.
- Once your subgraph is written, run the following commands:graph codegen && graph build
- Authenticate and deploy your subgraph. The deploy key can be found on the subgraph's page in Subgraph Studio.
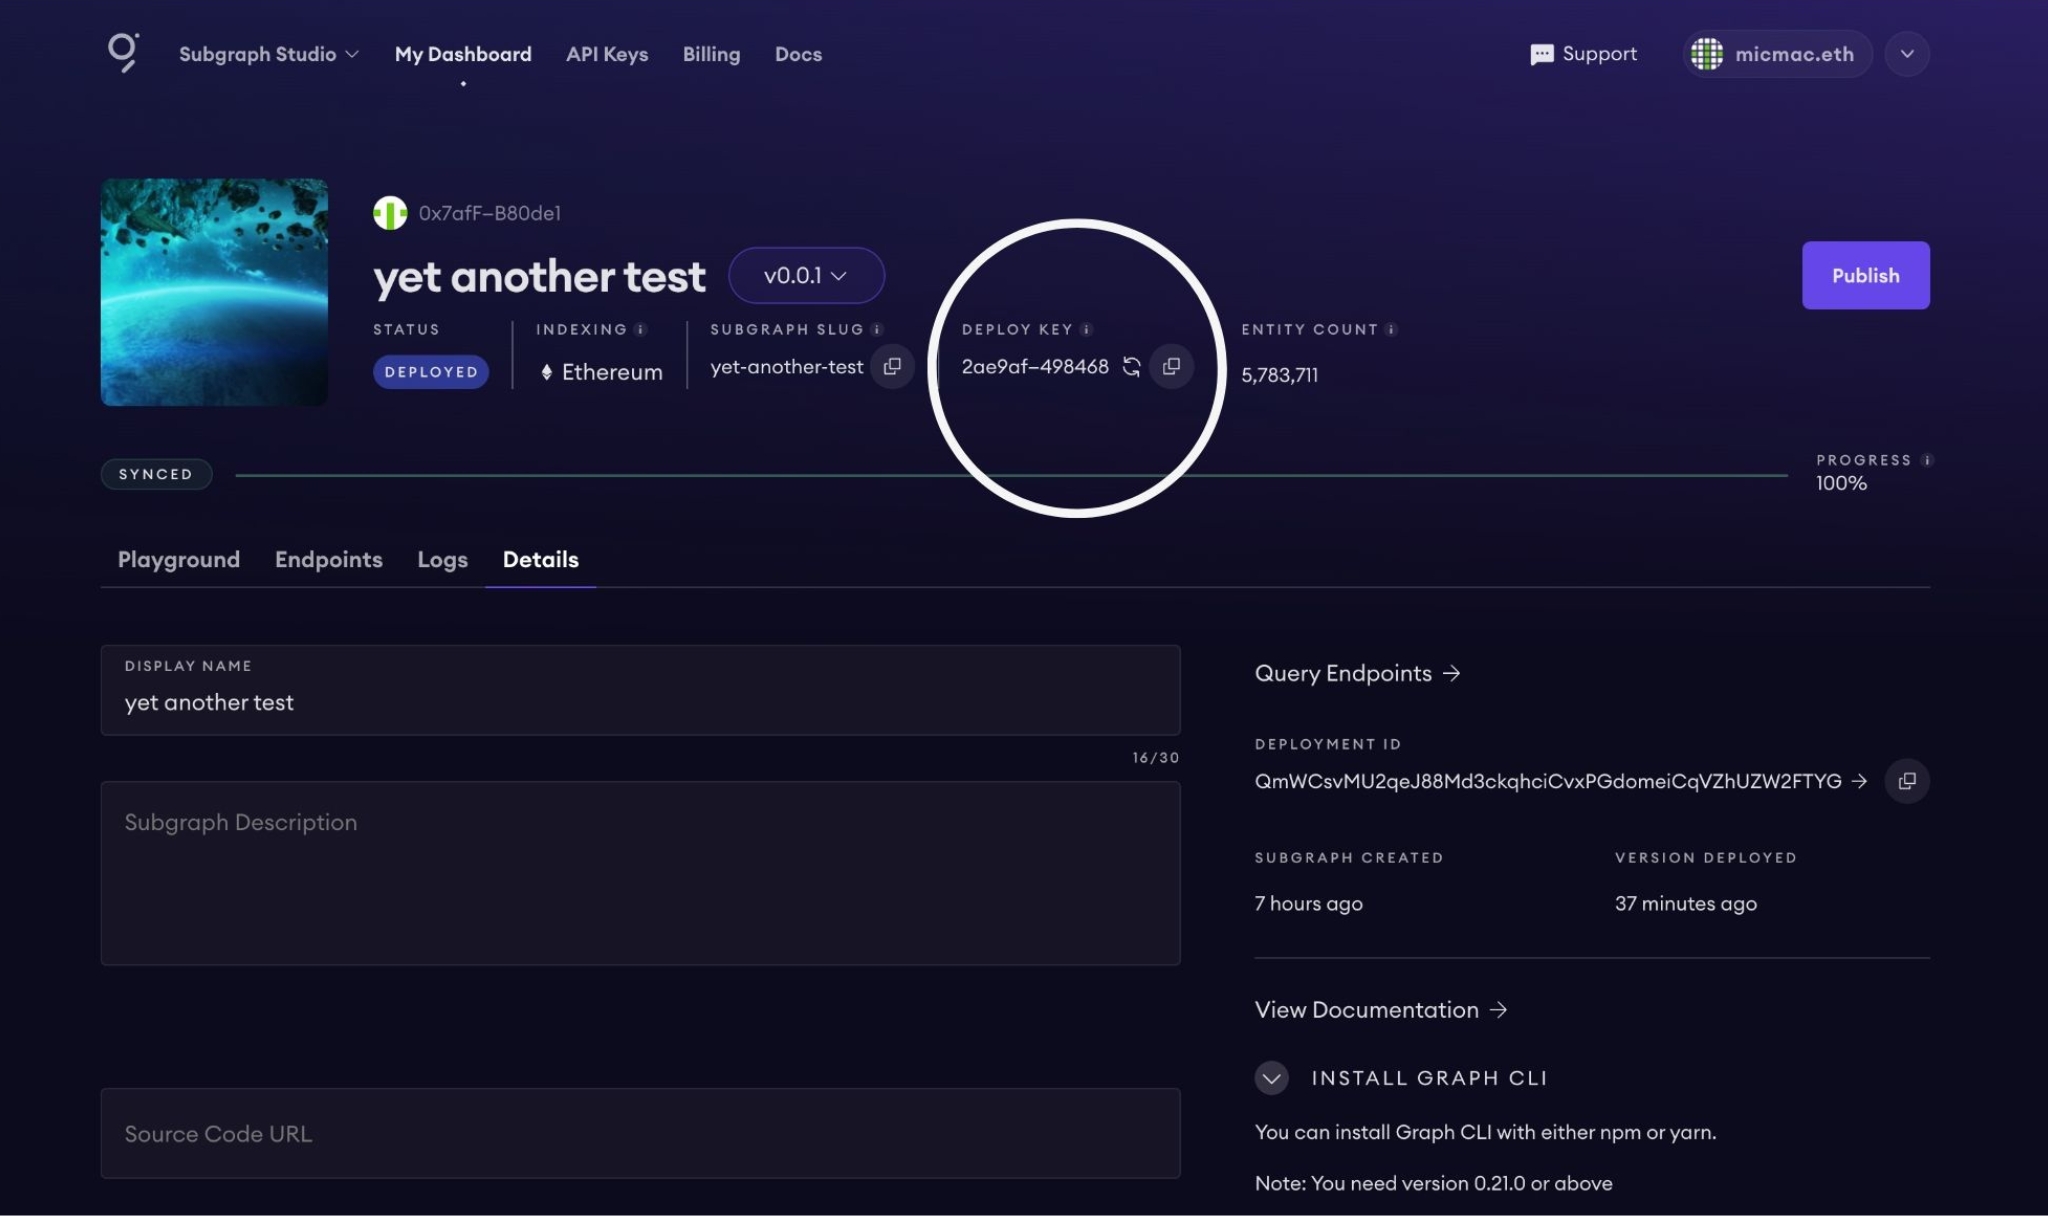
graph auth <DEPLOY_KEY>graph deploy <SUBGRAPH_SLUG>
The CLI will ask for a version label.
It's strongly recommended to use , e.g. 0.0.1. That said, you can choose any string for the version such as: v1, version1, asdf, etc.
6. Review your subgraph
If you’d like to examine your subgraph before publishing it to the network, you can use to do the following:
- Run and test sample queries
- Analyze your subgraph in the dashboard to check information.
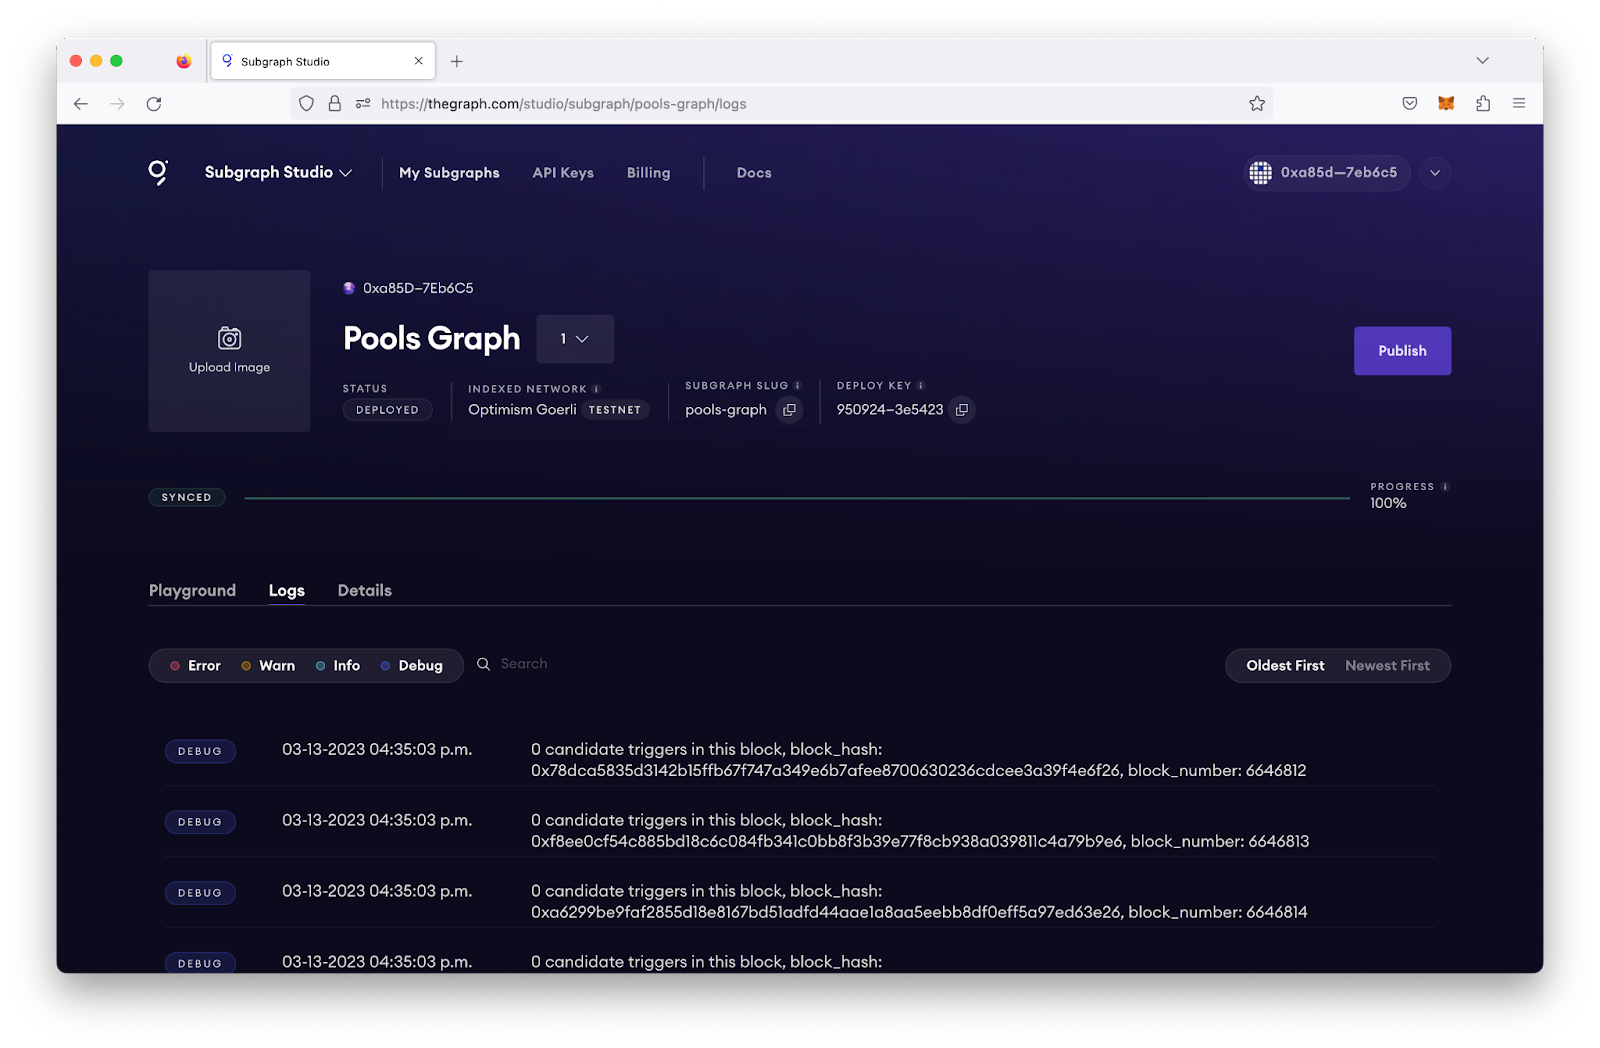
- Check the logs on the dashboard to see if there are any errors with your subgraph. The logs of an operational subgraph will look like this:
7. Publish your subgraph to The Graph Network
Publishing a subgraph to the decentralized network makes it available to query with 100,000 free queries per month, which is perfect for hobby developers and hackathon projects.
Publishing with Subgraph Studio
- To publish your subgraph, click the Publish button in the dashboard.
- Select the network to which you would like to publish your subgraph.
Adding curation signal to your subgraph
- To attract Indexers to query your subgraph, you should add GRT curation signal to it.
- This improves quality of service, reduces latency, and enhances network redundancy and availability for your subgraph.
- If eligible for indexing rewards, Indexers receive rewards based on the signaled amount.
- It’s recommended to curate your subgraph with at least 3,000 GRT to attract 3 Indexers. Check reward eligibility based on subgraph feature usage and supported networks.
To learn more about curation, read .
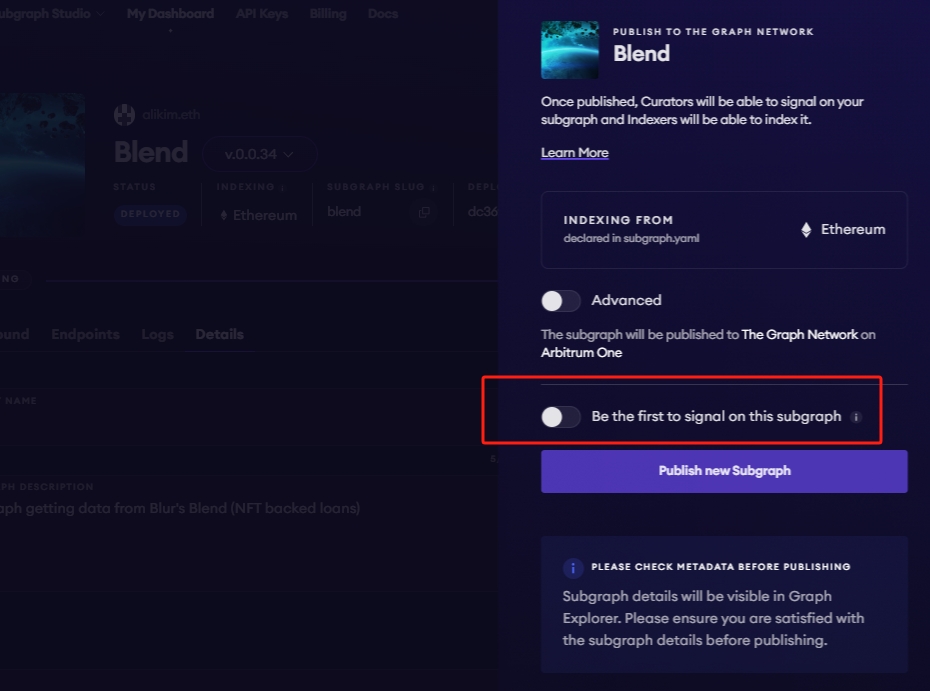
To save on gas costs, you can curate your subgraph in the same transaction you publish it by selecting this option:
8. Query your subgraph
Now, you can query your subgraph by sending GraphQL queries to its Query URL, which you can find by clicking the Query button.
How to build a Front-End Application with React and ethers.js
Now that we've deployed our smart contract and can easily query data from our subgraph on The Graph, it's time to build a user-friendly front-end application. We'll use for the UI and to interact with the blockchain.
In this section, we'll cover:
- Setting up a React application
- Connecting to the blockchain (Base Sepolia in our case) using MetaMask
- Interacting with the smart contract using ethers.js to start a coin flip
- Displaying active coin flips with our subgraph and allowing users to participate
Prerequisites
- Node.js and npm installed on your machine
- Basic understanding of React.js
- Familiarity with JavaScript and
Setting Up the React Application
1. Initialize a New React Project
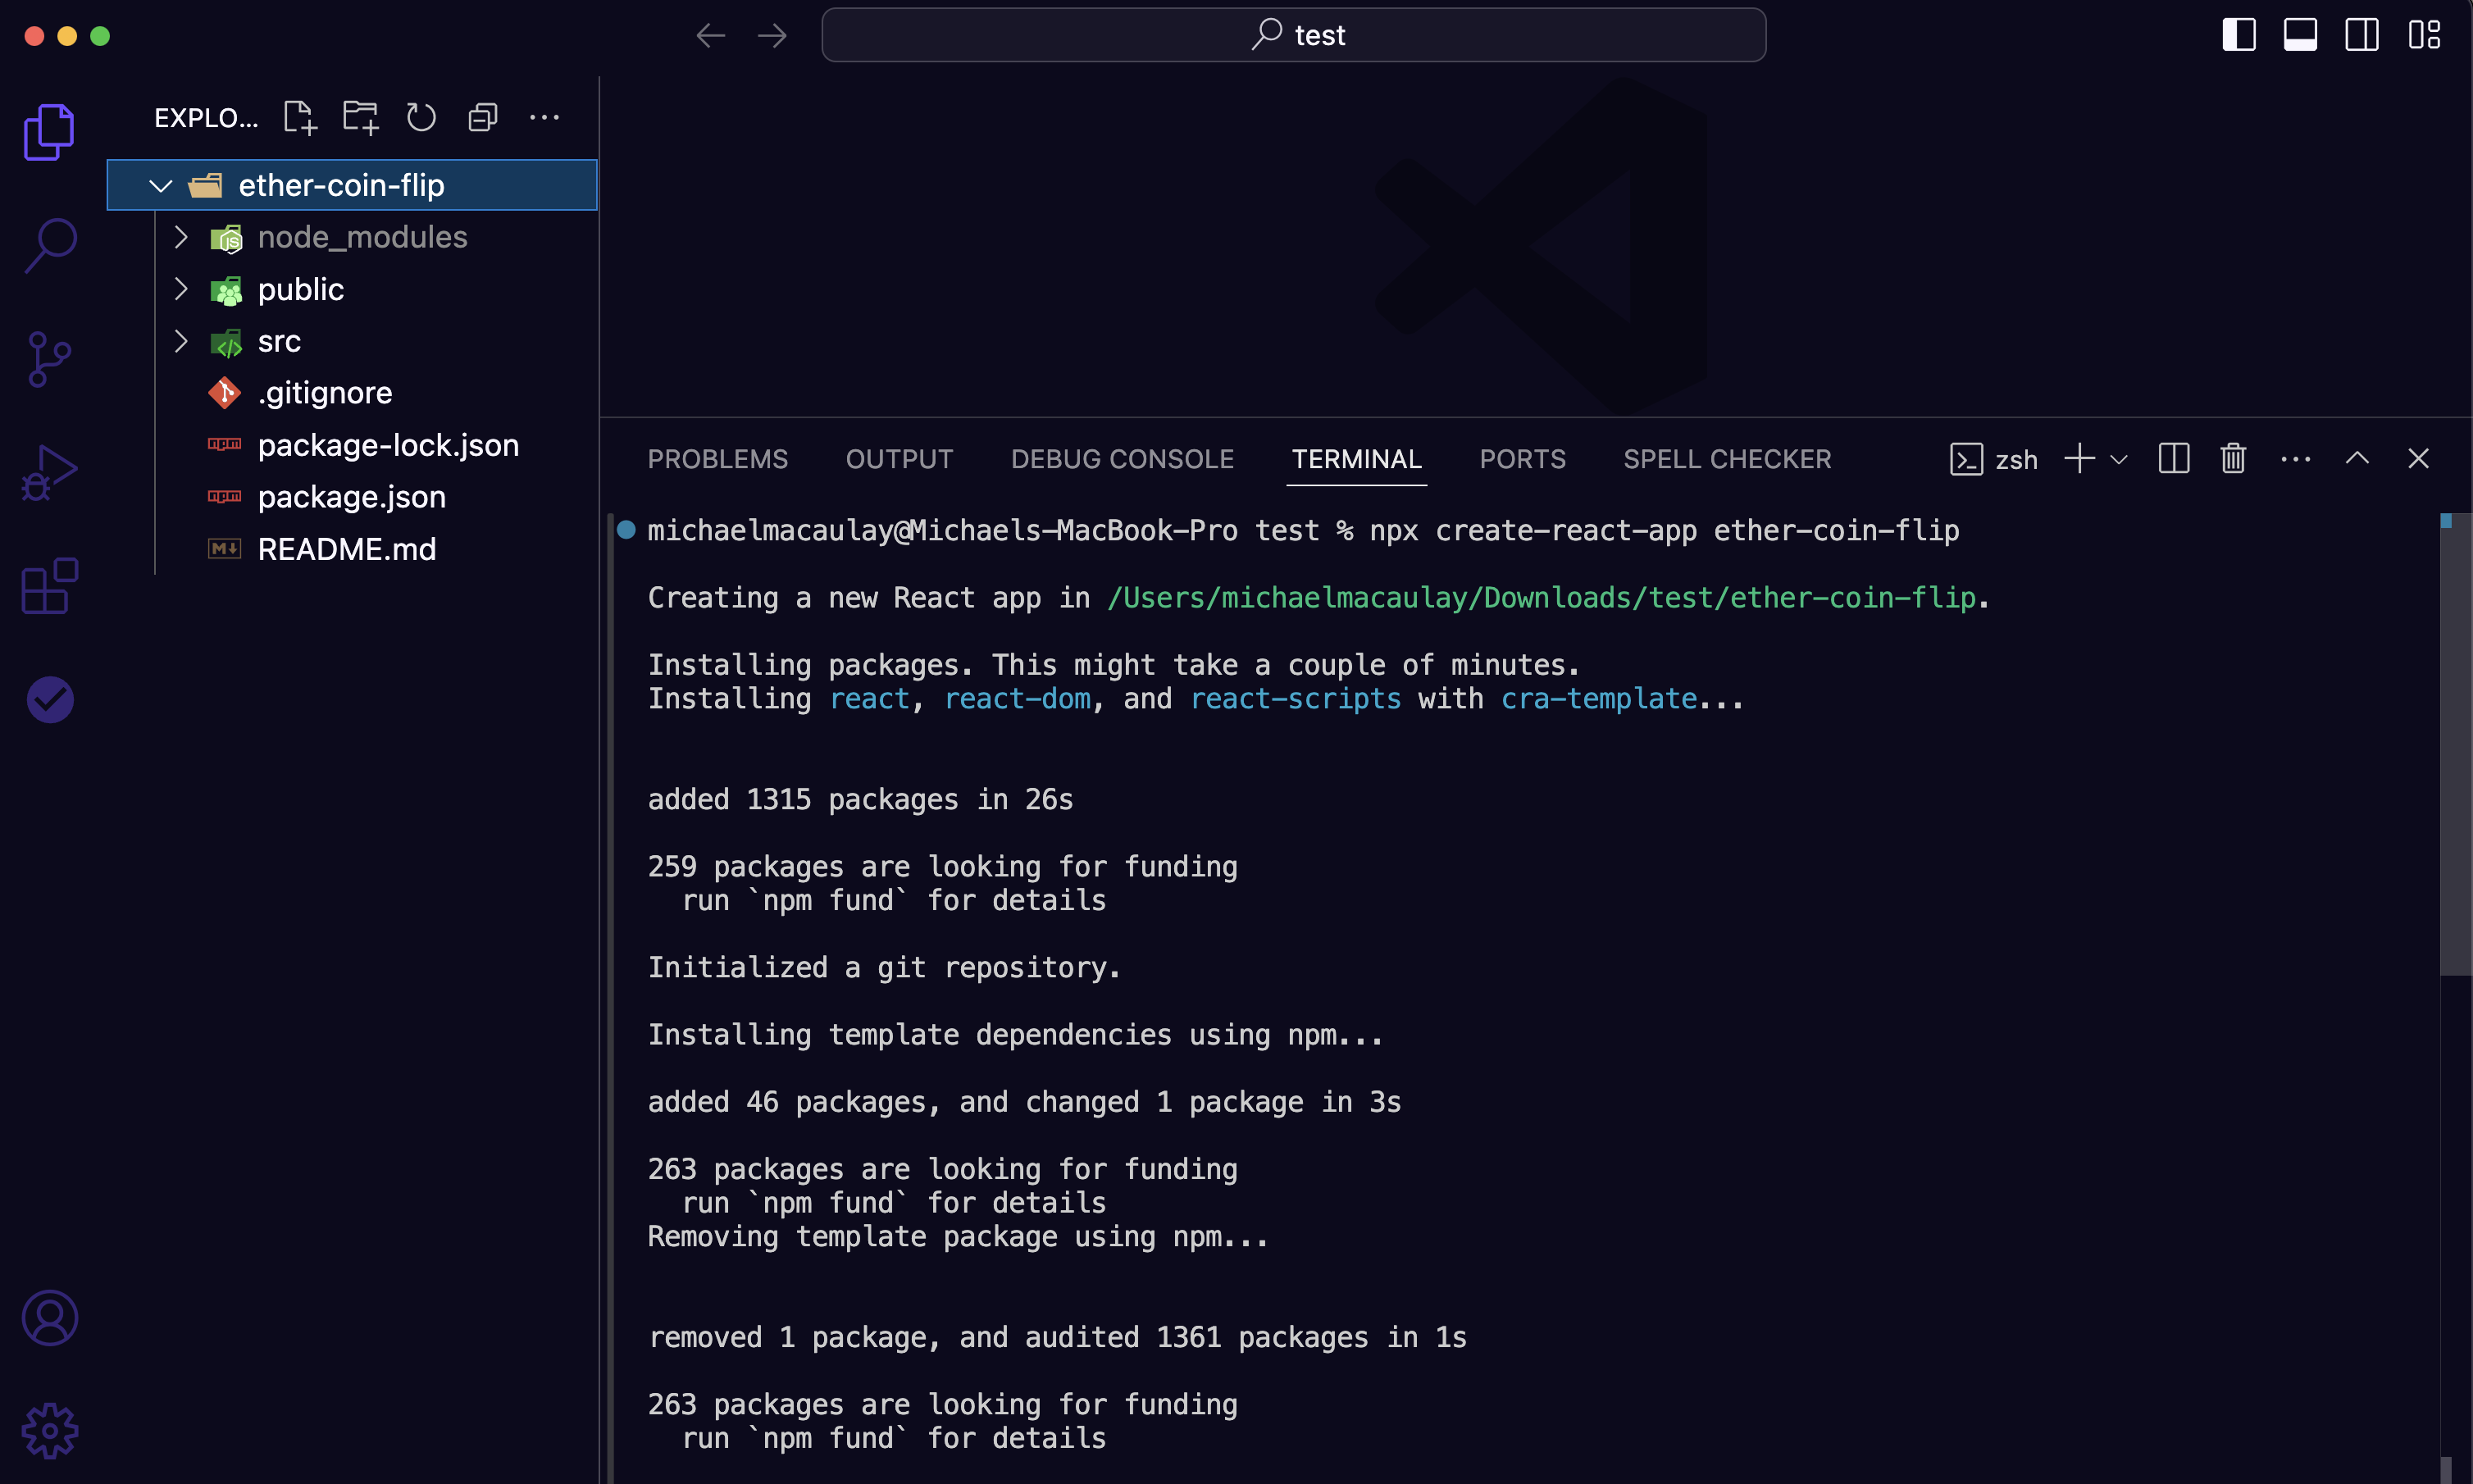
Use create-react-app on the command line to bootstrap your project:
npx create-react-app ether-coin-flip
This should create a fresh React project in your IDE:
Navigate into the project directory:
cd ether-coin-flip
2. Install Required Dependencies
We'll need several packages to interact with the blockchain and handle data fetching:
npm install ethers graphql graphql-request @tanstack/react-query
- ethers: Library for interacting with the Ethereum blockchain.
- graphql and graphql-request: For querying The Graph's API.
- @tanstack/react-query: For managing server state in React applications.
Most of the app will be built inside the App.js file with additional functionality added in with a Dashboard.js component later.
First, we'll take a look at the App.js file and explore each section of the code.
Building a React app using Ethers
import React, { useState } from "react";import "./App.css";import ABI from "./components/ABI.json";import { ethers } from "ethers";import Dashboard from "./components/Dashboard.js";
- Imports:
const contractAddress = "0xd3037A0CFfADA943253A0CCc84593cd7b79E1ABd";const abi = ABI;
- contractAddress: The address where your
EtherCoinFlipcontract is deployed on Base Sepolia. - abi: The ABI of your contract imported from
ABI.json.
// Using Base Sepoliaconst baseSepoliaChainId = "84532";const baseSepoliaParams = {chainId: baseSepoliaChainId,chainName: "Base Sepolia",nativeCurrency: {name: "Sepolia ETH",symbol: "ETH",decimals: 18,},rpcUrls: ["https://sepolia.base.org"],blockExplorerUrls: ["https://base-sepolia.blockscout.com/"],};
- baseSepoliaChainId: The chain ID for the Base Sepolia network.
- baseSepoliaParams: Network parameters required to add or switch to Base Sepolia in MetaMask.
let provider, signer;
- provider: An ethers.js provider to interact with the blockchain.
- signer: An ethers.js signer representing the user's wallet.
Function: switchToBaseSepolia
async function switchToBaseSepolia() {try {const currentChainId = await provider.send("eth_chainId", []);if (currentChainId !== baseSepoliaChainId) {try {await provider.send("wallet_switchEthereumChain", [{ chainId: baseSepoliaChainId },]);} catch (switchError) {if (switchError.code === 4902) {try {await provider.send("wallet_addEthereumChain", [baseSepoliaParams]);} catch (addError) {console.error("Failed to add Base Sepolia network:", addError);}} else {console.error("Failed to switch to Base Sepolia:", switchError);}}}} catch (error) {console.error("Failed to get chain ID or switch network:", error);}}
- Purpose: Ensures the user's MetaMask is connected to the Base Sepolia network.
- Steps:
- Get Current Chain ID: Fetches the chain ID of the currently connected network.
- Check if Already Connected: Compares it with
baseSepoliaChainId. - Switch Network: If not connected, attempts to switch to Base Sepolia.
- Switch Chain: Uses
wallet_switchEthereumChain. - Add Network: If the network is not added (
error code 4902), it adds the network usingwallet_addEthereumChain.
- Switch Chain: Uses
- Error Handling: Logs errors if switching or adding the network fails.
Component: App
function App() {const [isConnected, setIsConnected] = useState(false);const [contractInstance, setContractInstance] = useState(null);
- State Variables:
- isConnected: Tracks if the user's wallet is connected.
- contractInstance: Stores the initialized contract instance for interaction.
Function: connectWallet
const connectWallet = async () => {try {await initializeProvider();setIsConnected(true);} catch (error) {console.error("Error connecting wallet:", error);}};
- Purpose: Initiates wallet connection and provider setup.
- Steps:
- Initialize Provider: Calls
initializeProvider. - Update State: Sets
isConnectedtotrueupon success. - Error Handling: Logs any errors during the connection process.
Function: initializeProvider
async function initializeProvider() {if (typeof window.ethereum !== "undefined") {try {provider = new ethers.providers.Web3Provider(window.ethereum);await provider.send("eth_requestAccounts", []);signer = provider.getSigner();const contract = new ethers.Contract(contractAddress, abi, signer);await switchToBaseSepolia();setContractInstance(contract); // Store contract in state} catch (error) {console.error("Error initializing provider:", error);}} else {alert("No Ethereum provider detected. Please install MetaMask or another Ethereum wallet.");}}
- Purpose: Sets up the ethers.js provider and signer, connects to the smart contract.
- Steps:
- Check MetaMask Installation: Verifies if
window.ethereumis available. - Create Provider: Initializes a new
Web3Providerusing MetaMask's provider. - Request Accounts: Prompts the user to connect their wallet.
- Get Signer: Retrieves the signer representing the user's account.
- Initialize Contract: Creates a new contract instance with the ABI and signer.
- Switch Network: Calls
switchToBaseSepoliato ensure the correct network is selected. - Store Contract: Updates
contractInstancein the state for later use. - Error Handling: Alerts the user if MetaMask is not installed.
Component: StartCoinFlipButton
function StartCoinFlipButton({ contract }) {const [wager, setWager] = useState("");
- Purpose: Provides an interface for users to start a new coin flip by entering a wager amount.
- Props:
- contract: The initialized contract instance passed from the
Appcomponent.
- contract: The initialized contract instance passed from the
- State:
- wager: The amount of Ether the user wants to wager.
const startCoinFlip = async () => {if (!contract) {console.error("Contract is not initialized");return;}console.log(`Starting Coin Flip`);console.log(`Wager Amount: ${wager} ETH`);try {const transaction = await contract.newCoinFlip({value: ethers.utils.parseEther(wager),});await transaction.wait();console.log(`Coin flip started with a wager of ${wager} ETH!`);} catch (error) {console.error("Error starting coin flip:", error);}};
- Purpose: Calls the
newCoinFlipfunction on the smart contract with the specified wager. - Steps:
- Check Contract Initialization: Ensures the contract is available.
- Log Action: Outputs debug information to the console.
- Execute Transaction: Calls
newCoinFlipwith the wager converted to Wei. - Wait for Confirmation: Waits for the transaction to be mined.
- Error Handling: Logs any errors during the transaction.
Render Function for StartCoinFlipButton
return (<div><inputtype="number"placeholder="Enter Wager Amount in ETH"value={wager}onChange={(e) => setWager(e.target.value)}/><button onClick={startCoinFlip}>Start Coin Flip</button></div>);
- Components:
- Input Field: Allows the user to enter the wager amount in Ether.
value: Bound to thewagerstate variable.onChange: Updates thewagerstate when the input changes.
- Button: Triggers the
startCoinFlipfunction when clicked.
- Input Field: Allows the user to enter the wager amount in Ether.
Render Function of App
return (<div className="App"><h1>Ether Coin Flip</h1>{!isConnected ? (<button onClick={connectWallet}>Connect Wallet</button>) : (<><StartCoinFlipButton contract={contractInstance} /><Dashboard contract={contractInstance} /></>)}</div>);
- Components:
- Header: Displays the title of the application.
- Conditional Rendering:
- Not Connected: Shows a "Connect Wallet" button if the user is not connected.
- Connected: Renders the
StartCoinFlipButtonandDashboardcomponents when the wallet is connected.
And that is everything inside the App.js file! Here is all of it together:
import React, { useState } from "react";import "./App.css";import ABI from "./components/ABI.json";import { ethers } from "ethers";import Dashboard from "./components/Dashboard.js";const contractAddress = "0xd3037A0CFfADA943253A0CCc84593cd7b79E1ABd";const abi = ABI;// Using Base Sepoliaconst baseSepoliaChainId = "84532";const baseSepoliaParams = {chainId: baseSepoliaChainId,chainName: "Base Sepolia",nativeCurrency: {name: "Sepolia ETH",symbol: "ETH",decimals: 18,},rpcUrls: ["https://sepolia.base.org"],blockExplorerUrls: ["https://base-sepolia.blockscout.com/"],};let provider, signer;async function switchToBaseSepolia() {try {const currentChainId = await provider.send("eth_chainId", []);if (currentChainId !== baseSepoliaChainId) {try {await provider.send("wallet_switchEthereumChain", [{ chainId: baseSepoliaChainId },]);} catch (switchError) {if (switchError.code === 4902) {try {await provider.send("wallet_addEthereumChain", [baseSepoliaParams]);} catch (addError) {console.error("Failed to add Base Sepolia network:", addError);}} else {console.error("Failed to switch to Base Sepolia:", switchError);}}}} catch (error) {console.error("Failed to get chain ID or switch network:", error);}}function App() {const [isConnected, setIsConnected] = useState(false);const [contractInstance, setContractInstance] = useState(null);const connectWallet = async () => {try {await initializeProvider();setIsConnected(true);} catch (error) {console.error("Error connecting wallet:", error);}};async function initializeProvider() {if (typeof window.ethereum !== "undefined") {try {provider = new ethers.providers.Web3Provider(window.ethereum);await provider.send("eth_requestAccounts", []);signer = provider.getSigner();const contract = new ethers.Contract(contractAddress, abi, signer);await switchToBaseSepolia();setContractInstance(contract); // Store contract in state} catch (error) {console.error("Error initializing provider:", error);}} else {alert("MetaMask is not installed. Please install MetaMask.");}}function StartCoinFlipButton({ contract }) {const [wager, setWager] = useState("");const startCoinFlip = async () => {if (!contract) {console.error("Contract is not initialized");return;}console.log(`Starting Coin Flip`);console.log(`Wager Amount: ${wager} ETH`);try {const transaction = await contract.newCoinFlip({value: ethers.utils.parseEther(wager),});await transaction.wait();console.log(`Coin flip started with a wager of ${wager} ETH!`);} catch (error) {console.error("Error starting coin flip:", error);}};return (<div><inputtype="number"placeholder="Enter Wager Amount in ETH"value={wager}onChange={(e) => setWager(e.target.value)}/><button onClick={startCoinFlip}>Start Coin Flip</button></div>);}return (<div className="App"><h1>Ether Coin Flip</h1>{!isConnected ? (<button onClick={connectWallet}>Connect Wallet</button>) : (<><StartCoinFlipButton contract={contractInstance} /><Dashboard contract={contractInstance} /></>)}</div>);}export default App;
Now that we have finished the App.js file, it is time to create the Dashboard component for displaying active coin flips. This page should contain:
- The ability to start coin flips
- A dashboard displaying active coin flips (using our subgraph on The Graph)
- A button to end any given coin flip
It will also display a button for users to “end” a coin flip, with the ether amount & coin flip ID automatically used inside the function call, making the game simple and accessible.
Designing a Dashboard in React
import React from 'react';import { useQuery } from '@tanstack/react-query';import { gql, request } from 'graphql-request';import { ethers } from 'ethers';
- Imports:
- React: Core library for building UI components.
- useQuery: Hook from
@tanstack/react-queryfor data fetching. - gql, request: Functions from
graphql-requestfor making GraphQL queries. - ethers: Library for blockchain interactions.
GraphQL Query
const query = gql`{startedCoinFlips(first: 10) {idtheCoinFlipIDtheBetStartertheStartingWagerblockNumberblockTimestampisActivetransactionHash}finishedCoinFlips(first: 10) {idtheCoinFlipIDwinnerloserblockNumberblockTimestamp}}`;
- Purpose: Defines a GraphQL query to fetch the latest 10 started and finished coin flips from The Graph.
- Entities Queried:
- startedCoinFlips: Active coin flips that have been initiated.
- finishedCoinFlips: Coin flips that have been completed.
GraphQL API URL
const url = process.env.REACT_APP_THE_GRAPH_API_URL;
- Purpose: Retrieves the subgraph API URL from environment variables.
Component: Dashboard
export default function Dashboard({ contract }) {const { data, status } = useQuery({queryKey: ['activeCoinFlips'],async queryFn() {return await request(url, query);},});
- Props:
- contract: The initialized contract instance passed from the
Appcomponent.
- contract: The initialized contract instance passed from the
- useQuery Hook:
- queryKey: Identifies the query for caching purposes.
- queryFn: Async function that executes the GraphQL query.
- Returned Values:
- data: The data fetched from the API.
- status: The status of the query (
loading,error,success).
Function: endCoinFlip
const endCoinFlip = async (coinFlipID, startingWager) => {if (!contract) {console.error("Contract is not initialized");return;}try {// Parse coinFlipID to integerconst coinFlipIDInt = parseInt(coinFlipID);// Ensure startingWager is a string representing the amount in weiconst wagerValue = ethers.BigNumber.from(startingWager.toString());alert(`Ending Coin Flip ID: ${coinFlipIDInt} with Wager: ${ethers.utils.formatEther(wagerValue)} ETH`);const transaction = await contract.endCoinFlip(coinFlipIDInt, {value: wagerValue,});await transaction.wait();console.log(`Coin flip with ID ${coinFlipIDInt} ended with a wager of ${ethers.utils.formatEther(wagerValue)} ETH!`);// Retrieve the details of the coin flip from the contract to check the winner/loserconst coinFlipDetails = await contract.EtherCoinFlipStructs(coinFlipIDInt);const currentAddress = await contract.signer.getAddress();if (coinFlipDetails.winner.toLowerCase() === currentAddress.toLowerCase()) {alert("Congratulations! You won the coin flip!");} else {alert("Sorry, you lost the coin flip.");}} catch (error) {console.error("Error ending coin flip:", error);alert("Error ending coin flip. Please check the console for details.");}};
- Purpose: Allows the user to join an active coin flip by calling
endCoinFlipon the smart contract. - Steps:
- Check Contract Initialization: Ensures the contract is available.
- Parse Inputs:
- coinFlipIDInt: Converts the
coinFlipIDto an integer. - wagerValue: Converts the
startingWagerto a BigNumber in Wei.
- coinFlipIDInt: Converts the
- Alert User: Notifies the user about the action being taken.
- Execute Transaction: Calls
endCoinFlipwith the appropriate parameters. - Wait for Confirmation: Waits for the transaction to be mined.
- Retrieve Coin Flip Details: Fetches the updated coin flip data from the contract.
- Determine Outcome: Checks if the current user is the winner or loser.
- Alert User of Outcome: Displays a message indicating whether the user won or lost.
- Error Handling: Logs any errors and alerts the user.
Function: getActiveCoinFlips
// Function to filter active coin flipsconst getActiveCoinFlips = () => {if (!data) return [];const startedFlips = data.startedCoinFlips || [];const finishedFlips = data.finishedCoinFlips || [];const finishedIDs = new Set(finishedFlips.map(flip => flip.theCoinFlipID));// Filter out finished coin flipsreturn startedFlips.filter(flip => !finishedIDs.has(flip.theCoinFlipID));};const activeCoinFlips = getActiveCoinFlips();
- Purpose: Processes the fetched data to obtain a list of active coin flips.
- Steps:
- Check Data Availability: Returns an empty array if data is not available.
- Extract Started and Finished Flips: Gets arrays of started and finished coin flips.
- Create Set of Finished IDs: Uses a
Setfor efficient lookup of finished coin flip IDs. - Filter Active Flips: Removes any started coin flips that have been finished.
- Result: Returns an array of active coin flips.
Render Function
return (<main>{status === 'loading' && <div>Loading active coin flips...</div>}{status === 'error' && <div>Error occurred querying the subgraph :/</div>}{status === 'success' && activeCoinFlips.length > 0 ? (<table><thead><tr><th>Coin Flip ID</th><th>Bet Starter</th><th>Wager</th><th>Action</th><th>Transaction</th></tr></thead><tbody>{activeCoinFlips.map((flip) => (<tr key={flip.id}><td>{flip.theCoinFlipID}</td><td>{flip.theBetStarter}</td><td>{ethers.utils.formatEther(flip.theStartingWager)} ETH</td><td><buttononClick={() =>endCoinFlip(flip.theCoinFlipID,flip.theStartingWager)}>End Coin Flip</button></td><td><ahref={`https://base-sepolia.blockscout.com/tx/${flip.transactionHash}`}target="_blank"rel="noopener noreferrer">View on Block Explorer</a></td></tr>))}</tbody></table>) : (<p>No active coin flips available D:</p>)}</main>);
- Conditional Rendering:
- Loading State: Displays a loading message while the data is being fetched.
- Error State: Shows an error message if the query fails.
- Success State:
- Active Coin Flips Available: Renders a table listing all active coin flips.
- No Active Coin Flips: Displays a message indicating that there are no active coin flips.
- Table Structure:
- Headers: Defines the columns for coin flip details.
- Rows: Iterates over
activeCoinFlipsto display each coin flip.- Coin Flip ID: The unique identifier of the coin flip.
- Bet Starter: Address of the player who started the coin flip.
- Wager: The wager amount formatted in Ether.
- Action: A button to end the coin flip, calling
endCoinFlip. - Transaction: A link to view the transaction on the Block Explorer.
Running the React Application
In order to run the website locally, complete the following steps:
- Start the development server
npm start
- In your browser, open http://localhost:3000
- Connect your wallet
- Start a new coin flip by entering the wager amount & clicking the start coin flip button
- End a coin flip by selecting one from the dashboard and clicking the end coin flip button
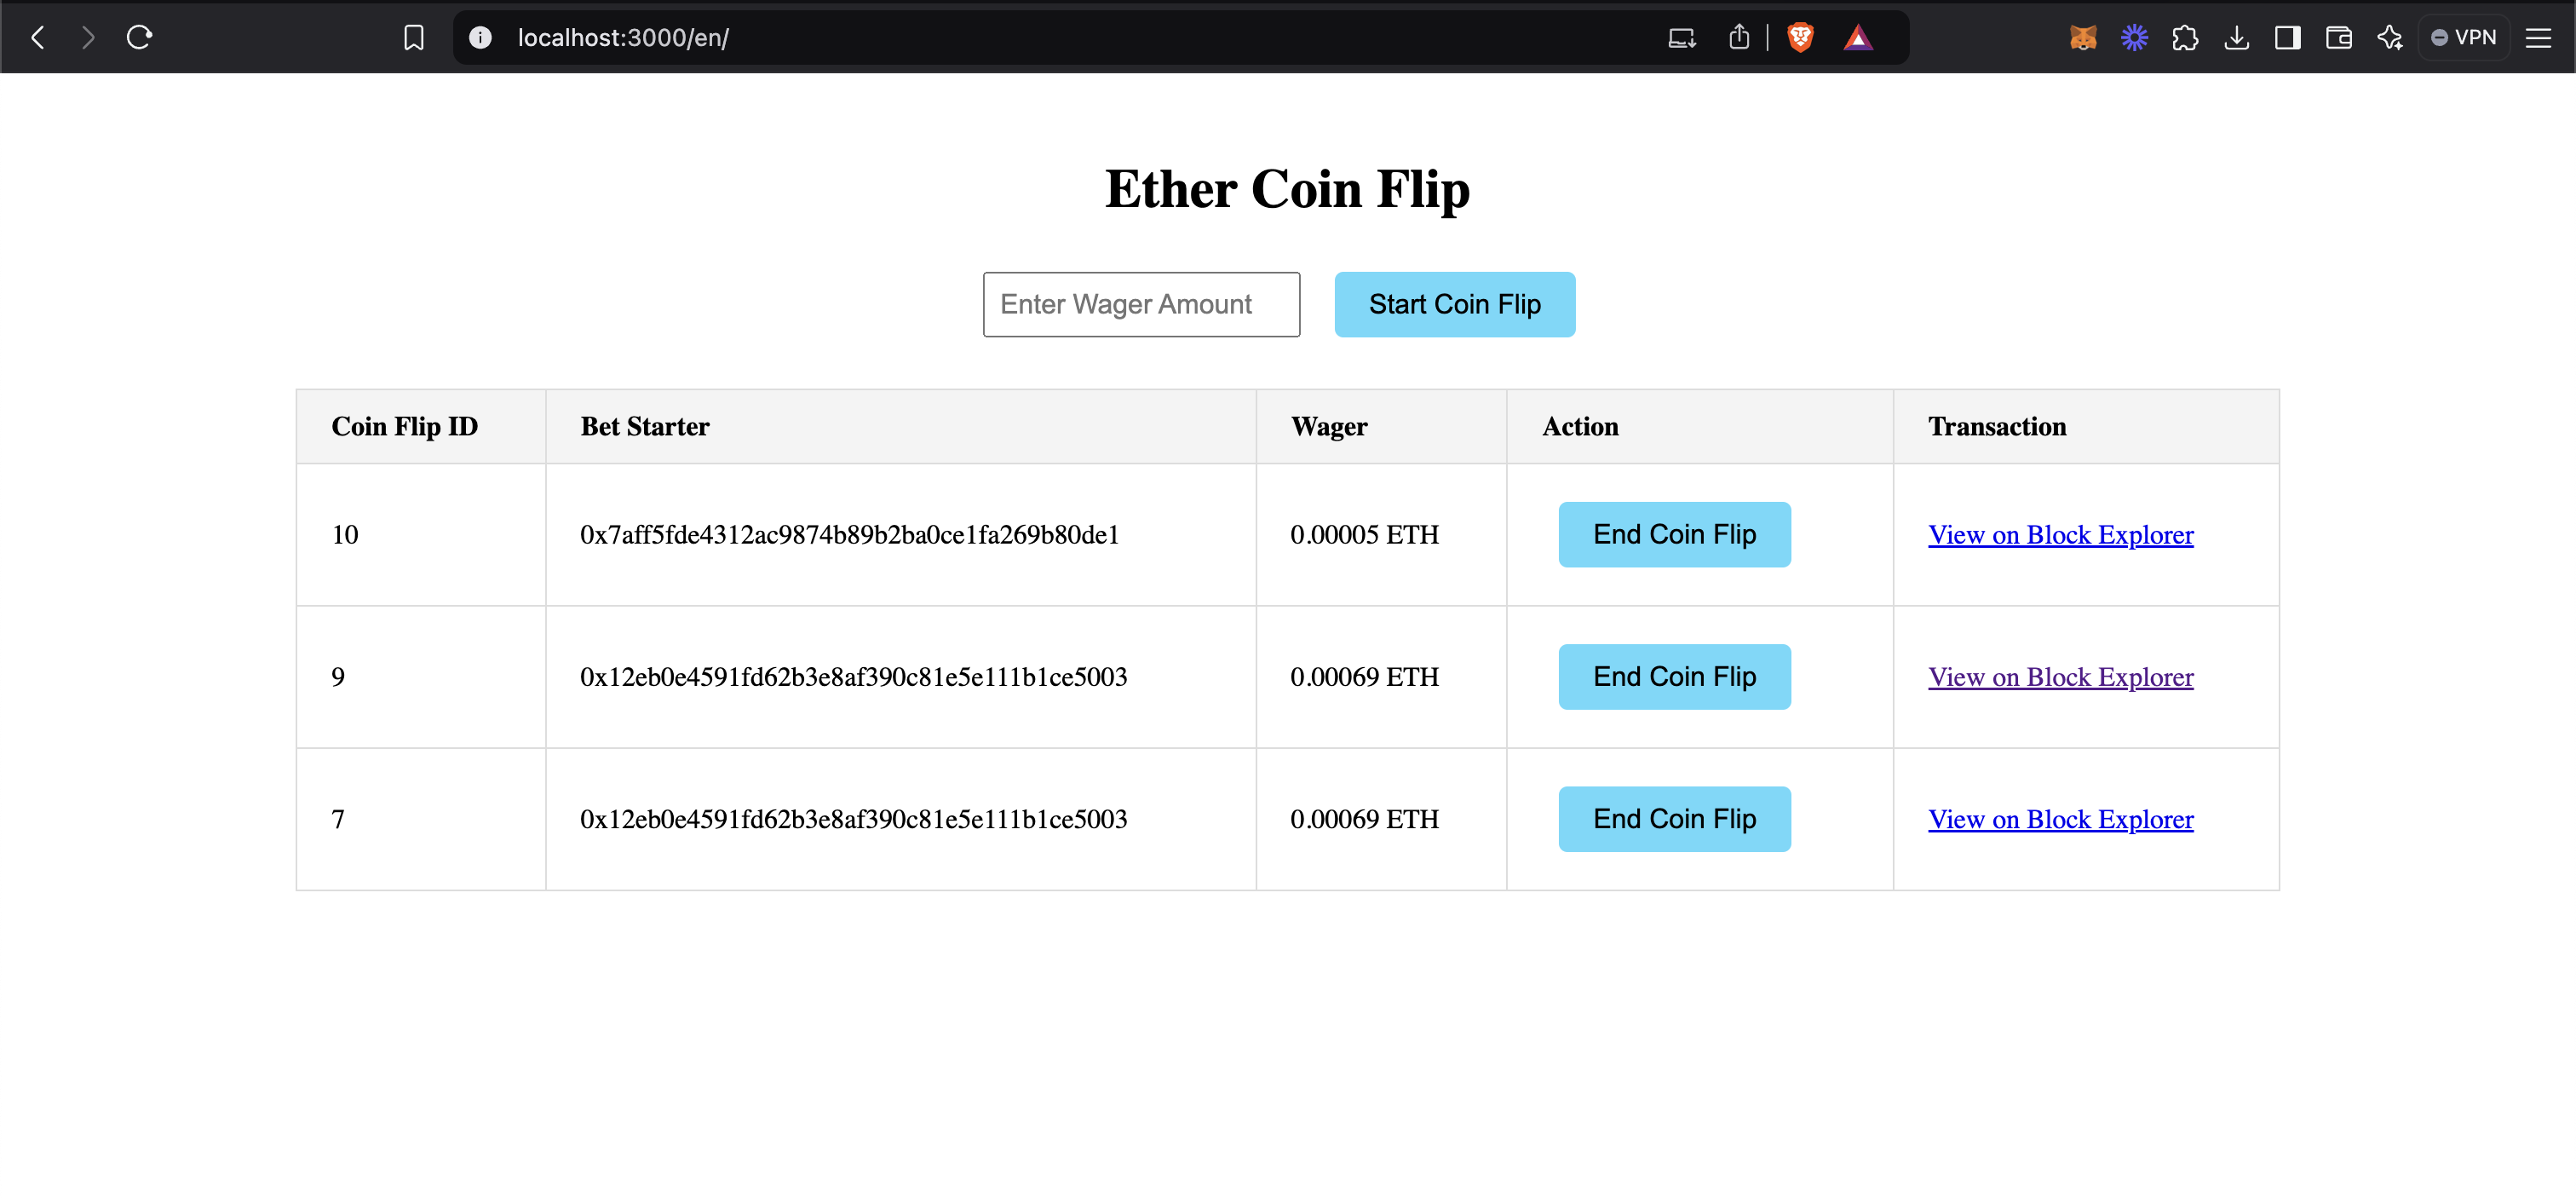
Now, your should have the site running locally and connected to Base Sepolia via ethers.js!
Final Thoughts
The world of decentralized applications is vast and full of opportunities. With the knowledge and experience gained from this tutorial, you're well-equipped to innovate and contribute to the evolving web3 ecosystem.
About The Graph
is the leading indexing and query protocol powering the decentralized internet. Since launching in 2018, it has empowered tens of thousands of developers to effortlessly build and leverage across countless blockchains, including Ethereum, Solana, Arbitrum, Optimism, Base, Polygon, Celo, Soneium, and Avalanche. With powerful tools like Substreams and Token API, The Graph delivers high-performance, real-time access to onchain data. From low-latency indexing to rapid token data, it serves as the premier solution for building composable, data drive dapps.
Discover more about how The Graph is shaping the future of decentralized physical infrastructure networks (DePIN) and stay connected with the community. Follow The Graph on , , , , , and . Join the community on The Graph’s , join technical discussions on The Graph’s .
